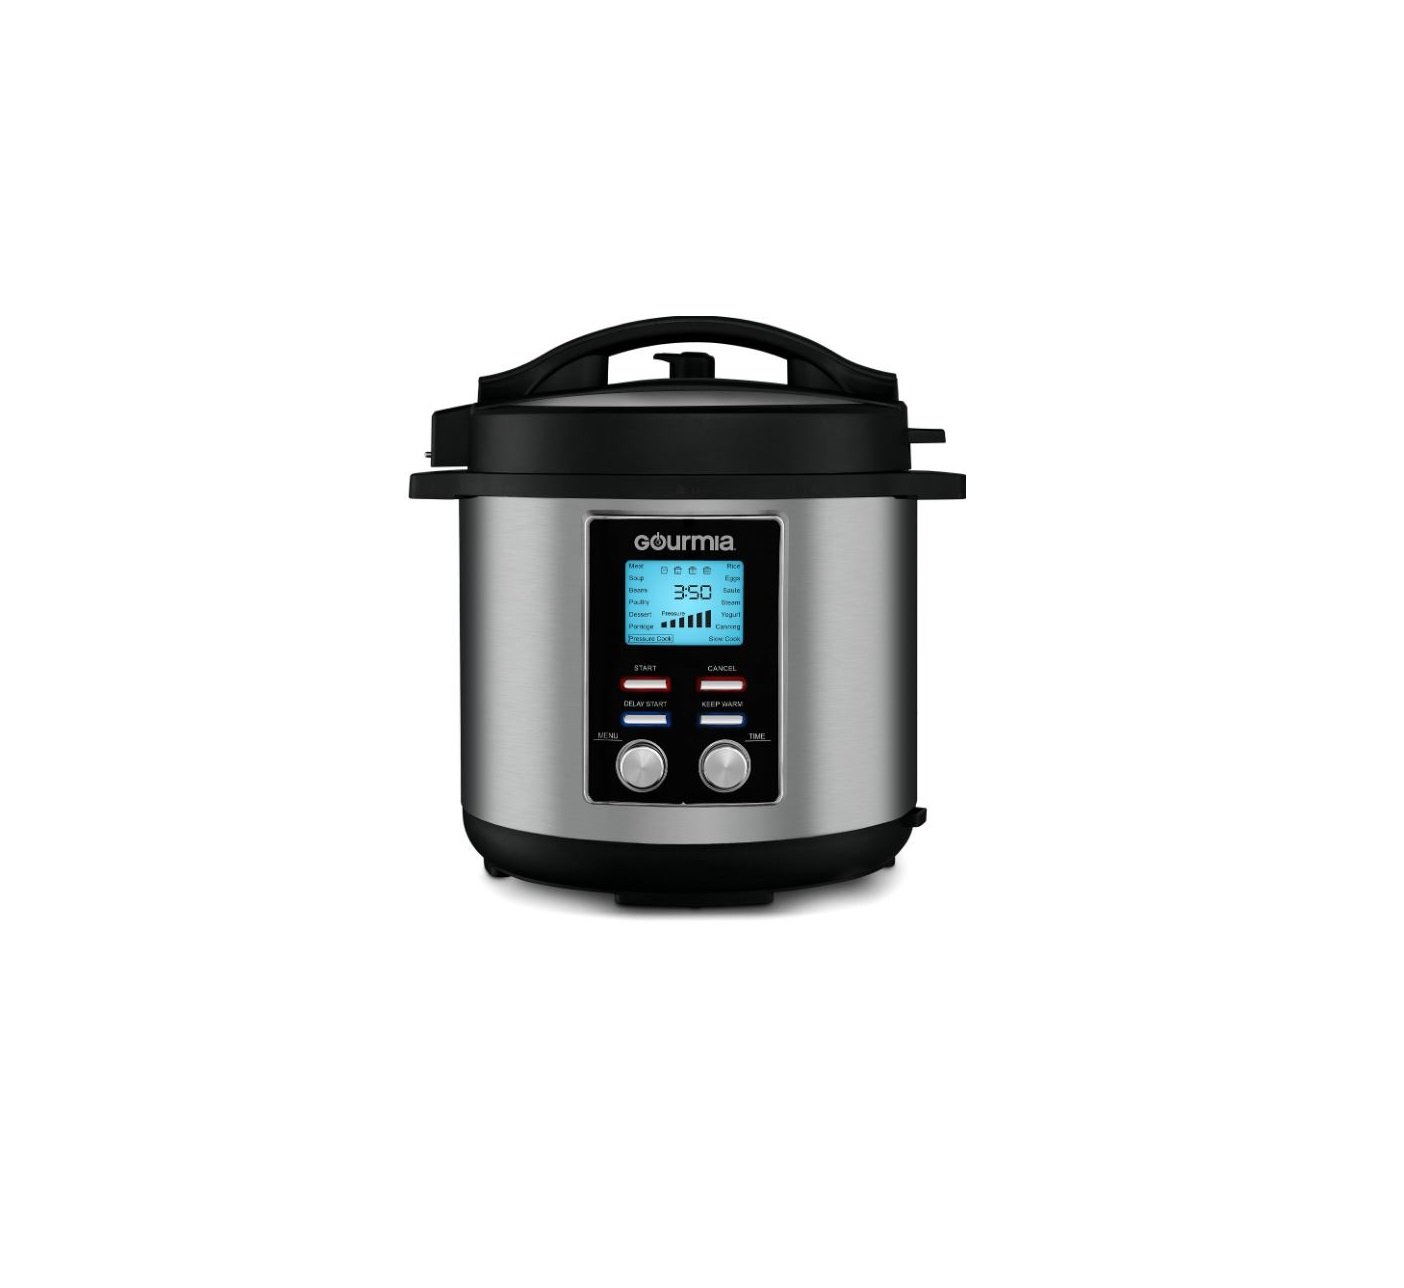
Gourmia GPC855 Pressure Cooker User Manual

Read this manual thoroughly before using and save it for future reference
FOR CUSTOMER SERVICE QUESTIONS OR COMMENTS VISIT US @ GOURMIA.COM
[email protected] OR CALL 888.552.0033
Model: GPC-655
Model: GPC-855
© 2018 Gourmia
www.gourmia.com
The Steelstone Group
Brooklyn, NY
All rights reserved. No portion of this manual may be reproduced by any means whatsoever without written permission from The Steelstone Group, except for the inclusion of quotations in a media review.
Although every precaution has been taken in the preparation of this manual, The Steelstone Group assumes no responsibility for errors or omissions. Nor is any liability assumed for damages resulting from the use of the information contained herein. Although every effort has been made to ensure that the information contained in this manual is complete and accurate, The Steelstone Group is not engaged in rendering professional advice or services to the individual consumer; further, The Steelstone Group shall not be held responsible for any loss or damage allegedly arising from any information or suggestion in this manual.
Welcome to the Convenient World of the
Pressure Cooker from Gourmia
Enter the magic world of speed cooking with this Gourmia pressure cooker. In just a matter of minutes, you can now serve up the most deluxe dinners. Gone are the days of defrosting and cooking for hours on end.
Why use a pressure cooker you ask?
Advanced technology merges with convenience to bring you and your family the best of all worlds. A pressure cooker functions by trapping and sealing the steam to cook at higher temperatures and faster speeds, while locking in essential nutrients and flavors to ensure healthier, tastier and quicker meals cooking up to 70% faster.
The fresh luscious aroma, and the succulent taste of the food that emerges will leave you wondering how you’ve managed until now. Its ease of use and many
functions ensure that it remains your new go-to appliance. Go ahead, invite those guests! Have them think you’ve been preparing all day; when the cleanup is done, you’ll let them in on your time saving secret.
The pages of this manual offer comprehensive instructions to guide you through the functions and features of the Gourmia pressure cooker. Inside this guide you will also find information on its modes of operation, complete step-by-step instructions for the operation, assembly, cleaning, and maintenance of your appliance.
Please read all safety instructions thoroughly to ensure safe usage at all times.
Thank you for your purchase! We sincerely hope you will enjoy this as well as all the many innovative products brought to you by Gourmia.
IMPORTANT SAFEGUARDS
Before using the electrical appliance, the following basic precautions should always be followed:
- This appliance is not intended for use by persons (including children younger then 8) with reduced physical, sensory or mental capabilities, or lack of experience and knowledge, unless they have supervision.
- Check if the voltage indicated on the appliance corresponds to the local main voltage before you connect the appliance.
- Do not use with an extension cord. There is a short cord provided specifically to prevent entanglement and similar dangerous scenarios.
- Do not use the appliance if the plug, the main cord or the appliance itself is damaged. Always make sure that the plug is inserted properly into a wall outlet.
- Do not operate any appliance with a damaged cord or plug or after the appliance malfunctions, or has been damaged in any manner. Return appliance to the nearest authorized service facility for examination, repair or adjustment.
- Close supervison is neccesary when any appliance is used by or near children. Children should be supervised to ensure that they do not play with the appliance. Cleaning and user maintenance shall not be done by children unless they are older than 8 and supervised.
- Do not let the cord hang over the edge of table or counter or touch hot surfaces.
- To protect against electric shock do not immerse cord, plugs, or appliance in water or other liquid. Do not plug in the appliance or operate the control panel with wet hands.
- Never connect this appliance to an external timer switch or separate remote-control system in order to avoid a hazardous situation. Always attach plug to appliance first, then plug cord in the wall outlet. To disconnect, turn off the appliance, then remove plug from wall outlet.
- Do not place the appliance on or near combustible materials such as a tablecloth or curtain. The accessible surfaces may become hot during use. Do not place on or near a hot gas or electric burner, or in a heated oven.
- Do not place the appliance against a wall or against other appliances. Leave at least 4 inches of free space on the back and sides and 4 inches of free space above the appliance. Do not place anything on top of the appliance.
- Do not use the appliance for any other purpose than described in this manual. The use of accessory attachments not recommended by the appliance manufacturer may cause injuries.
- Do not let the appliance operate unattended. Extreme caution must be used when moving an appliance containing hot oil or other hot liquids.
- Do not use outdoors.
- Do not touch the hot surfaces, use handles and knobs only. Keep your hands and face at a safe distance from the steam and from the air outlet openings. Also be careful of hot steam and air when you remove the cover from the appliance.
- After using the appliance,the inside of the metal lid is very hot. Unplug from outlet when not in use and before cleaning. Allow to cool before putting on or taking off parts, and before cleaning the applinace.
- Immediately unplug the appliance if you see dark smoke coming out of the appliance. Wait for the smoke emission to stop, before you remove the pan from the appliance.
- Do not alter or tamper with any component or accessory included with this unit. Do not use with any accessory that was not designed specifically for this unit.
- FOR HOUSEHOLD USE ONLY
SAVE THESE INSTRUCTIONS
FOR CUSTOMER SERVICE VISIT US @ GOURMIA.COM OR CALL 888.552.0033
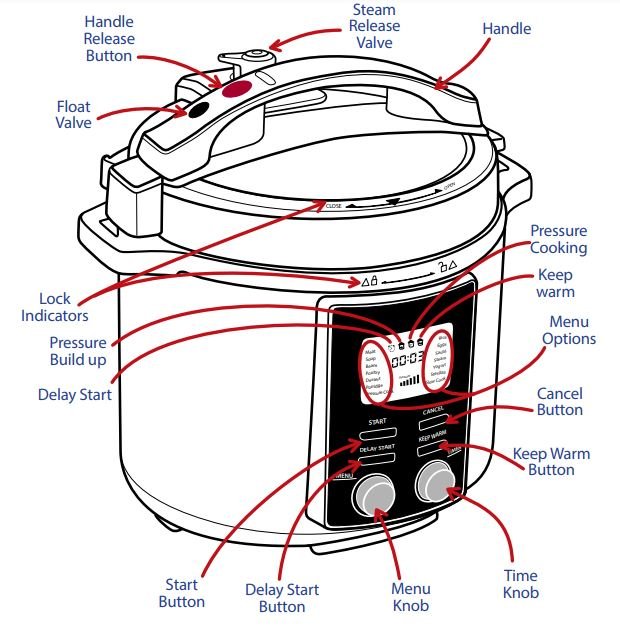
KNOW YOUR PRESSURE COOKER
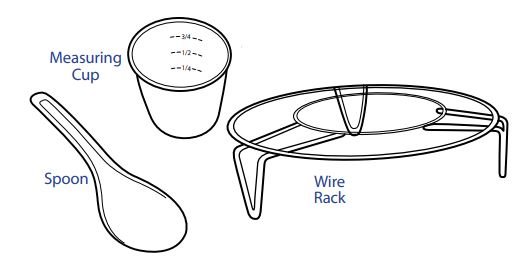
WHEN USING YOUR PRESSURE COOKER
When Using Your Pressure Cooker:
|
USING YOUR PRESSURE COOKER
| Before using your pressure cooker: Warning: Be careful not to put anything near the steam release valve at any time.
|
USING YOUR PRESSURE COOKER
1. Position the pressure cooker on a dry, flat and heat resistant surface.
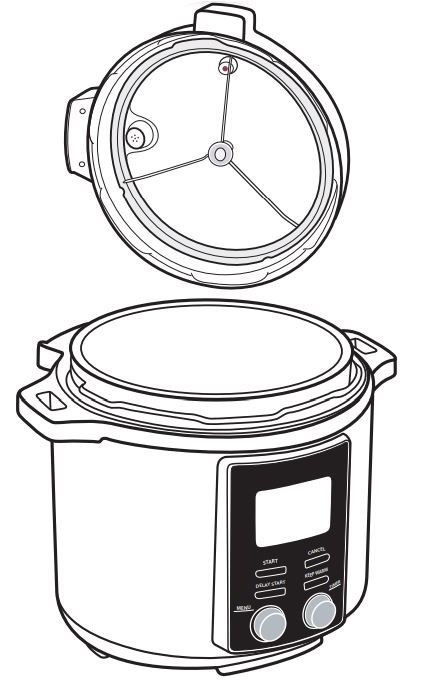
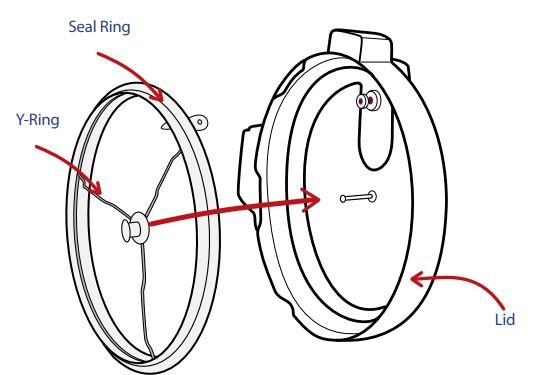
2. Ensure that the Seal Ring is properly secured around the removable Y-Ring. Then align the center of the Y-Ring with the metal pin in the center of the lid and press down firmly to secure it into place.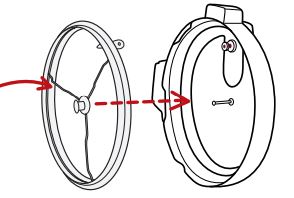
3. Insert ingredients into the removable pot, making sure not to fill the pot above the FULL line.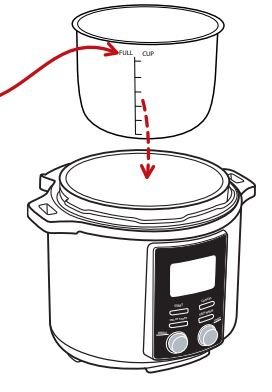 Note: When cooking foods that expand such as rice or dried vegetables, do not fill the inner pot more than half-way. Over-filling may result in a clogged steam release valve or excess pressure.
Note: A minimum of ½ cup of water must be used during any cooking process with this pressure cooker.
4. Place the inner pot into the base.
5. Plug the pressure cooker into a wall outlet.
USING YOUR PRESSURE COOKER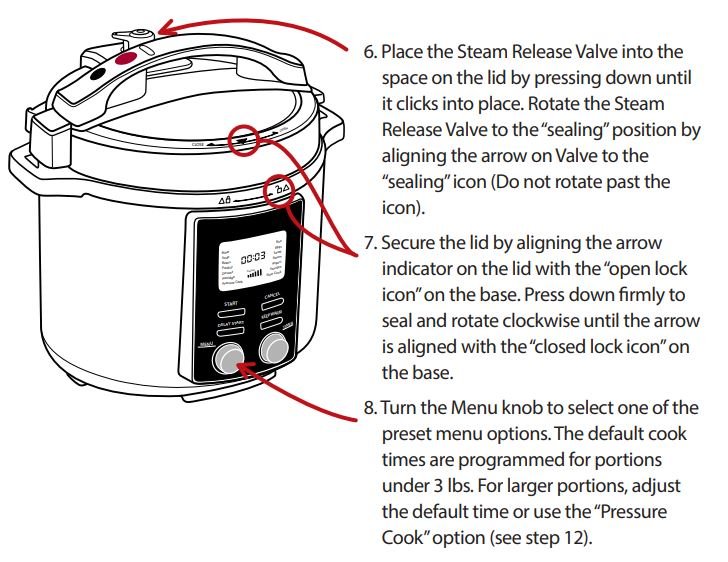
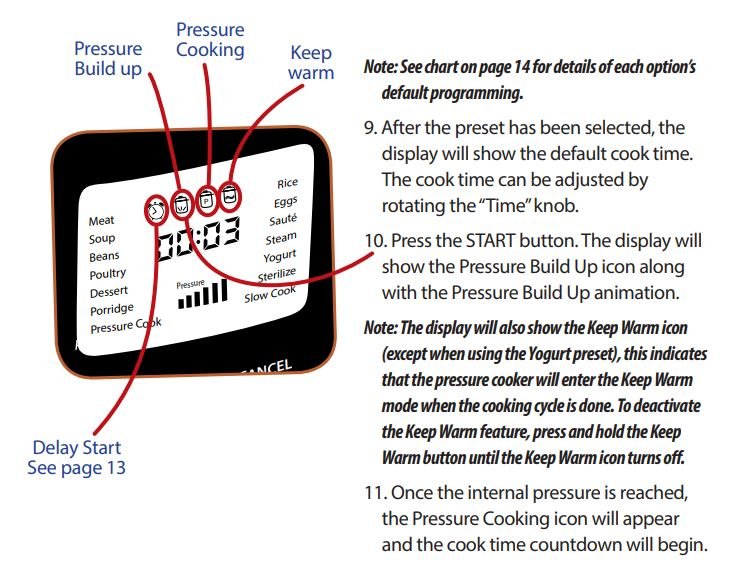
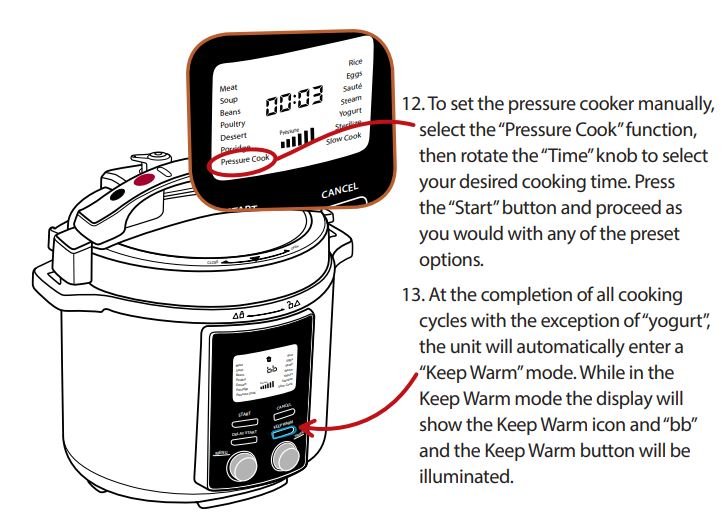
| NOTE: For the duration of time the unit is cooking with pressure, and until the pressure is released, the Float Valve will be raised and the lid is locked. NEVER ATTEMPT TO OPEN THE LID FOR THE DURATION OF THE PRESSURE COOKING TIME. |
14. You can reset or cancel any function by pressing the “cancel” button at any time.
15. The pressure will naturally begin to drop during the keep warm cycle.
Note: You can only open the lid once the pressure is released (see page 12)
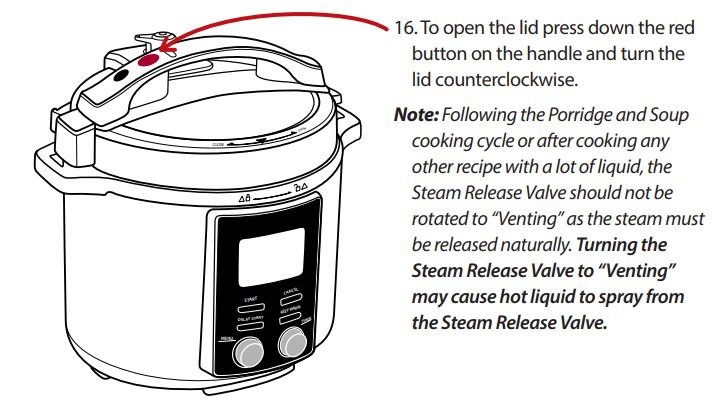
USING THE STEAM RELEASE VALVE
This Pressure Cooker is equipped with two forms of pressure release:
1. Natural Release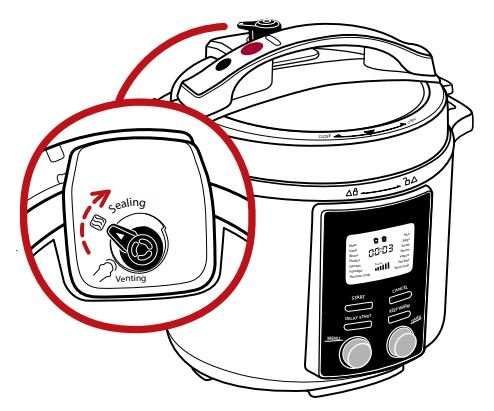
It allows the cooker to rest after cooking until the pressure naturally subsides so the lid can be opened. When foods have high liquid contents, such as soups, stews and beans, they will respond best to using the natural release method. This avoids splattering and foaming when the lid is opened. Foods that can rest and continue while the pressure drops, such as roasts and whole chickens, can be used with the natural release method. To use the natural release method, rotate the Steam Release Valve to “the “Sealing” icon (do not rotate the Valve past the icon)” and keep it in that position during and after cooking until the Float Valve drops, indicating the pressure inside has dissipated.
| CAUTION: Hot steam – use tongs or long utensil to turn the Steam Release Valve. Keep hands and face away from Steam Release Valve. |
2. Quick Release
It allows the cooker to release pressure quickly when cooking is done so the lid can be opened.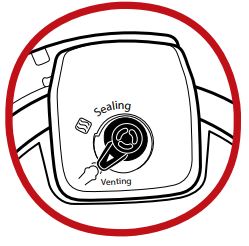
Do not use this feature when pressure cooking grains, beans, rice, oatmeal, and other foods that can splatter or foam when the lid is opened. To use the quick release method, set the Steam Release Valve to “Sealing” during cooking and turn it to “Venting” when the cooking is done to release steam. If foods such as vegetables or seafood require a precise cooking time, turn the steam release valve to venting to quickly release the pressure and open the lid.
USING THE SAUTÉ PRESET
Before pressure cooking, many recipes will benefit from the golden color, richer flavors and moist results gained from sautéing. This setting allows cooking over high heat, without the lid
To sauté your meats or vegetables prior to pressure cooking:
- Remove the lid from the unit.
- Add oil or butter into the inner pot, then add the food.
- Select the “sauté” preset. Press the “start” button.
- Stir or turn the food as needed until the desired color and consistency is reached.
- Press the “cancel” button if you want to cancel the sauté preset before the timer finishes counting down.
- Allow the unit to rest 2-3 minutes after canceling the sauté preset before begining to pressure cook. If the unit will not begin pressure cooking, allow it to cool for a longer period after sautéing before selecting another preset.
USING THE DELAY START FUNCTION
This function postpones the cooking time from beginning for up to 24 hours.
- Prepare desired food and place into cooking pot.
- Secure the lid onto the unit, turn in clockwise to lock it in place.
- Make sure the pressure release valve is set to the “sealing” position.
- Plug the pressure cooker into the wall outlet.
- Select a preset (step 8, page 10) or set the desired cooking time manually (step 12, page 11).
- Press the “delay start” button. The “delay start” indicator icon will illuminate and begin blinking. The display screen will show 0:30 which is equal to 30 minutes of delay time. Turn the time knob right to increase or left to decrease the desired time. The “delay start” time can be increased or decreased by 30 minute increments. The maximum delay period is 24 hours.
- Press the Start button. The cooking cycle will begin after the delay start time elapses.
CAUTION: When using this function ensure that the foods being cooked are not sensitive to warm temperatures and will not spoil from remaining at room temperature for an extended period of time.
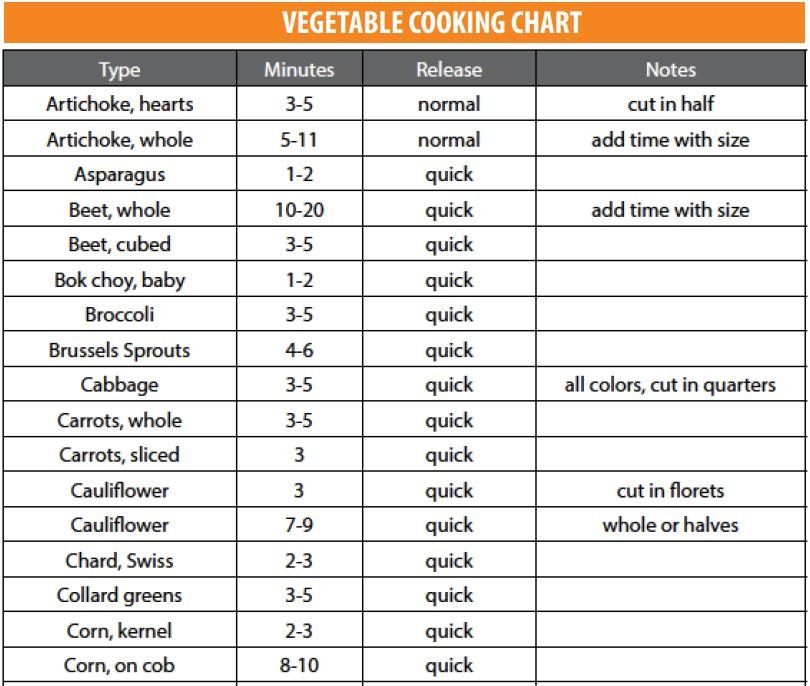
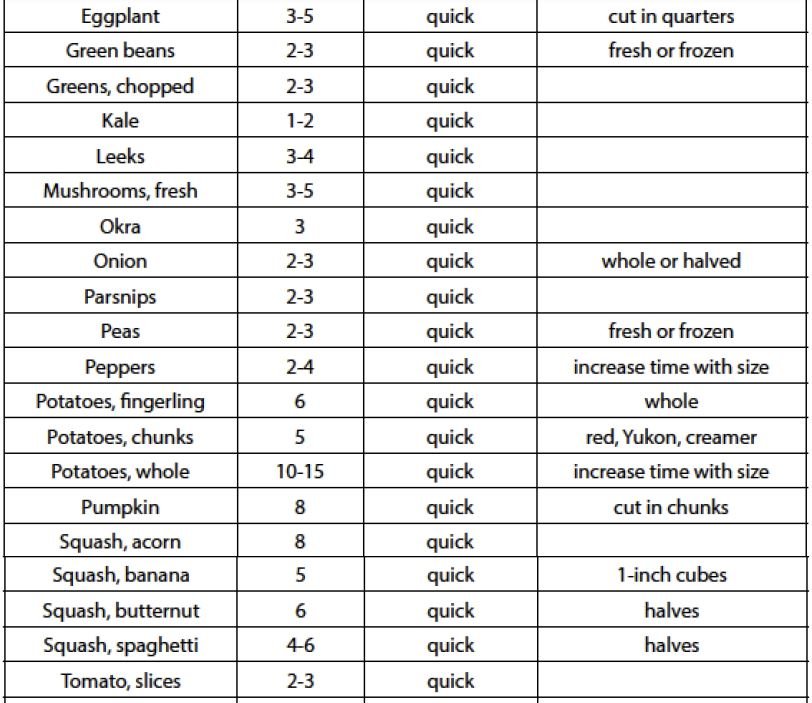
CHARTS & TIPS
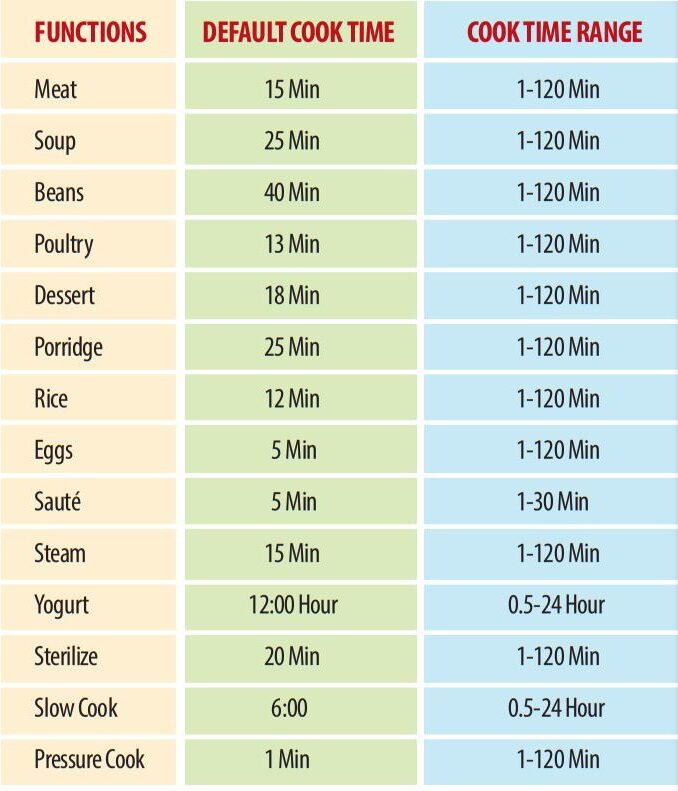
WARNING:
• The lid cannot be opened until the pressure is fully released – do not attempt to force it open.
• The lid is very hot during and after use- do not touch any of the metal parts.
General Tips and Tricks:
- Use the sauté setting to sear or brown foods in the inner pan before cooking a full meal using a pressure setting.
- If cooking frozen food without defrosting, add ten minutes to the recommended cooking time
- Pressure cooking requires a different liquid to solid ratio. Use recipes written for pressure cooker cooking.
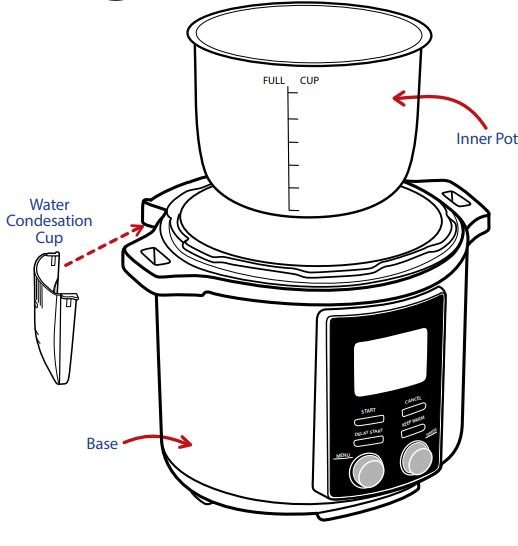
- The condensation container drains excess liquid that gathers around the rim. Insert and remove the container by sliding it on and off the rails.
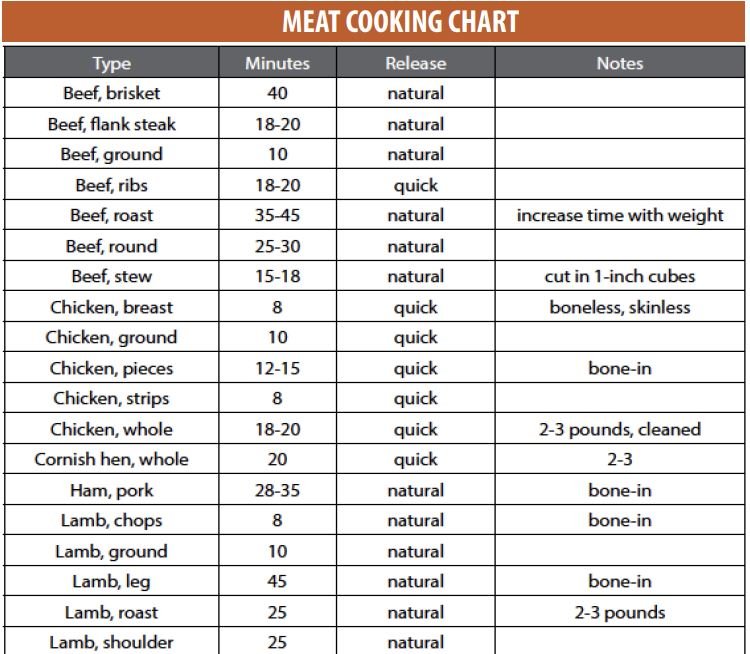
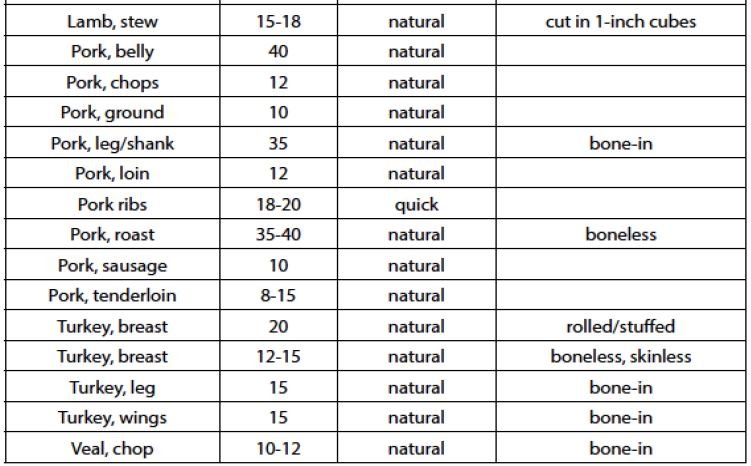
Tips for Meat:
|
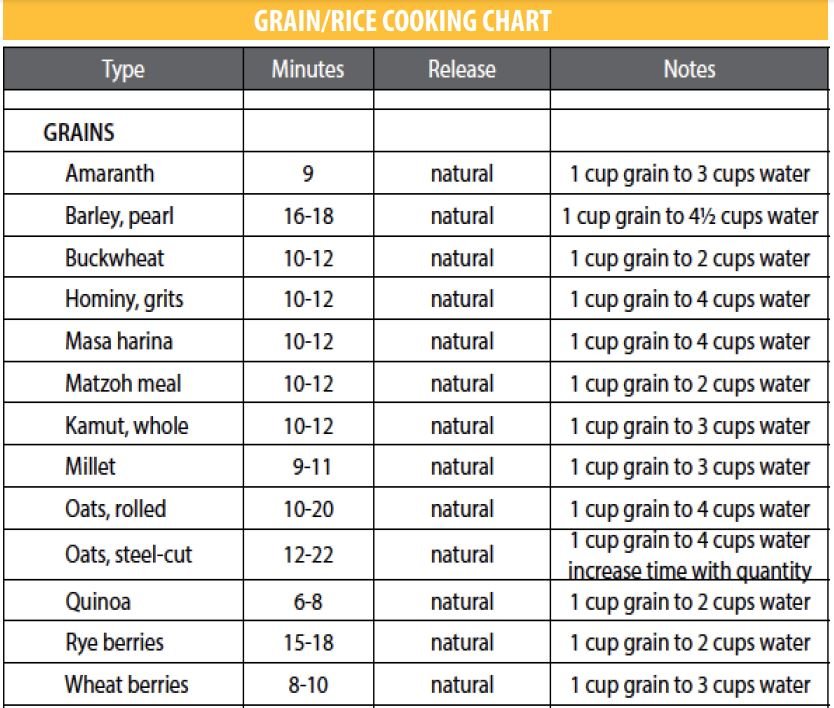

Tips for Cooking Rice
|
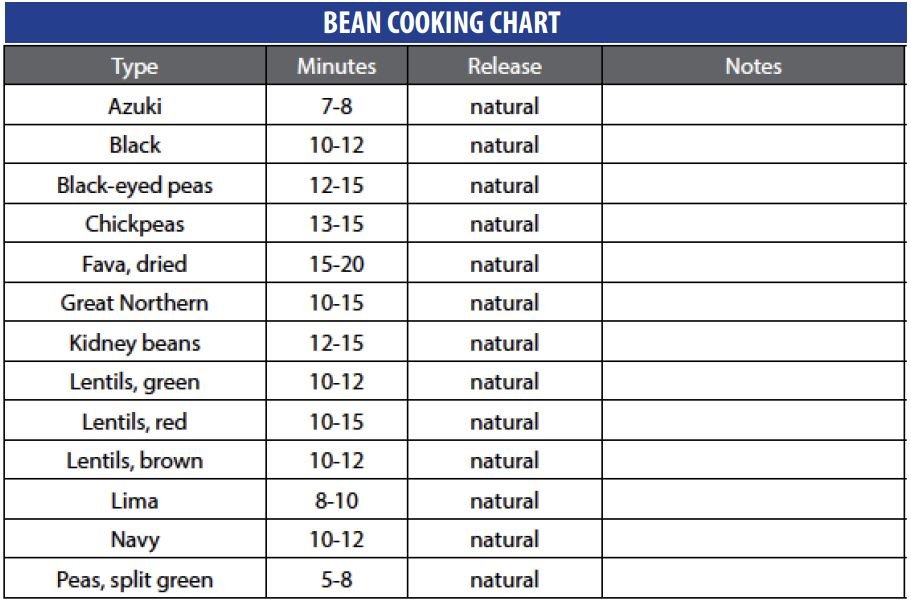
Tips for Cooking Beans:
|
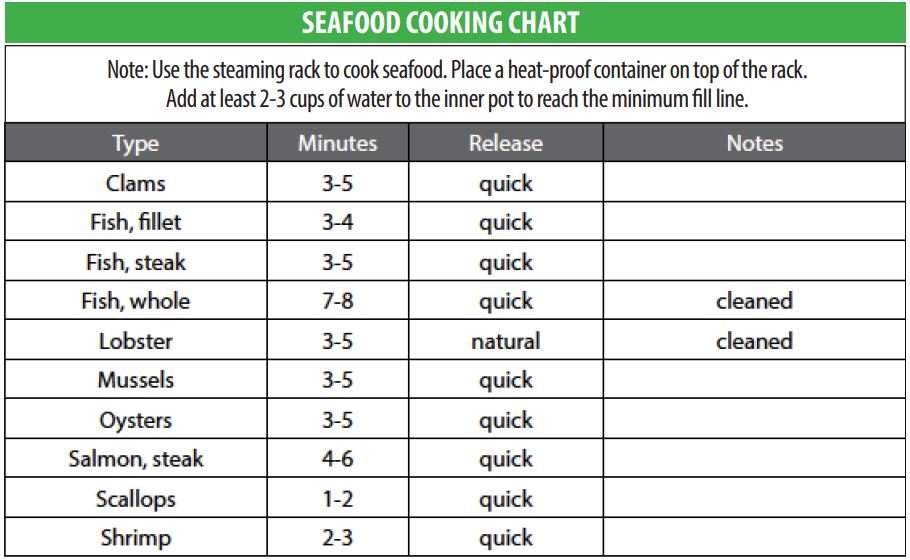

Tips for Cooking Poultry
|
Tips for Cooking Porridge
|
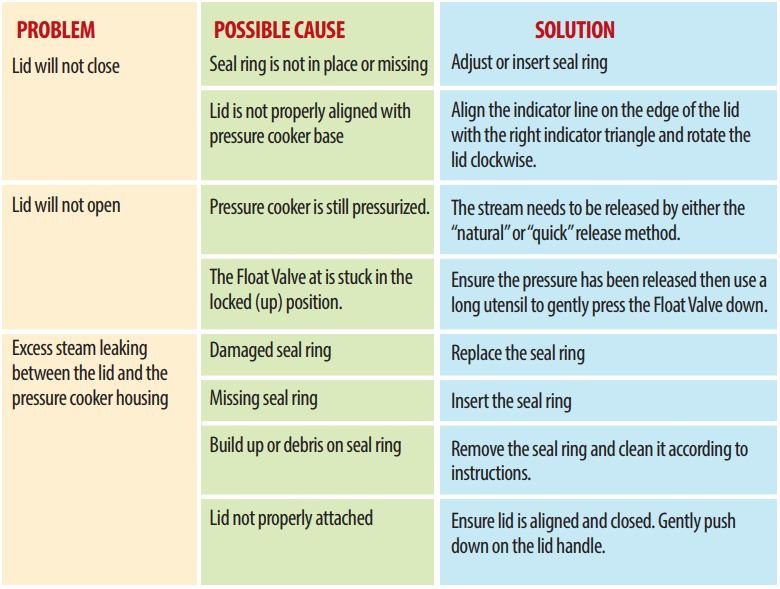
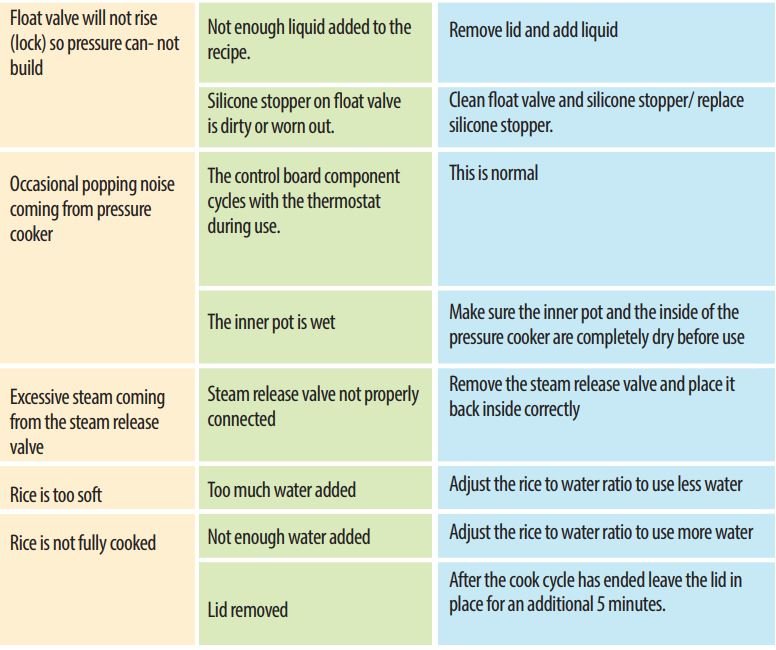
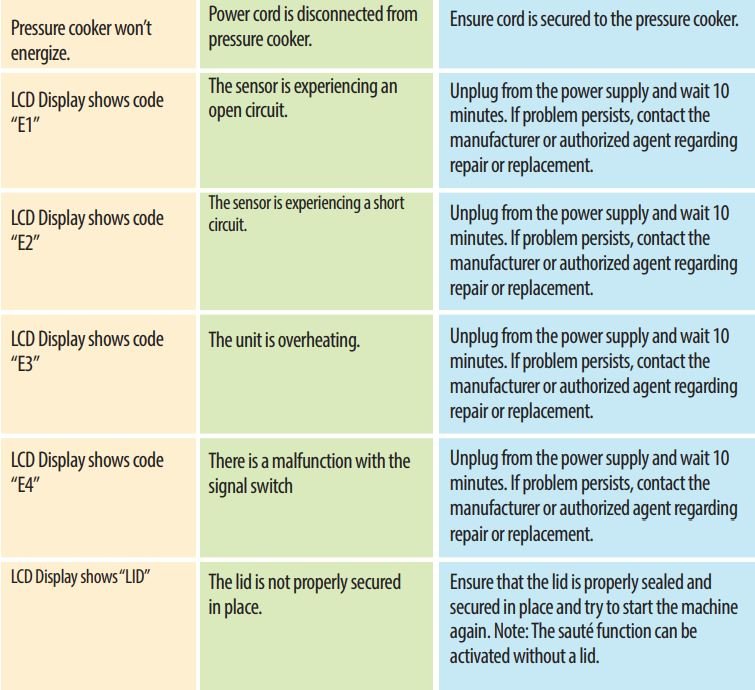
TROUBLESHOOTING
CLEANING AND MAINTENANCE
|
- The interior and exterior of the electrical base can be wiped down with a slightly damp and soft cloth, using mild detergent as needed. Never immerse the pressure cooker or cord in water or any other liquid.
- The following components can be removed and washed thoroughly using mild detergent and warm running water: Lid, Seal Ring, Steam Release Valve, rubber ring on the Float Valve, inner pot, rack and Condensation cup (remove by gently grasping and firmly pulling upwards). Allow all parts to dry completely before reassembling.

NOTE:
- Do not use abrasive materials on the non-stick surface of the inner pot to avoid scratching.
- To prevent wear and tear, do not lock the lid of the pressure cooker into place when storing
| NOTE: After use, ensure that the appliance is completely cooled off and dry before removing the cord. Loosely coil the cord and store it within the inner pot of the appliance. Store the appliance in a clean and dry location. |
WARRANTY & SERVICE
This Limited Warranty is for one full year from the date of purchase. It is applicable to the original purchaser only and is not transferable to a third party user. Repair or replacement of defective parts is solely at the seller’s discretion. In the event that repair isn’t possible, the seller will replace the product/part. If product repair/ replacement won’t suffice, the seller has the option of refunding the cash value of the product or component returned.
Product defects not covered under the Warranty provisions include normal wear and damage incurred from use or accidental negligence, misuse of instruction specifications or repair by unauthorized parties. The manufacturing company is not liable for any incidental or consequential damages incurred by such circumstances.
| Environment Do not throw away the appliance with the normal household waste at the end of its life, but hand it in at an official collection point for recycling. By doing this, you help to preserve the environment. Guarantee and service |
FOR CUSTOMER SERVICE
QUESTIONS OR COMMENTS
VISIT US @ GOURMIA.COM
[email protected]
OR CALL 888.552.0033

Download Manual PDF
Gourmia GPC855 Pressure Cooker
User Manual PDF Download
