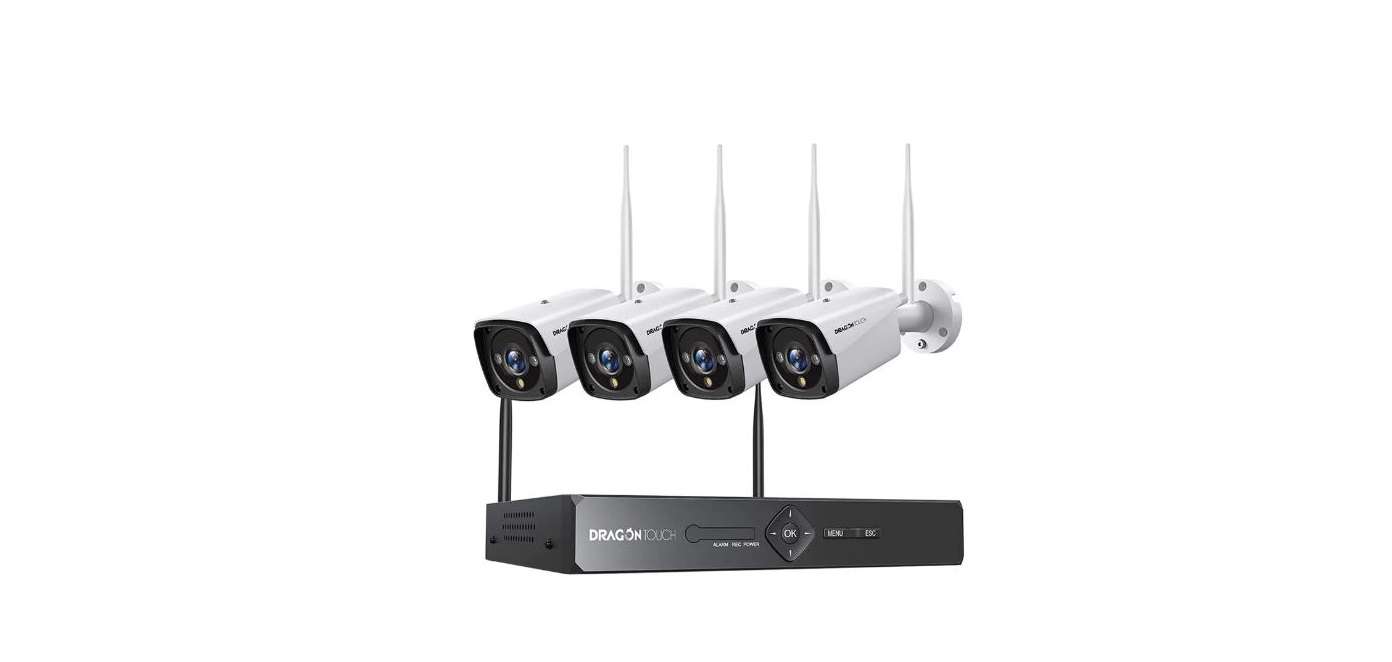
Homeviz Dragon Touch K4W10 HD NVR KIT User Manual
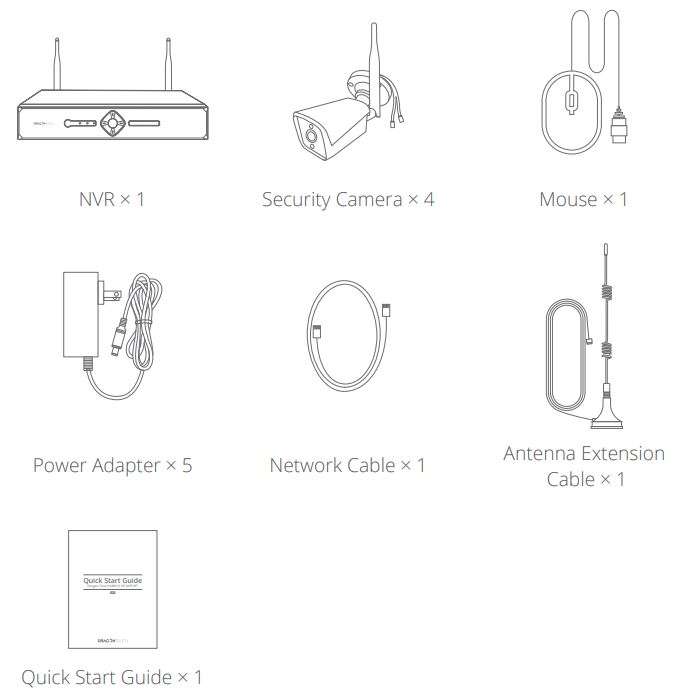
WHAT’S IN THE BOX
INTRODUCTION
1. NVR Front Panel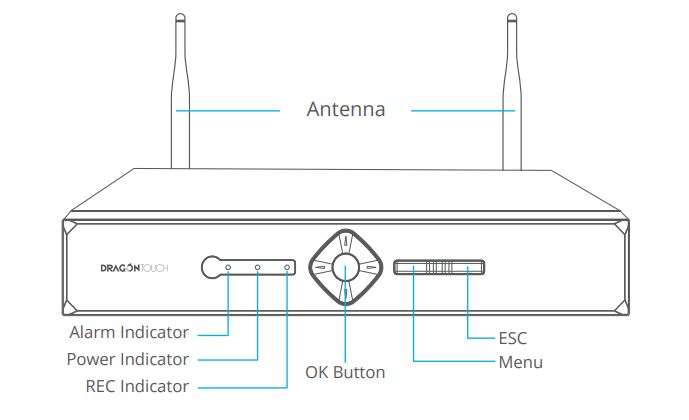
1. NVR Front Panel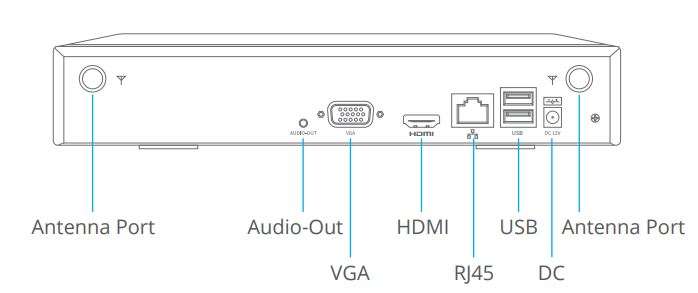
SPECIFICATIONS
1. NVR (Network Video Recorder)
| Type | 3MP Wireless NVR |
| NVR Chip | HISILICON chip |
| Video Input | 8 channels |
| Audio Compression | G.711 |
| Video Compression | H.265/H.264 |
| Operating System | Embedded LINUX |
| Recording Mode | Manual/Motion Detection/Schedule/Alarm/ Human Recognition |
| Sync Playback | Supports 8-channel 720P/960P/1080P synchronous playback |
| Playback Speed | 1/4, 1/2, 2X, 4X |
| Storage & Backup | Hard disk, USB drive |
| Antenna | 2 × 5dB antenna with built-in professional enhanced wireless reception |
| Wireless Transmission Range | 394 ft (120 m) without obstacles, 98.4 ft (30 m) through walls (actual range varies depending on the environment) |
| Video Input Capabilities | Supports 8-channel 3MP video signal input and 8*1080P/8*960P/8*720P |
| Video Output Capabilities | 720P60, XGA, 1080P60 |
| Interface | VGA port, HDMI port, RJ45 port, USB ports, DC12V input jack |
| HDD | Supports up to 8TB SATA HDD (HDD not included) |
| Remote Access | Supports Android, iOS smartphone, webpage access |
| Network | 2.4G wireless network |
| Other Features | Digital WDR, 3D noise reduction, Day/Night switch, flip, etc. |
2. Camera
Image Sensor: HISILICON 3MP image sensor
Video Compression: H.265/H.264
Recording Mode: Manual/Motion Detection/Schedule/Alarm/Human Recognition
Input: DC 12V
Antenna: Built-in professional enhanced wireless reception
INSTALLATION AND CONNECTIONS
1. Installation
Note:
- Internet connection is required for remote viewing.
- Do not connect the NVR to a computer directly. It must be connected to a TV or monitor only.
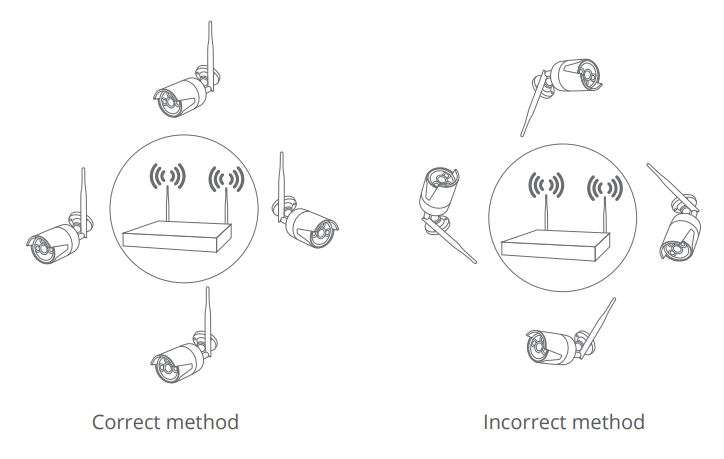
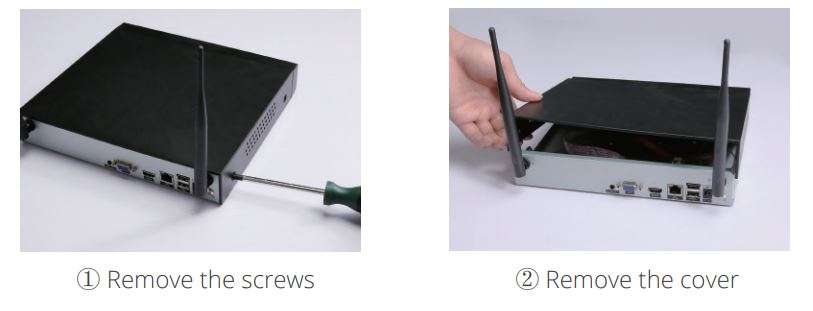
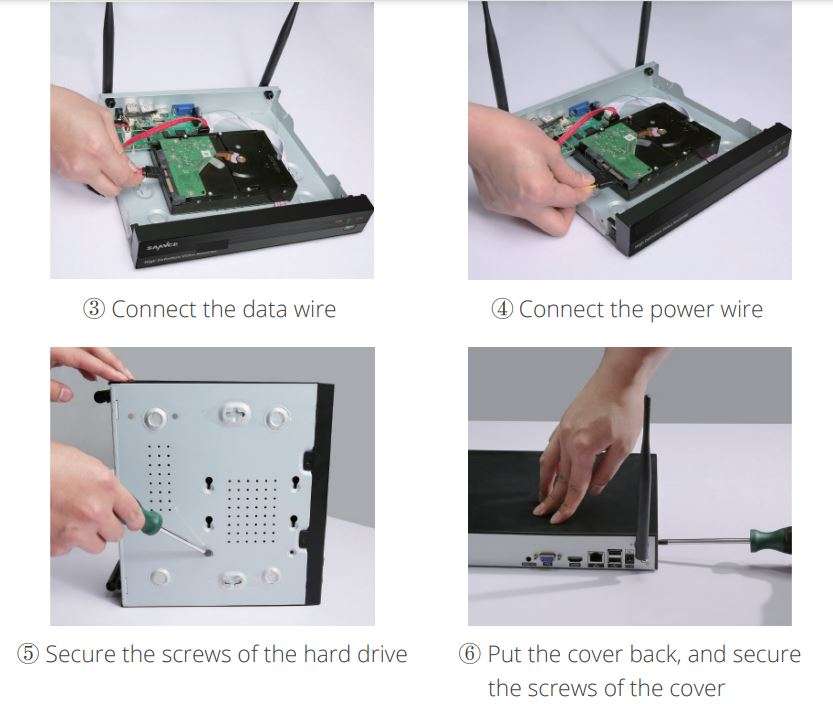
2. Hard Disk Installation
The NVR system requires a 3.5″ or 2.5″ SATA internal hard drive or mobile hard disk drive for video recording. Without installing a hard drive, the system can display real-time video, but cannot record or play back video footage. The system supports a hard drive of up to 8TB.
Note:
- Hard disk drive sold separately.
- Installing a 2.5-inch SATA hard drive may require a bracket (sold separately).


Note:
- Please power off the NVR before you install the hard drive.
- The system cannot record or play back video without a hard drive.
MENU OPERATION
1. Startup Wizard
After booting up the NVR, the Startup Wizard will be displayed on the screen. If you don’t want to see the Startup Wizard next time, you can check and enable “No more hints”, then click [Next].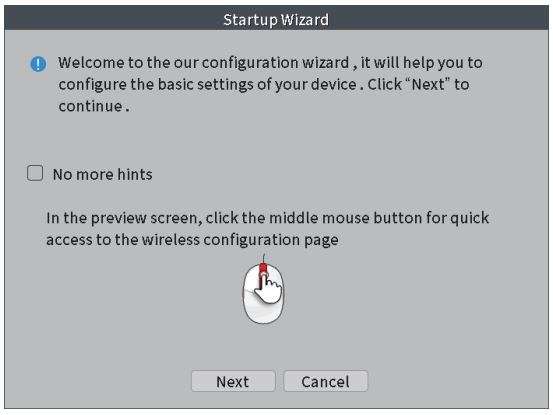
2. Modify Password
The first time you run the NVR, you must log in and set a new password. There is no need to enter a password when you log in for the first time. Just click [OK] to log in and click [OK] to set a new password.
[New]: Input a new password.
[Confirm]: Retype the same password

3. Safety Question
Set a safety question to reset the NVR password if you forget it, then click [Next].
[Question]: Select a security question.
[Answer]: Enter the answer.
[Way to receive verification code]: Supports monitor APP or email.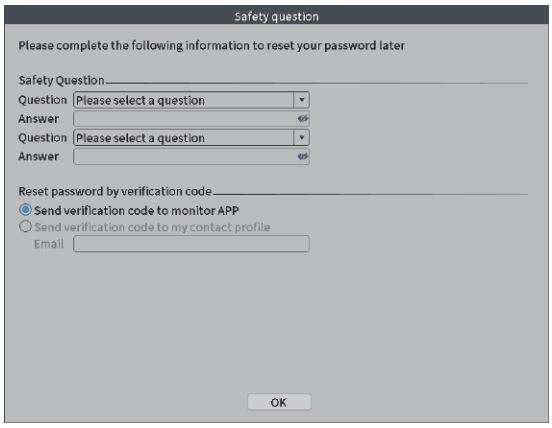
4. Time-Language Configuration
Enter Startup Wizard and click [Next] to go to this interface.
[Time Zone]: Set and select the time zone.
[System Time]: Set the system date and time.
[Date Format]: Choose the date format: YMD, MDY or DMY.
[Date Separator]: Choose the separator of the date format.
[Time Format]: Choose the time format: 24-hour or 12-hour.
[Language]: Select your preferred language.
5. Wireless Device List
Click “Wireless” in the shortcut menu to add a camera.
[Wired Configuration]: Search/add/delete/clear IP channels.
[Repeat Set]: Set the wireless relay transmission mode.
[Code for Wireless]: Pair the camera and NVR wireless signal.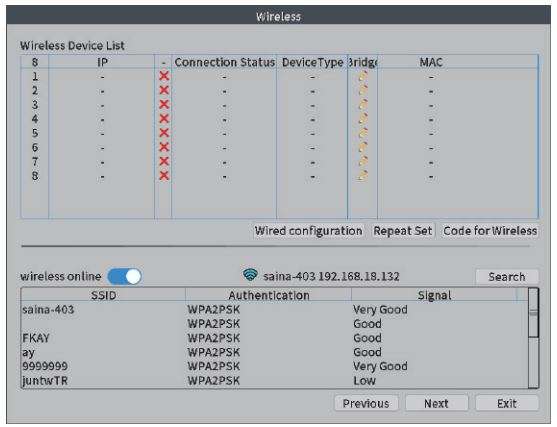
[NETIP]: Select network protocol.
[Search]: Search IP cameras in the same LAN.
[Add]: Add a camera to the list.
[Quick set]: System auto search and add cameras.
[Delete]: Delete an IP camera in the same LAN.
[Clear]: Delete all added cameras.
[Encode]: Pair a camera in the same LAN.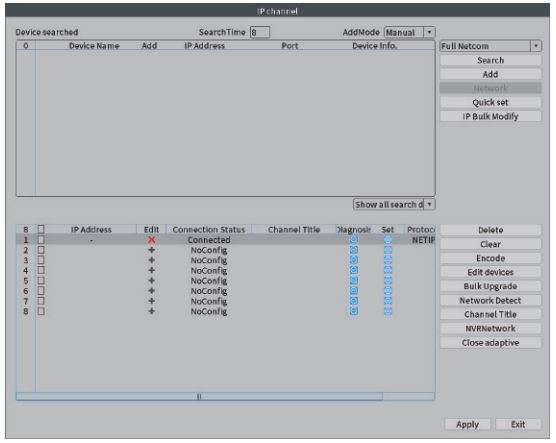
6. Install the Mobile App
[Serial Number]: Scan the QR code to add a device to the app.
[APP]: Scan the QR code to download the HOMEVIZ app, which is available on the App Store and Google Play (for Android and iOS mobile phones).
install mobile app


7. Exit Startup Wizard
Click “OK” to exit the Startup Wizard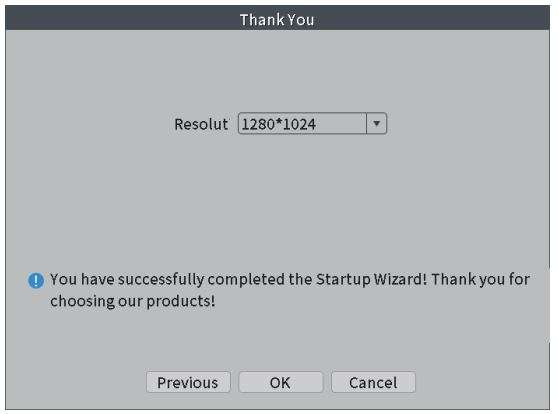
8. Access by Mobile Phone
For Android Devices
1) Install the HOMEVIZ app for free from Google Play. Tap the app icon to open the app.
2) Tap [Register] to create a new account, then log in by inputting the user name and password.
3) Tap [+] to add a new device.
4) Configure the following: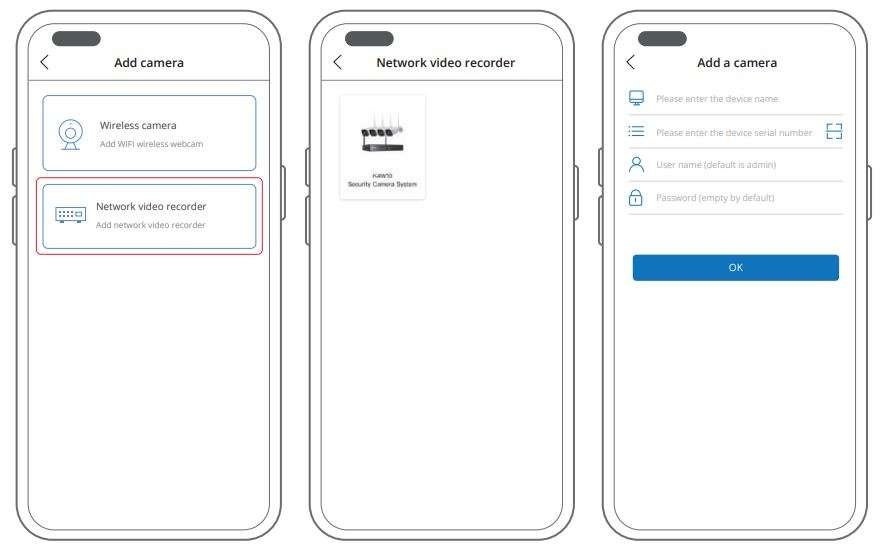
- [Device Name]: Input a name for your system.
- [
 ]: Scan the QR code in the NVR Guide to get the serial number. The Guide will pop up when you power on the NVR for the first time and you can find it on the NVR’s quick menu. If you cannot scan the QR code, go to [Main Menu] → [Advanced] → [Version] → [Serial Number] to get the serial number and input it manually.
 - [User Name]: admin
- [Password]: The password is the same as the NVR’s password.
5) Tap OK to add your device to the app.
6) Whenever you open the HOMEVIZ app, the Device List window will pop up first. From here, you can access video from all connected cameras. Just tap the device you want to view.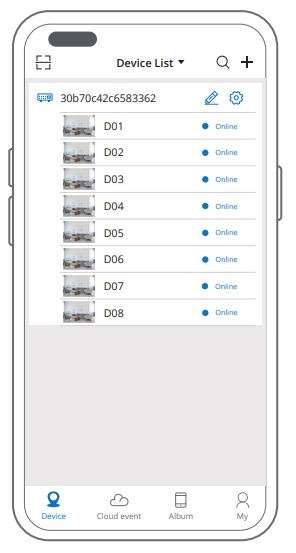
9. Share Access with Your Friends
You can share access to your camera with your friends via your mobile phone.
Step 1: On your mobile phone, open the HOMEVIZ app and tap [![]() ] and [Share to friends].
] and [Share to friends].
Step 2: On your friends’ mobile phone, open the app, tap [ ![]() ] and scan the QR code that you sent.
] and scan the QR code that you sent.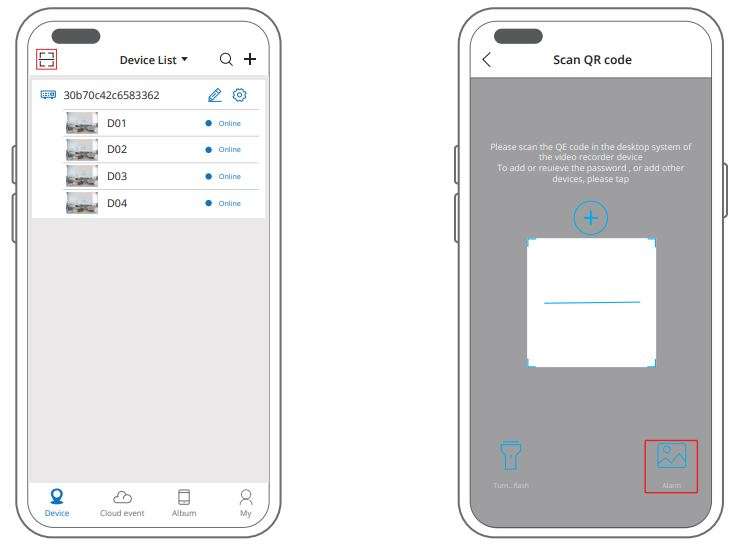
Then your friends can access your camera.
10. Recording Settings
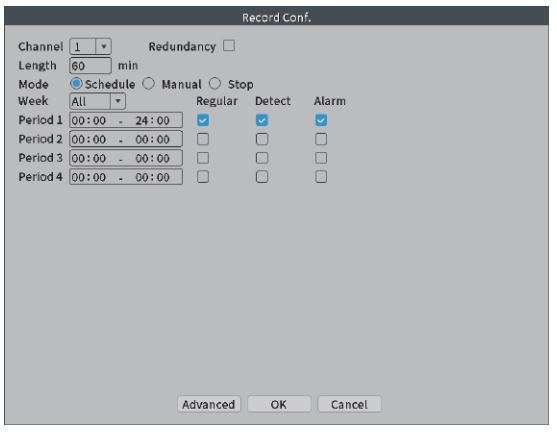
- Make sure the hard disk drive has been installed in advance, then go to the NVR’s [Main Menu] → [Advanced] → [HDD Info] to confirm that the status of the hard disk drive is [Normal]. Go to the NVR’s [Main Menu] → [Main Menu] → [Record Conf.] to enter the recording settings interface. If you set the recording time for 24 hours, the system will keep recording all day long. Select and check [Regular] (Schedule recording), [Detect] (motion detection recording) or [Alarm] (other alarm recording such as video loss recording), then click [OK] to save.

[Channel]: Select the corresponding channel number to set the channel.
[Redundancy]: Click and check this option to double backup the file. If your system supports the installation of two hard drives, every video file will be duplicated to be saved on each. Make sure that two hard disks are installed. One is the read-write disk and the other is the redundant disk.
[Length]: Set the time length of each video file. 60 minutes is the default value.
[Mode]: Set video state: schedule, manual or stop.
[Week]: Select day of the week.
[Period]: Set the time section of common recording. The recording starts in the set range only.
[Recording Type]: Set the recording type: regular, detect or alarm.
- Regular: Continuous recording according to the time period.
- Detect: Records a video once motion is detected during the time period. Please use this mode for light alarm cameras.
- Alarm: For hardware alarms.
11. Playback
There are two methods for playing back video files on the hard drive.
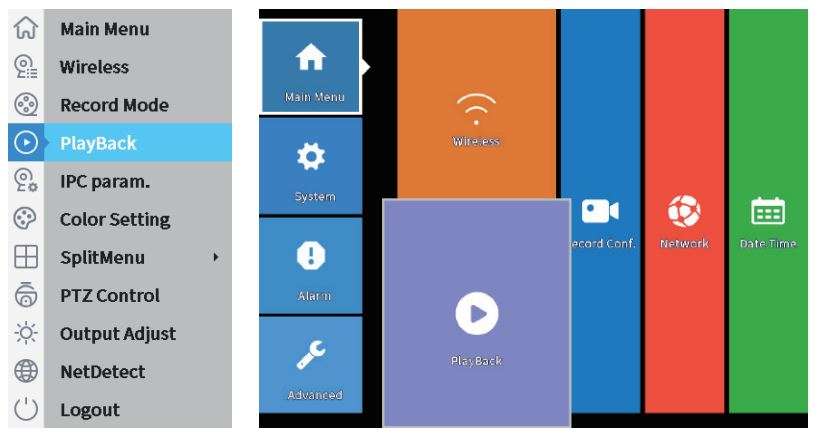
- Right-click the mouse and select [Playback] in the menu list.
- Enter [Main Menu] → [Main Menu] → [Playback].

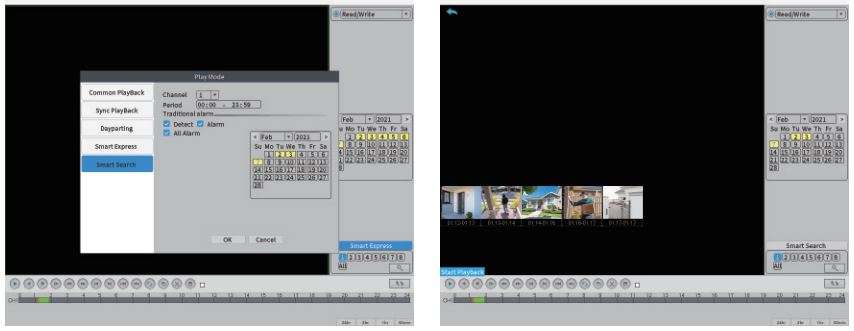
Playback mode includes Common Playback, Sync Playback, Dayparting, Smart Express and Smart Search.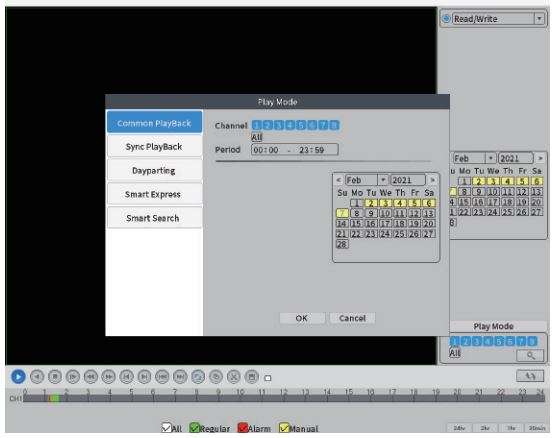
[Common Playback]: In Common Playback mode, you can select the channel, period and date.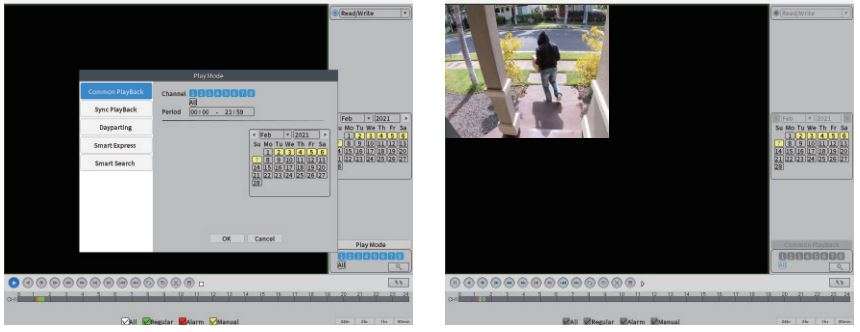
[Sync Playback]: Play back multiple channels of video at the same time.
[Dayparting]: Play back multiple videos of the same channel at the same time.
[Smart Express]: Intelligently fast forward the specified file type.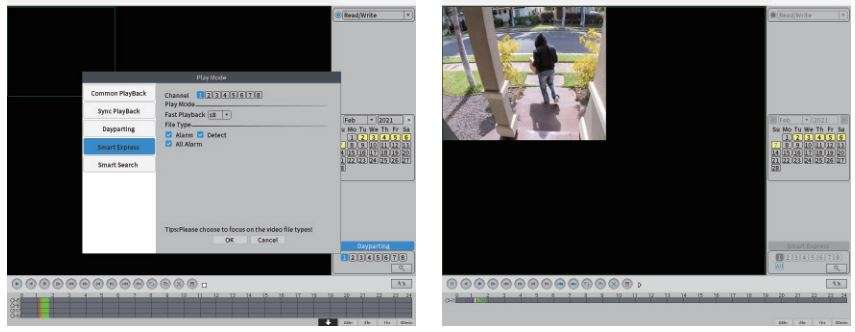
[Smart Search]: Intelligently play back the specified file type.
11. Alarm Settings
Go to the NVR’s [Main Menu] → [Alarm] to enter the Alarm interface. Alarm functions include Intelligent Alert, Abnormality and Traditional Alarm.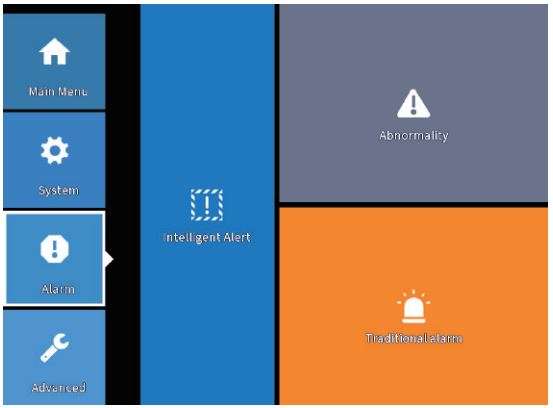
13. Intelligent Alert
- Go to the NVR’s [Main Menu] → [Main Menu] → [Record] → [Record Configuration] and check [Detect].
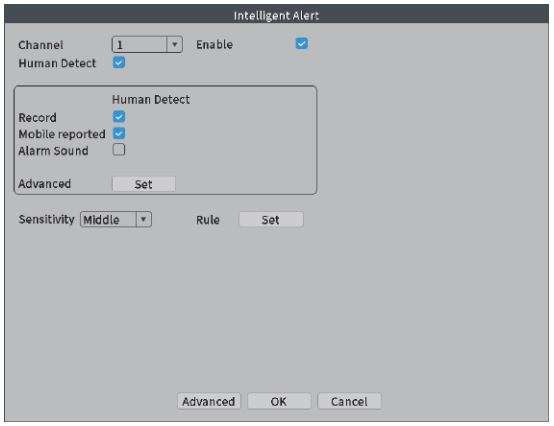
- Go to the NVR’s [Main Menu] → [Alarm] → [Intelligent Alert] to enter the Intelligent Alert interface. The human body motion detection function is enabled by default. If you only need motion detection, disable “Human Detect“. Set Period/Record Channel/Tour/Snapshot/Mobile Reported and other functions according to your needs, then click [OK] to save.
14. Light Mode
Go to the NVR’s [Main Menu] → [IPC Param.] → [Image Set] → [Day/Night Mode].
[Starlight Infrared]: The camera detects the ambient light levels through the sensor, and video output will automatically switch between color and black and white.
[Full Color]: Display footage in full color, even when ambient light is insufficient.
[Black and White]: Display footage in black and white, even when ambient light is sufficient.
[Smart Alert]: If the preview image is in black and white, human motion detected in the camera’s field of view will trigger a human detection alarm and an alarm sound will be heard, the infrared light will go out and the white light will illuminate, and the preview image will switch to a color image. If the preview image is in color, human motion detected in the camera’s field of view will trigger a human detection alarm and an alarm sound will be heard.
[Intelligent Variable Light]: The white light will illuminate when ambient light is insufficient so that the preview footage will be in color. [Smart Infrared]: The camera will detect the ambient light levels through the photoresistor, and video output will automatically switch between color and black and white.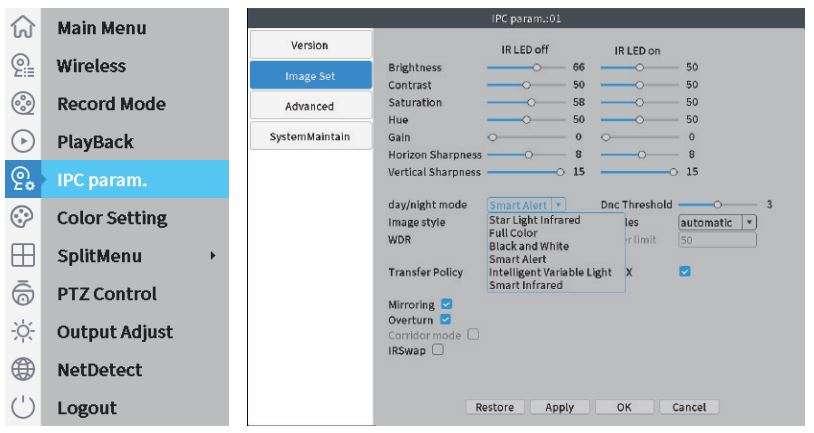
15. Email Settings
① Make sure your NVR is successfully connected to the router and Internet. You can go to the NVR’s [Main Menu] → [Advanced] → [Version] to confirm that [Nat status] shows “Connected“.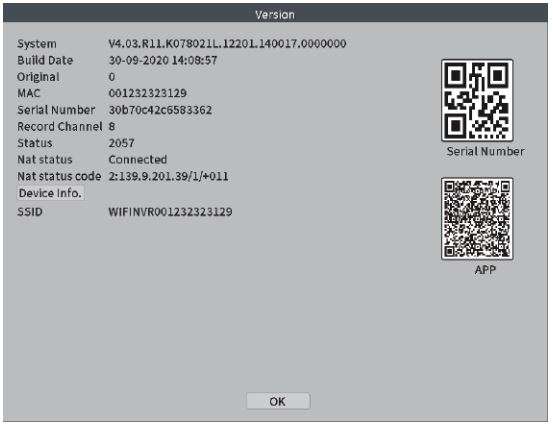
② Go to the NVR’s [Main Menu] → [Alarm] → [Intelligent Alert] to click [Set] and check [Send Email].
③ Go to the NVR’s [Main Menu] → [Main Menu] [Network] → [Net Service] → [EMAIL] to enter the Email Settings interface, then double-click [EMAIL].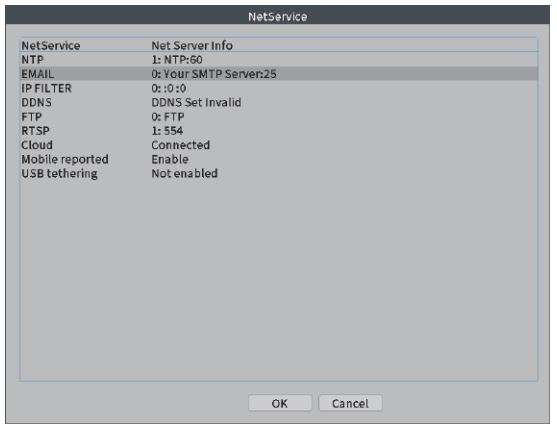
④ Login to your Gmail mailbox on the website and enter https://myaccount.google.com/security?pli=1#connectedapps.
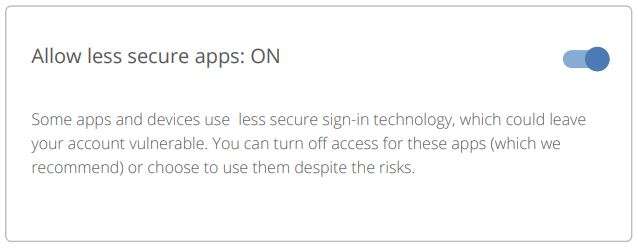
⑤ Please check [Enable] and select ”TLS” in the [Encryption] option, then input the information as required. For example, [SMTP Server] is [smtp.gmail.com] (you must enable [Less secure on] on the web page), [Port] is [587], [User Name] and [Sender] are your Gmail account details, [Password] is your Gmail account password and [Receiver] can be any email. Change [Title] according to your needs, then click [OK] to save. Ensure your [Mail Testing] succeeds, then click [OK] to save. Alerts will now be sent to your email when motion is detected.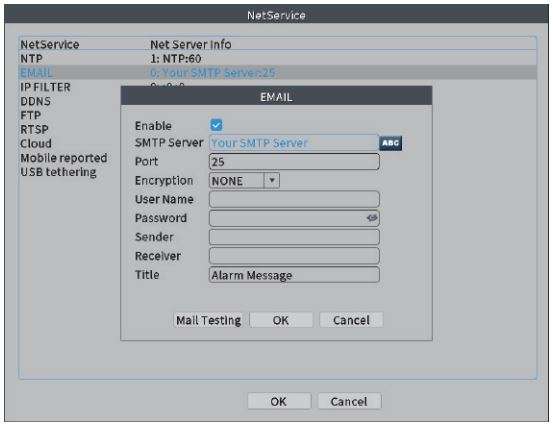
Note: The account of User Name is the same as Sender, while Receiver is a different account for receiving email alerts. Click [OK] to save after [Mail Testing] succeeds. It will send alarm messages. Please check the camera after you receive an alarm, then check the recorded video later.
16. Video Blind
① Go to the NVR’s [Main Menu] → [Record] → [Record Configuration] to check [Detect].
② Go to the NVR’s [Main Menu] → [Alarm] → [Traditional Alarm] → [Video Blind] to enter the Video Blind interface. Check [Enable] and select [Channel], [Sensitivity], [Period], [Record Channel], [Snapshot], [Send Email] or [Mobile reported] according to your needs, then click [OK] to save.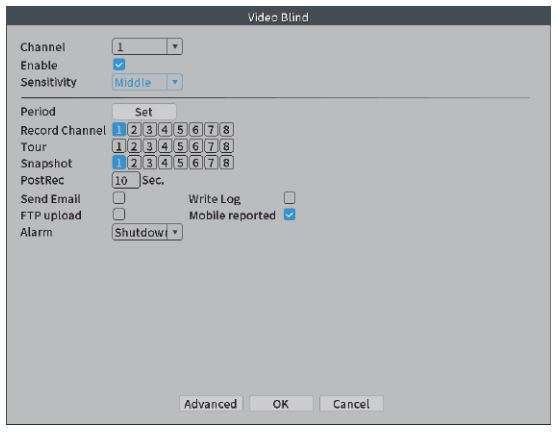
17. Video Loss
① Go to the NVR’s [Main Menu] → [Record] → [Record Configuration] to check [Detect].
② Go to the NVR’s [Main Menu] → [Alarm] → [Traditional Alarm] → [Video Loss] to enter the Video Loss interface. Check [Enable] and select [Channel], [Period], [Record Channel], [Send Email] or [Mobile reported] according to your needs, then click [OK] to save.
When the equipment cannot receive the channel video signal, the video loss alarm and linkage function will be turned on.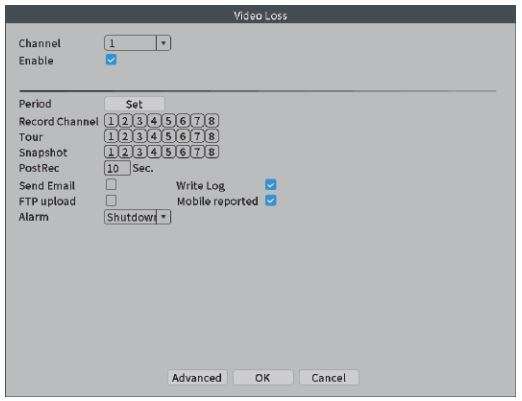
18. Abnormality
① Go to the NVR’s [Main Menu] → [Record] → [Record Configuration] to check [Alarm].
② Go to the NVR’s [Main Menu] → [Alarm] → [Abnormality] to enter the Abnormality interface. Click and select [Event Type] (No Storage/Storage Device Error/Storage No Device/Net Disconnection/IP Conflict can be selected), [Enable], [Show Message], [Mobile Reported] or [Send Email] according to your needs, then click [OK] to save.
Analyzing and inspecting current software and hardware of the device: When some abnormal events occur, the device will give a relative response such as displaying a message.
19. Network Settings
Go to the NVR’s [Main Menu] → [Main Menu] → [Network] and check [DHCP Enable]. You will then receive an IP Address as shown in the figure below.
Note: Ensure that you have a router and high-speed network connection. Connect your NVR to the router by using the Ethernet cable. Ensure that your network speed reaches at least 1Mbps for the best video recording.
Go to the NVR’s [Main Menu] → [Network] → [Net Service] → [Cloud], ensure that your NVR has a high-speed network connection. [Cloud] will be [Connected], then click [OK] to save your settings.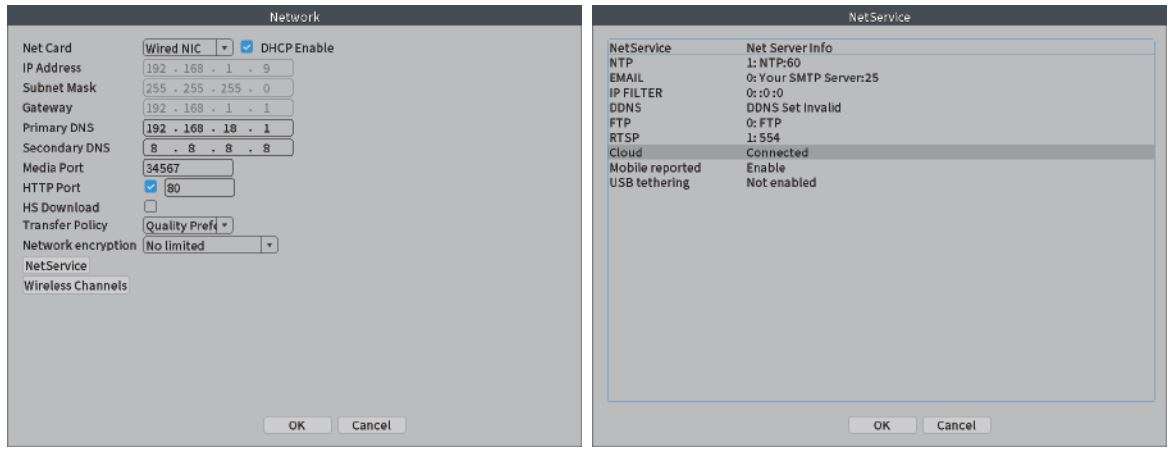
Go to the NVR’s [Main Menu] → [Advanced] → [Version] → [Serial Number] to check your [Serial Number]. It is a combination of 16 characters and numbers.
Go to the NVR’s [Main Menu] → [Main Menu] → [Network] → [Wireless Channels] to check the NVR’s wireless channels, including region and channel options. The NVR has been set completely before leaving the factory. Please contact technical support before resetting.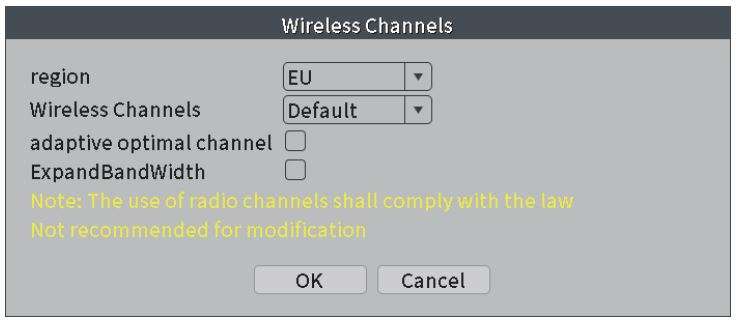
20. Backup
Go to the NVR’s [Main Menu] → [System] → [Backup] to backup video files to external storage. Plug a USB drive into the USB 2.0 port, as shown in the figure below.
Click [Backup] and a dialog box will pop up. You can select backup files according
to [Type], [Channel], [Start Time] and [End Time]. Add your files, select [Backup format] (AVI or H.264) and click [Start].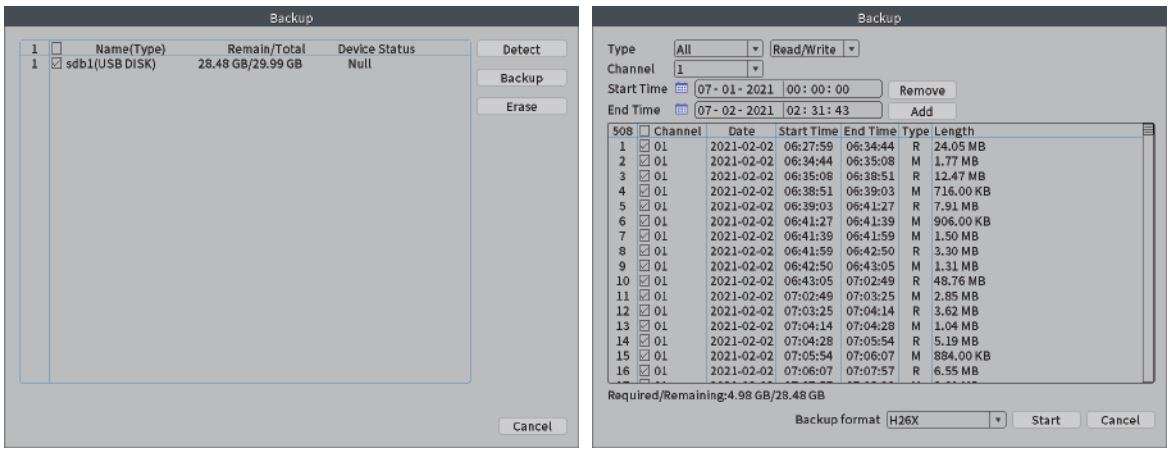
[Type]: Select the corresponding type ([All], [Alarm], [MD], [Alarm/MD], [Manual] and [General]) to back up.
[Channel]: Select the corresponding channel to back up.
[Start Time]: Select time to start backup.
[End Time]: Select time to end backup.
Click [OK] when you receive the message [Backup finished], then you can remove the USB drive. You need to install the player to play the video on the PC.
LEGAL DISCLAIMER
REGARDING PRODUCTS WITH INTERNET ACCESS, THE USE OF SUCH PRODUCTS SHALL BE WHOLLY AT YOUR OWN RISK. OUR COMPANY SHALL NOT TAKE ANY RESPONSIBILITY FOR ABNORMAL OPERATION, PRIVACY LEAKAGE OR OTHER DAMAGES RESULTING FROM CYBER ATTACK, HACKER ATTACK, VIRUS INSPECTION OR OTHER INTERNET SECURITY RISKS. HOWEVER, OUR COMPANY WILL PROVIDE TIMELY TECHNICAL SUPPORT IF REQUIRED.
SURVEILLANCE LAWS VARY BY JURISDICTION. PLEASE CHECK ALL RELEVANT LAWS IN YOUR JURISDICTION BEFORE USING THIS PRODUCT IN ORDER TO ENSURE THAT YOUR USE CONFORMS WITH THE APPLICABLE LAWS. OUR COMPANY SHALL NOT BE LIABLE IN THE EVENT THAT THIS PRODUCT IS USED FOR ILLEGITIMATE URPOSES.
IN THE EVENT OF ANY CONFLICTS BETWEEN THIS MANUAL AND THE APPLICABLE LAWS, THE LATTER PREVAILS.
REGULATORY INFORMATION
FCC Information
FCC Compliance Statement
This device complies with Part 15 of the FCC Rules. Operation is subject to the following two conditions: (1) this device may not cause harmful interference, and (2) this device must accept any interference received, including interference that may cause undesired operation.
Caution: Changes or modifications not expressly approved by the party responsible for compliance could void the user’s authority to operate the equipment.
Note: This equipment has been tested and found to comply with the limits for a Class A digital device, pursuant to part 15 of the FCC Rules. These limits are designed to provide reasonable protection against harmful interference when the equipment is operated in a commercial environment. This equipment generates, uses, and can radiate radio frequency energy and, if not installed and used in accordance with the instruction manual, may cause harmful interference to radio communications. Operation of this equipment in a residential area is likely to cause harmful interference in which case the user will be required to correct the interference at his own expense.
EU CONFORMITY STATEMENT
![]() This product and, if applicable, the supplied accessories are marked with “CE” and comply therefore with the applicable harmonized European standards listed under the EMC Directive 2004/108/EC, RoHS Directive 2011/65/EU and Amendment (EU)2015/863.
This product and, if applicable, the supplied accessories are marked with “CE” and comply therefore with the applicable harmonized European standards listed under the EMC Directive 2004/108/EC, RoHS Directive 2011/65/EU and Amendment (EU)2015/863.
![]() 2012/19/EU (WEEE directive): Products marked with this symbol cannot be disposed of as unsorted municipal waste in the European Union. For proper recycling, return this product to your local supplier upon the purchase of equivalent new equipment, or dispose of it at a designated collection point. For more information,
2012/19/EU (WEEE directive): Products marked with this symbol cannot be disposed of as unsorted municipal waste in the European Union. For proper recycling, return this product to your local supplier upon the purchase of equivalent new equipment, or dispose of it at a designated collection point. For more information,
see www.recyclethis.info
 2013/56/EU (battery directive): This product contains a battery that cannot be disposed of as unsorted municipal waste in the European Union. See the product documentation for specific battery information. The battery is marked with this symbol which may include lettering to indicate cadmium (Cd), lead (Pb) or mercury (Hg). For proper recycling, return the battery to your supplier or a designated collection point. For more information, see www.recyclethis.info
SAFETY INSTRUCTIONS
These instructions are intended to ensure that users can use the product correctly and avoid danger and property loss. The precaution measures are divided into [Warnings] and [Cautions].
Warnings: Serious injury or death may occur if any of the warnings are neglected.
Cautions: Injury or equipment damage may occur if any of the cautions are neglected.
![]() Warnings
Warnings
- The proper configuration of all passwords and other security settings is the responsibility of the installer and/or end-user.
- Use of the product must be in strict compliance with the electrical safety regulations of the nation and region. Please refer to the technical specifications for detailed information.
- The input voltage should meet both SELV (Safety Extra Low Voltage) and Limited Power Source with 100 to 240 VAC or 12 VDC according to the IEC60950-1 standard. Please refer to the technical specifications for detailed information.
- Do not connect several devices to one power adapter as adapter overload may cause overheating or a fire hazard.
- Please ensure that the plug is firmly connected to the power socket.
- If smoke, odor or noise emit from the device, turn off the power at once and unplug the power cable.
PREVENTIVE AND CAUTIONARY TIPS
Before connecting and operating your device, please be advised of the following tips:
- Ensure that the device is installed in a well-ventilated, dust-free environment.
- The device is designed for indoor use only. Keep all liquids away from the device.
- Ensure that the environmental conditions meet the factory specifications.
- Ensure that the device is properly secured to a rack or shelf. Major shocks or jolts to the device as a result of dropping it may cause damage to its sensitive electronics.
- Use the device in conjunction with a UPS if possible.
- Power down the device before connecting and disconnecting accessories and peripherals.
- A factory-recommended hard disk drive should be used with this device.
- The improper use or replacement of the battery may result in an explosion hazard. Replace with the same or equivalent type battery only. Dispose of used batteries according to the instructions provided by the battery manufacturer.
CONTACT US
For any inquiries about Dragon Touch products, please feel free to contact us. We will respond within 24 hours.
Email: [email protected]
Tel: 888-811-1140 (US) Mon-Fri (except holidays) 9am-5pm (EST)
Official website: www.dragontouch.com
Download Manual PDF
Homeviz Dragon Touch K4W10 HD NVR KIT User Manual PDF Download
