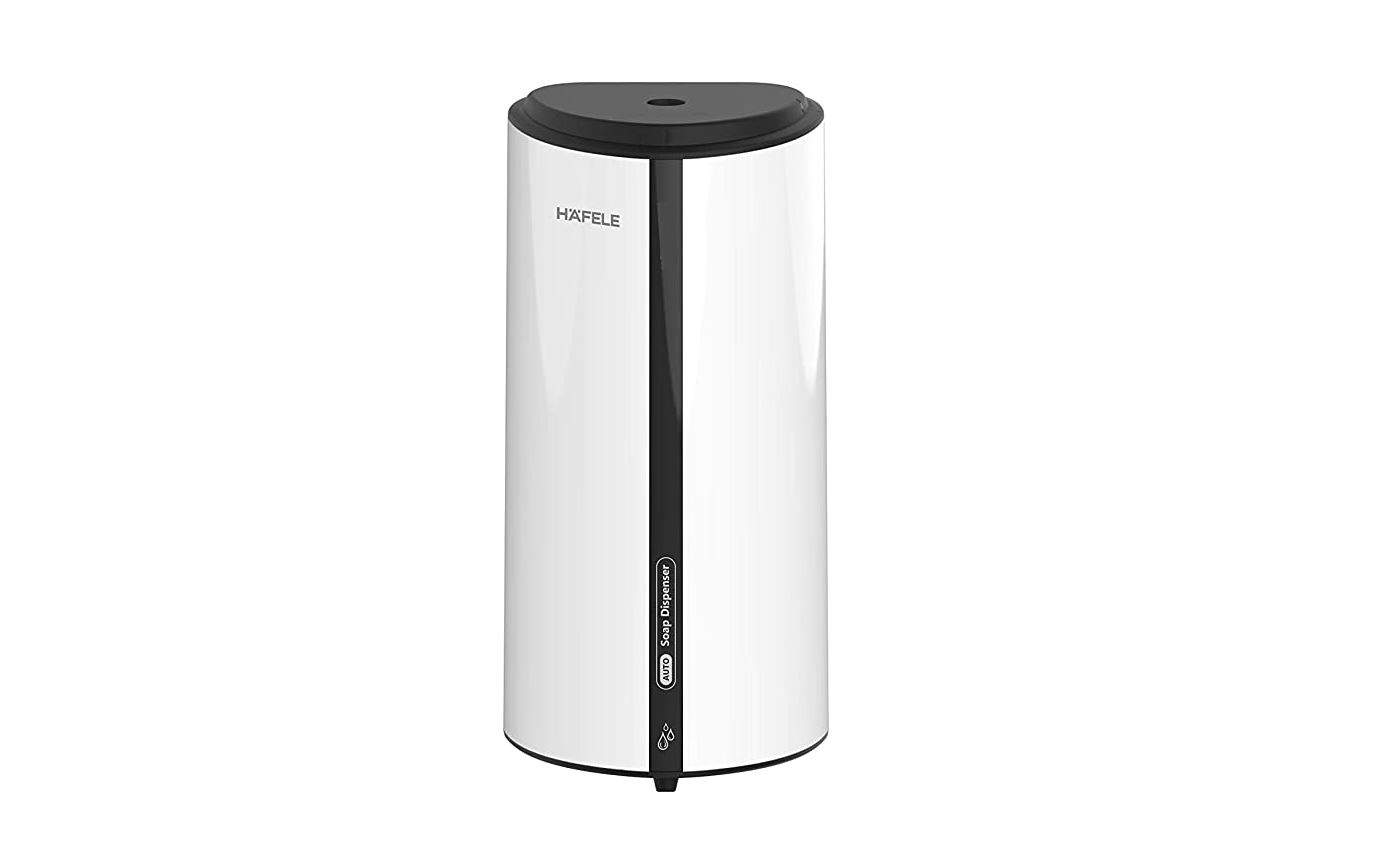
HAFELE 580.37.051 Automatic Soap
Dispenser User Manual
CAUTION & IMPORTANT SAFETY INSTRUCTIONS
⚠ READ AND KEEP THESE INSTRUCTIONS SAFETY PRECAUTIONS
WARNING-TO REDUCE THE RISK OF INJURE TO PERSONS OBSERVE THE FOLLOWING:
- To prevent children from eating the liquid soap, they must use this product in the presence of a guardian.
- To protect the environment, please dispose the exhausted batteries in an environment-friendly way. Please recycle the waste batteries as specified.
- Do not wash or shower the product as micro precision electronic components are contained.
⚠ CHECKLIST AND NOTES ON OPEN-PACKAGE - Please check all the items (refer to the packing list) before installation. If any parts are missing or have problems, please contact your regional dealer or contractor in time.
- Any change of specification is subject to no notice. If there are any difficulties during installation, please contact your regional dealer or contractor in time.
- The main parts are packed in special bags. Please avoid violent hit or friction when handling and opening the box.
⚠ TO MAKE SURE THE APPLIANCE DO WORK AND EXTEND ITS LIFESPAN UNDER THE GOOD CONDITION, PLEASE NOTICE THAT:
- The instructions manual must be followed carefully when installing.
- Use the same known brand AA battery (4pcs) with good quality. New and used batteries can’t be mixed. If the inferior batteries are counterfeit and shoddy, it may do harm to unit working and i ts lifetime.
- Before installation, please make sure the wall is plain and clean.
- Make sure the distance must be more than 25cm from the table or any reflective objects to the sensor.
- The instructions manual should be turned over to the user or person in charge after finishing the installation.
- Any objects should not be put within the sensing distance.
- No reflective objects such as stainless steel and photoelectric sensors are allowed to be installed on the table directly facing the sensing window, that will cause the appliance to work automatically.
- Indoor use only.
CAUTION
- The unit is suggested to install batteries even if you don’t use it, so that the unit can automatically run once per 72 hours in the standby status to avoid the catheter press ure adhesion.
- Some of unit had installed batteries and in dormant status before delivery. Keep press setting buttons for more than 5 seconds, the indicator will flash 3 times turning into standby status. Whereas if the unit turn to dormant status after keeping press the setting button, you can also re-installation batteries to turn the unit to standby status directly.
PACKING LIST
| Automatic soap dispenser X1 | Wall-mounted kit X1 | ST4X25 screws X3 | Key X1 |
| Expansion screws X3 | User Manual X1 | Certificate of Qualification X1 |
SPECIFICATIONS
| Voltage | DC6V/ AA Battery (4pcs) | Supply | 0.5~2.5ml(5 levels adjustable) |
| Volume | 850ml | Sensing distance | 5~9cm |
| Ambient temperature | > 0_45°C |
SKETCH MAP AS FOLLOWS
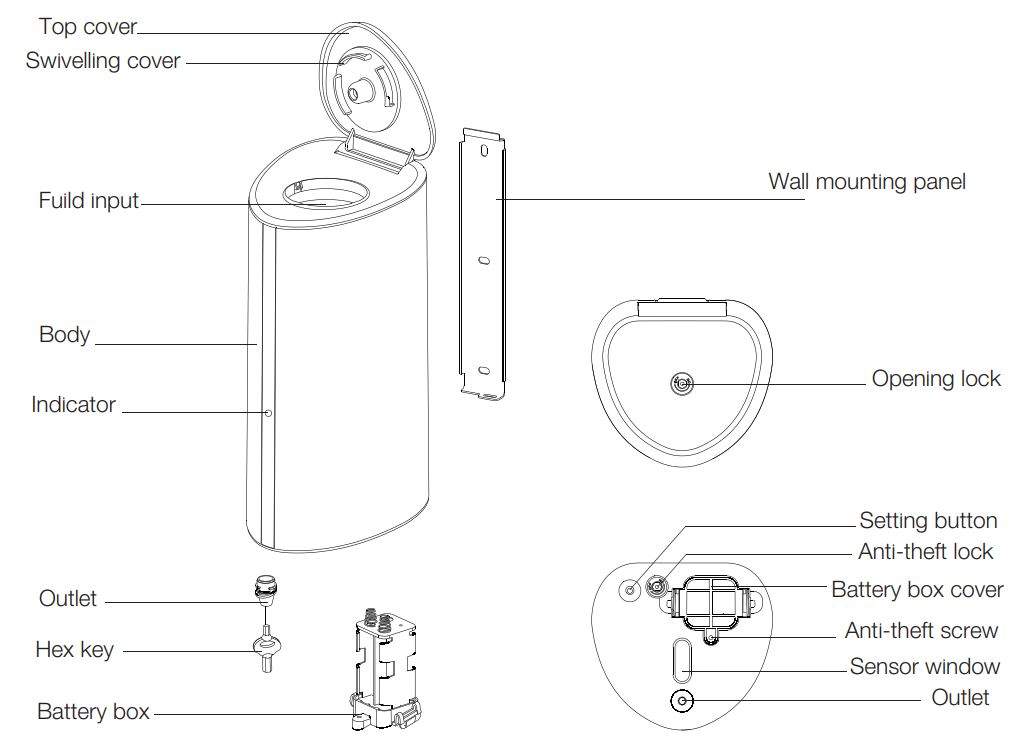
Notes: The sketch map refers to the unit , and please take the actual item as final reference.
SKETCH MAP OF INSTALLATION
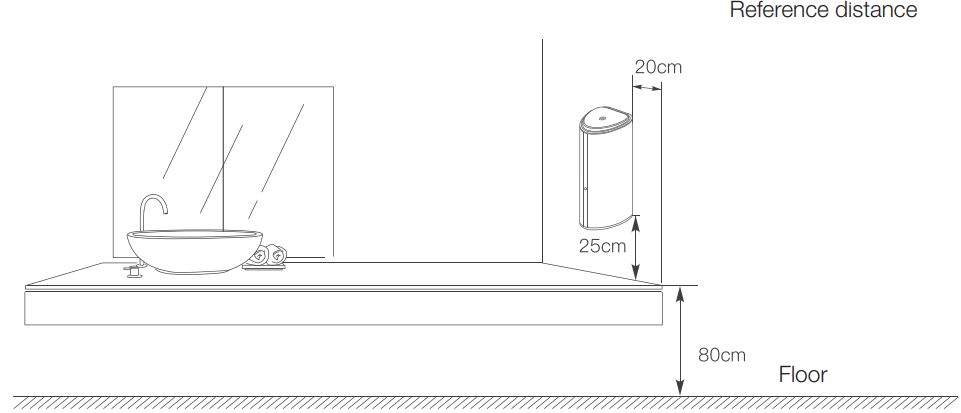
Caution: If the surface of table is made of stainless steel, the sensing distance must be over 35cm.
INSTALLATION STEPS
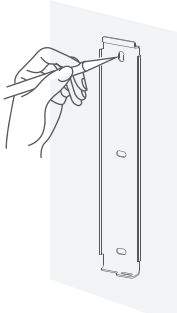
- Find a proper position on the wall, put the wall mounting panel on it and use pencil to mark the position of the three holes.

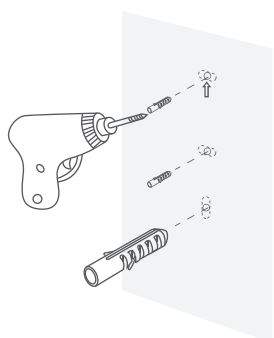
- Drill three holes (06) in the wall according to the marks. Put expansion screws into the holes.

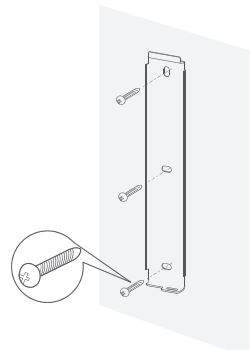
- Screws shall match with expansion screws in the wall, fix them together with wall mounting panel.

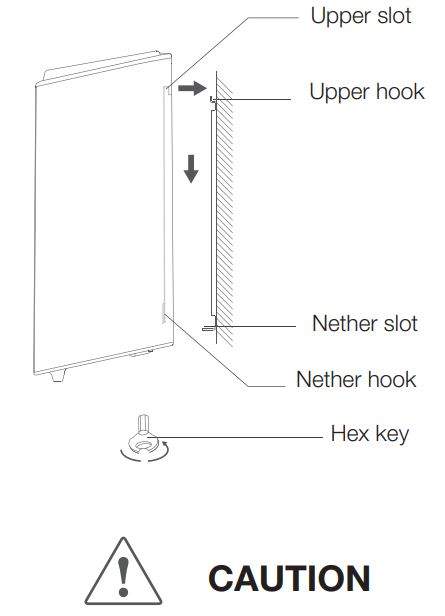
- Choose an appropriate angle. Put the upper slot (at the back of the unit)down into the upper hook (at the mounting panel). Make the dispenser fit tightly to the mounting panel. Push the dispenser slightly down to make sure both hooks be put in the slot well. Then use hex key to lock the antitheft screw.
- Do not knock hard on the products to prevent the precision electronic components and solenoid valves from trouble.
- Be careful not to damage the connecting wire when dismantling.
- Please use neutral detergent to clean the surface. Firstly, dip the soft cloth into neutral detergent to wipe the unit, then wipe off the detergent and dirt by wrung-out wet soft cloth, finally to dry the unit by dry soft cloth. Do not clean this unit by showering or using nonstandard cleaning solutions in case of surface damage or components corrosion. To keep this unit working in best condition please don’t do anything that will damage the sensor window.
THE INSTALLATION AND REPLACEMENT OF BATTERIES
- When the indicator appears low battery prompt, please replace the batteries in time.
- In order to avoid liquid soap outflow, make sure the product is straight up when installing battery.
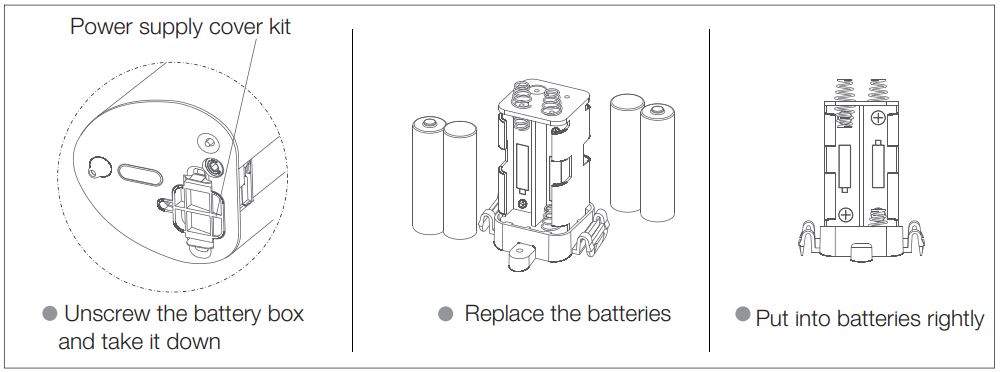
- Please use standard batteries {DC 6V/AA battery (4pcs)}. New and used batteries can’t be mixed. The usage as follows:
a. Unscrew the battery box with the screwdriver.
b. Press handles on both sides and take down the battery box.
c. Put the new batteries into battery box in the direction of “+” and “_”,
d. Put the battery box back and click it to the proper position, tighten the screws.
HOW TO USE
- Unscrew the battery box by Philips screwdriver and take it down. Fill it with the batteries {DC 6V/AA battery (4pcs)} and put it back. Then tighten it by anti-theft screw for locking.
- Use the key to open top cover and add in the soap liquid. Please clean the surface if there is any soap liquid overflowing.
- Reach out your hands under the sensor. The indicator lights up and the soap liquid will drop down automatically as soon as the sensor receives the signal.
- For initial use, repeat step 3 until the liquid or soap drops normally.
- Low battery prompt: The indicator light flashes 3 times every 30 seconds. The battery is low. It is recommended to replace the batteries (4 batteries are replaced at the same time).

SUPPLY VOLUME SETTINGS
- After the batteries are installed, the machine automatically enters the standby state, and the liquid output is automatically adjusted to the factory default setting.
- Adjustments At the standby status, press the setting button (hands off when indicator lights up) to adjust the supply volume including 5 different levels. The default of the unit is about 1.0 ml (refer to the water volume), then press once to be 1.5ml, twice 2.0ml, three times 2.5ml, four times 0.5ml, five times will be back to the default to finish a circle.
SIMPLE TROUBLESHOOTING ACTIVITIES
| Status | Causes | Methods |
|
Indicator not work | Controller fault | Replace the controller |
| Abnormal power supply | Check circuit or battery | |
| Loose contact or power running out | Reload or replace batteries | |
| Disconnection or loose contact of internal wiring | Check internal wiring | |
| Dirty sensor window | Clean sensor window | |
| Indicator flashes frequently | Insufficient power supply | Recharge or change batteries {DC 6V/AA battery (4pcs)} |
| No liquid soap supply | On-going sensing | Remove reflective object |
| Long sensing distance | Put hands down enough to get the sensor induction or slowly move hands up & down | |
|
Insufficient liquid soap supply | Malfunctioning machine | Contact regional dealer or contractor |
| Supply liquid soap within short time | Make an adjustment referring to the user manual | |
| Extremely dense liquid | Refill low density liquid | |
| Liquid solidified or pipe blocked | Repeatedly to use it until the liquid supply is normal Contact regional dealer or contractor |
⚠ Warning: No impurities and other dirt in the tank to avoid blocking,
WARRANTY
- One Year Warranty from the date of invoice*
- This warranty is only effective if proof of purchase (original sales receipt) is provided.
- The range of warranty is exclusive of normal depreciation or any damages caused by improper use.
- Warranty will be void if the unit was repaired by unauthorized person or was damaged by using the spare parts not from Hafele. Hafele or its Authorized Service Franchisee solely can service/repair the Product
- To know more about warranty terms and conditions, please contact customer care (*Terms & Conditions Apply).
![]()
Häfele VN LLC.
Phone: (+84 28) 39 113 113
Email: [email protected]

