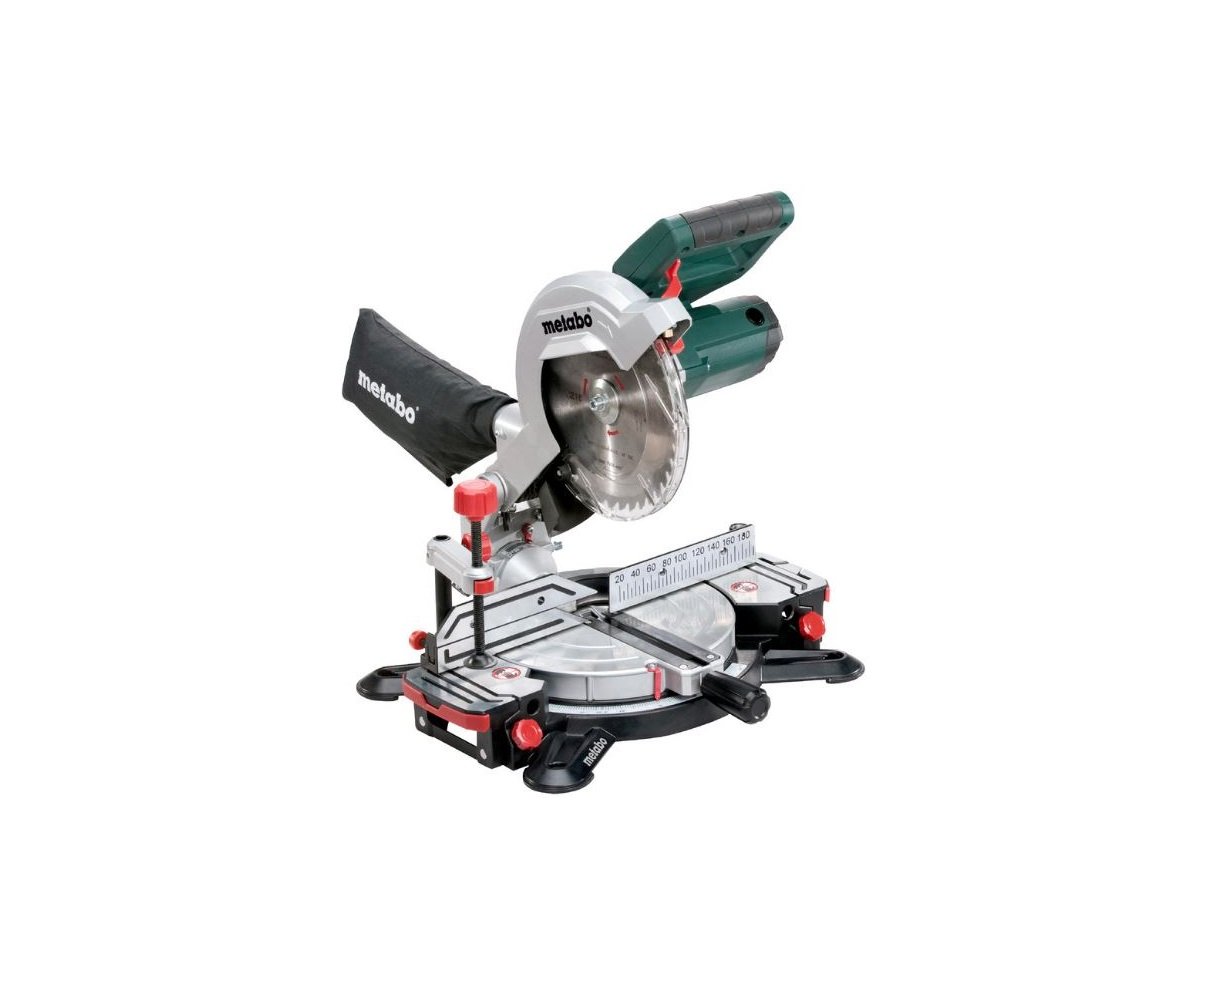
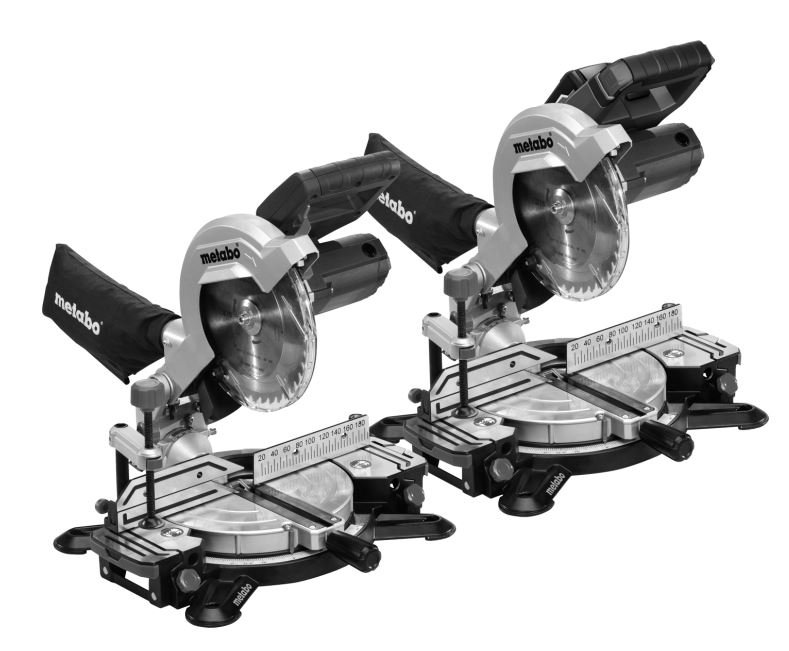
metabo KS 216 M LASERCUT 619216000 MITRE SAW User Manual







*2) 2014/30/EU, 2006/42/EC, 2011/65/EU, 2011/65/EU
*3) EN 50581:2012, EN 62841-1:2015, EN 62841-3-9:2015 (KS 18 LTX 216: EN 61029-1:2009+A11:2010, EN 61029-2-9:2012+A11:2013)
2016-07-12, Volker Siegle
Direktor Produktentstehung & Qualität (Vice President Product Engineering & Quality)
*4) Metabowerke GmbH – Metabo-Allee 1 – 72622 Nuertingen, Germany
Declaration of Conformity
We declare under our sole responsibility: These crosscut and mitre saws, identified by type and serial number *1), comply with all relevant requirements of the directives *2) and standards *3). Technical file at *4) – see page 4.
Specified Use
The mitre saw is suited for longitudinal and cross cuts, inclined cuts, mitre cuts and double mitre cuts.
Only materials for which the respective saw blade is suited may be machined (approved saw blades see chapter 12. Accessories).
The permissible dimensions of the stock have to be adhered to (see chapter 16. Technical Specifications).
Workpieces with round or irregular cross-section (such as firewood) must not be cut, as they cannot be held securely during the cutting process. When sawing a thin workpiece laid on its edge, a suitable guide must be used for firm support.
Any other use does not comply with the intended purpose. Unspecified use, modification of the tool or use of parts that have not been tested and approved by the manufacturer can cause unforeseeable damage!
General Safety Instructions
⚠️ For your own protection and for the protection of your electrical tool, pay attention to all parts of the text that are marked with this symbol!
 WARNING – Reading the operating instructions will reduce the risk of injury. Pass on your power tool only together with these documents.
General Power Tool Safety Warnings
⚠️ WARNING – Read all safety warnings and all instructions. Failure to follow all safety warnings and instructions may result in electric shock, fire and/or serious injury.
Keep all safety instructions and information for future reference! The term “power tool” in the warnings refers to your mains-operated (corded) power tool or battery-operated (cordless) power tool.
1. Work area safety
- Keep work area clean and well lit. Untidy or poorly lit workplaces can cause accidents.
- Do not operate power tools in explosive atmospheres, such as in the presence of flammable liquids, gases or dust. Power tools create sparks which may ignite the dust or fumes.
- Keep children and bystanders away while operating a power tool. Distractions can cause you to lose control.
2. Electrical safety
- Power tool plugs must match the outlet. Never modify the plug in any way. Do not use any adapter plugs with earthed or grounded power tools. Unmodified plugs and matching outlets will reduce risk of electric shock.
- Avoid body contact with earthed or grounded surfaces, such as pipes, radiators, ranges and refrigerators. There is an increased risk of electric shock if your body is earthed or grounded.
- Do not expose power tools to rain or wet conditions. Water entering a power tool will increase the risk of electric shock.
- Do not abuse the cord. Never use the cord for carrying, pulling or unplugging the power tool. Keep cord away from heat, oil, sharp edges or moving parts. Damaged or entangled cords increase the risk of electric shock.
- When operating a power tool outdoors, use an extension cord suitable for outdoor use. Use of a cord suitable for outdoor use reduces the risk of electric shock.
- If operating a power tool in a damp location is unavoidable, use a residual current circuit breaker (RCCB). Use of a residual current circuit breaker reduces the risk of electric shock.
3. Personal safety
- Stay alert, watch what you are doing and use common sense when operating a power tool. Do not use a power tool while you are tired or under the influence of drugs, alcohol or medication. A moment of inattention while operating power tools may result in serious personal injury.
- Use personal protective equipment. Always wear eye protection. Protective equipment such as dust mask, non-skid safety shoes, hard hat, or hearing protection used for appropriate conditions will reduce personal injuries.
- Prevent unintentional starting. Ensure the switch is in the off-position before connecting to power source and/or battery pack, picking up or carrying the tool. Carrying power tools with your finger on the switch or energising power tools that have the switch on invites accidents.
- Remove any adjusting key or wrench before turning the power tool on. A wrench or a key left attached to a rotating part of the power tool may result in personal injury.
- Do not overreach. Keep proper footing and balance at all times. This enables better control of the power tool in unexpected situations.
- Dress properly. Do not wear loose clothing or jewellery. Keep your hair, clothing and gloves away from moving parts. Loose clothes, jewellery or long hair can be caught in moving parts.
- If devices are provided for the connection of dust extraction and collection facilities, ensure these are connected and properly used. Use of dust extraction can reduce dustrelated hazards.
- Don’t lull yourself into a false sense of security and ignore the safety regulations for power tools, even if you are familiar with the power tool after frequent use. Failure to observe the following warnings can result in serious injury or damage to property.
4. Use and handling the power tool
- Do not force the power tool. Use the correct power tool for your application. The correct power tool will do the job better and safer at the rate for which it was designed.
- Do not use the power tool if the switch does not turn it on and off. Any power tool that cannot be controlled with the switch is dangerous and must be repaired.
- Disconnect the plug from the power source and/or the battery pack from the power tool before making any adjustments, changing accessories, or storing power tools. Such preventive safety measures reduce the risk of starting the power tool accidentally.
- When not in use, store the power tools out of the reach of children Do not allow personnel to use the device unless they are already familiar with it or have read these instructions. Power tools are dangerous in the hands of untrained users.
- Maintain power tools and accessories carefully. Check for misalignment or binding of moving parts, breakage of parts and any other condition that may affect the power tool’s operation. If damaged, have the power tool repaired before use. Many accidents are caused by poorly maintained power tools.
- Keep cutting tools sharp and clean. Properly maintained cutting tools with sharp cutting edges are less likely to bind and are easier to control.
- Use the power tool, accessories, tool bits etc. in accordance with these instructions. Take into consideration the working conditions and tasks required. Use of the power tool for operations different from those intended could result in a hazardous situation.
- Keep the handles and handle surfaces dry, clean and free of oil and grease. Slippery handles and handle surfaces do not permit safe handling and control of the power tool in unforeseen situations.
5. Use and handling cordless tools
- Always charge the batteries only in chargers recommended by the manufacturer. Chargers designed for a specific type of battery may pose a fire hazard when used together with other battery types.
- Use only the batteries provided for this purpose in the power tools. Using other batteries may cause injuries and pose a fire hazard.
- When not in use, keep batteries away from paper clips, coins, nails, screws or other small metal objects that could bridge the contacts. Short circuits between battery contacts can cause burns or fires.
- Fluid may escape if batteries are used inappropriately. Avoid all contact with this fluid. In the event of accidental skin contact,
rinse the affected area thoroughly. If the fluid enters your eyes, seek immediate medical assistance. Escaping battery fluid can cause skin irritation or burns. - Do not use damaged or modified batteries. Damaged or modified batteries may behave unpredictably and lead to fire, explosion or risk of injury.
- Do not expose the battery pack to fire or excessive temperatures. Fire or temperatures above 130 °C can cause an explosion.
- Follow all instructions on charging and never charge the battery or the cordless tool outside the temperature range indicated in the operating instructions. Incorrect charging or charging outside the permitted temperature range may destroy the battery and increase the risk of fire.
6. Service
- Have your power tool serviced by a qualified technician using only original replacement parts. This will ensure that the safety of the power tool is maintained.
- Never service damaged batteries. Any servicing of batteries should only be carried out by the manufacturer or authorised customer service points.
7. Additional Safety Instructions
– These operating instructions are intended for people with basic technical knowledge in handling machines such as the one described here. If you have had no experience with machines of this kind, you should initially work under the supervision of people with previous experience.
– The manufacturer bears no liability for damage caused by non-compliance with these operating instructions.
Information in these operating instructions is designated as shown below:
⚠️ Danger!
Risk of personal injury or environmental damage.
 Risk of electric shock!
Risk of personal injury from electric shock.
 Drawing-in/trapping hazard!
Risk of personal injury by body parts or clothing being drawn into the rotating saw blade.
 Caution!
Risk of material damage.
ℹ️ Note:
Additional information.
Special Safety Instructions
- Mitre saws are intended to cut wood or wood-like products, they cannot be used to cut ferrous materials such as bars, rods, studs etc. Abrasive dust causes blockage of movable parts such as the lower guard. Sparks from abrasive cutting will burn the lower guard, the kerf insert and other plastic parts.
- Use clamps to support the workpiece whenever possible. If supporting the workpiece by hand, you must always keep your hand at least 100 mm from either side of the saw blade. Do not use this saw to cut pieces that are too small to be securely clamped or held by hand. If your hand is placed too close to the saw blade, there is an increased risk of injury from blade contact.
- The workpiece must be stationary and clamped or held against both the fence and the table. Do not feed the workpiece into the blade or cut “freehand” in any way. Unrestrained or moving workpieces could be thrown at high speeds, causing injury.
- Never cross your hand over the intended line of cutting either in front or behind the saw blade. Supporting the workpiece “cross handed” i.e. holding the workpiece to the right of the saw blade with your left hand or vice versa is very dangerous.
- Never reach behind the fence when the saw blade is rotating. Do not undercut a safety distance of 100 mm between the hand and the rotating saw blade (applies to both sides of the saw blade, e.g. when removing wood scraps). The proximity of the spinning saw blade to your hand may not be obvious and you may be seriously injured.
- Inspect your workpiece before cutting. If the workpiece is bowed or warped, clamp it with the outside bowed face toward the fence. Always make certain that there is no gap between the workpiece, fence and table along the line of the cut. Bent or warped workpieces can twist or shift and may cause binding on the spinning saw blade while cutting. There should be no nails or foreign objects in the workpiece.
- Do not use the saw until the table is clear of all tools, wood scraps, etc., except for the workpiece. Small debris or loose pieces of wood or other objects that contact the revolving blade can be thrown with high speed.
- Cut only one workpiece at a time. Stacked multiple workpieces cannot be adequately clamped or braced and may bind on the blade or shift during cutting.
- Ensure the mitre saw is mounted or placed on a level, firm work surface before use. A level and firm work surface reduces the risk of the mitre saw becoming unstable.
- Plan your work. Every time you change the bevel or mitre angle setting, make sure the adjustable fence is set correctly to support the workpiece and will not interfere with the blade or the guarding system. Without turning the tool “ON” and with no workpiece on the table, move the saw blade through a complete simulated cut to assure there will be no interference or danger of cutting the fence.
- Provide adequate support such as table extensions, saw horses, etc. for workpieces that are wider or longer than the table top. Workpieces longer or wider than the mitre saw table can tip if not securely supported. If the cutoff piece or workpiece tips, it can lift the lower guard or be thrown by the spinning blade.
- Do not use another person as a substitute for a table extension or as additional support. Unstable support for the workpiece may lead to binding of the blade. The workpiece can also shift during the cutting operation pulling you and the helper into the spinning blade.
- The cut-off piece must not be jammed or pressed by any means against the spinning saw blade. If confined, i.e. using length stops, the cut-off piece could get wedged against the blade and thrown violently.
- Always use a clamp or a fixture designed to properly support round material such as rods or tubing. Rods have a tendency to roll while being cut, causing the blade to “bite” and pull the work with your hand into the blade.
- Let the blade reach full speed before contacting the workpiece. This will reduce the risk of the workpiece being thrown.
- If the workpiece or blade becomes jammed, turn off the mitre saw. Wait for all moving parts to stop and disconnect the plug from the power source and/or remove the battery pack. Then work to free the jammed material. Continued sawing with a jammed workpiece could cause loss of control or damage to the mitre saw.
- After finishing the cut, release the switch, hold down the saw head and wait for the blade to stop before removing the cut-off piece. Reaching with your hand near the coasting blade is dangerous.
1. Additional Safety Instructions
- Please also observe the special safety instructions in the respective chapters.
- Where applicable, follow the legal directives or regulations for the prevention of accidents.
⚠️General hazards!
- Consider environmental conditions:
- Use suitable workpiece supports when cutting long stock.
- The saw shall only be started and operated by persons familiar with circular saws and who are at any time aware of the dangers associated with the operation of such tools. Persons under 18 years of age shall use this tool only in the course of their vocational training, under the supervision of an instructor.
- Keep bystanders, particularly children, out of the danger zone. Do not permit other persons to touch the tool or power cable while it is running.
- Avoid overheating of the saw teeth.
- When sawing plastic, avoid melting of the plastic.
⚠️Risk of personal injury and crushing by moving parts!
- Do not operate the tool without installed guards.
- Always keep sufficient distance to the saw blade. Use suitable feeding aids, if necessary. Keep sufficient distance to driven components when operating the power tool.
- Wait for the saw blade to come to a complete stop before removing cutoffs, scrap, etc. from the work area.
- Cut only workpieces of dimensions that allow for safe and secure holding while cutting.
- Use clamping devices or a vice to hold the workpiece. It is held safer by these devices than by your hand.
- Do not attempt to stop the saw blade by pushing the workpiece against its side.
- Remove the mains plug from the socket or remove the detachable battery pack before carrying out any settings, maintenance or repairs.
- If the device is not in use, pull the mains plug or remove the detachable battery pack.
⚠️Cutting hazard, even with the cutting tool at standstill!
- Wear gloves when changing cutting tools.
- Store saw blade in such manner that nobody will get hurt.
⚠️Danger from kickback of the saw head
(saw blade gets caught in the workpiece and the saw head suddenly kicks back)!
- Select a saw blade suited for the material to be cut.
- Keep the handle tight. When the saw blade enters the workpiece, the risk of kickback is particularly high.
- Cut thin or thin-walled workpieces only with finetoothed saw blades.
- Always use sharp saw blades. Replace damaged saw blades immediately. There is an increased risk of kickback if a blunt sawtooth gets caught in the workpiece’s surface.
- Do not jam workpieces.
- If in doubt, check workpiece for inclusion of foreign matter (e.g. nails or screws).
- Never cut several workpieces at the same time
– and also no bundles containing several individual pieces. Risk of personal injury if individual pieces are caught by the saw blade uncontrolled.
 Drawing-in/trapping hazard!
- Ensure that during operation no parts of the body or clothing can be caught and drawn in by rotating components (no ties no gloves, no clothes with wide sleeves; contain long hair with a hairnet).
- Never cut workpieces to which ropes, cords, strings, cables or wires are attached or which contain such materials.
⚠️Hazard generated by insufficient personal protection gear!
- Wear hearing protection.
- Wear protective goggles.
- Wear dust mask.
- Wear suitable work clothes.
- Wear non-slip footwear.
- Wear gloves when handling saw blades and rough tools. Carry saw blades in a container.
⚠️ Risk of injury by inhaled wood dust!
- Work only with a suitable dust collector attached to the saw. The dust extraction unit must comply with the values stated in chapter 16..
Reduce dust exposure:
- Some dust created by using this power tool may contain chemicals known to cause cancer, allergic reaction, respiratory disease, birth defects or other reproductive harm. Some examples of such substances are, lead (in paint containing lead), additives used for wood treatment (chromate, wood preservatives), some wood types (such as oak or beech dust).
- The risk from these exposures depends on how long you or bystanders are being exposed.
- Do not let particles enter the body.
- To reduce your exposure to these chemicals: work in a well ventilated area, and work with approved safety equipment, such as dust masks that are specially designed to filter out microscopic particles.
- Observe the relevant guidelines for your material, staff, application and place of application (e.g. occupational health and safety regulations, disposal).
- Collect the generated particles at the source, avoid deposits in the surrounding area.
- Use the supplied dust collection unit and a suitable extraction unit. This ensures that fewer particles enter the environment in an uncontrolled way.
- Reduce dust exposure with the following measures:
– Do not direct the escaping particles and the
exhaust air stream at yourself or nearby persons or on dust deposits.
– Use an extraction unit and/or air purifiers
– Ensure good ventilation of the workplace and
keep clean using a vacuum cleaner Sweeping or blowing stirs up dust
– Vacuum or wash the protective clothing Do not blow, beat or brush
⚠️Hazard generated by modification of the machine or use of parts not tested and approved by the equipment manufacturer!
- Assemble tool in strict accordance with these instructions.
- Use only parts approved by the equipment manufacturer. This applies especially for:
– saw blades (for order numbers, refer to chapter 12. Accessories).
– Safety devices.
– Cutting laser
– Illumination of cutting line - Do not change any parts.
- Ensure that the speed indicated on the saw blade is at least the same as the speed indicated on the saw.
⚠️Hazard generated by tool defects!
- Before every use check tool for possible damage: before operating the tool all safety devices, protective guards or slightly damaged parts need to be checked for proper function as specified. Check to see that all moving parts work properly and do not jam. All parts must be correctly installed and fulfil all conditions necessary to ensure perfect operation of the unit.
- Do not used any damaged or contorted saw blades.
⚠️Risk of injury by noise!
- Wear hearing protection.
⚠️Danger from blocking workpieces or workpiece parts!
If blockage occurs:
- switch machine off,
- Pull the mains plug or remove the detachable battery pack,
- wear gloves,
- clear the blockage using a suitable tool.
2. Special safety instructions for cordless machines:
Remove the battery pack from the machine before making any adjustments, changing tools, maintaining or cleaning.
 Protect battery packs from water and moisture!
 Do not expose battery packs to fire!
Do not use faulty or deformed battery packs!
Do not open battery packs!
Do not touch contacts or short-circuit battery packs!
 A slightly acidic, flammable fluid may leak from defective Li-ion battery packs!
![]() If battery fluid leaks out and comes into contact with your skin, rinse immediately with plenty of water. If battery fluid leaks out and comes into contact with your eyes, wash them with clean water and seek medical attention immediately!
If battery fluid leaks out and comes into contact with your skin, rinse immediately with plenty of water. If battery fluid leaks out and comes into contact with your eyes, wash them with clean water and seek medical attention immediately!
3. Symbols on the machine (depends on model)
 Read the operating instructions.
 Never place hands into running saw blade.
 Wear protective goggles and ear protectors.
 Never operate the tool in a damp or wet environment.
 Laser radiation – Do not look into the light beam.
LASER CLASS 2
4. Safety devices
Retractable blade guard (18)
The retractable blade guard protects against unintentional contact with the saw blade and from chips flying about.
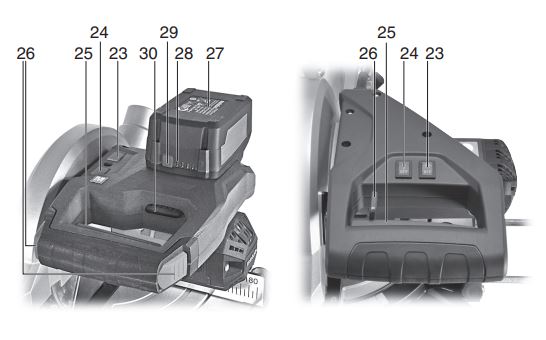
Safety lock (26)
Cordless tools: The machine can only be switched on when the safety lock is activated.
Mains-powered tools: The retractable blade guard opens and the saw can be lowered only when the safety lock is activated.
Parallel guide/ ripping fence (19)
The parallel guide/ ripping fence prevents that the workpiece can be moved during the cutting process. During operation, the parallel guide/ ripping fence always has to be installed.
The additional profile (31) at the parallel guide/ ripping fence has to be moved for inclined cuts after loosening the set screw (32).
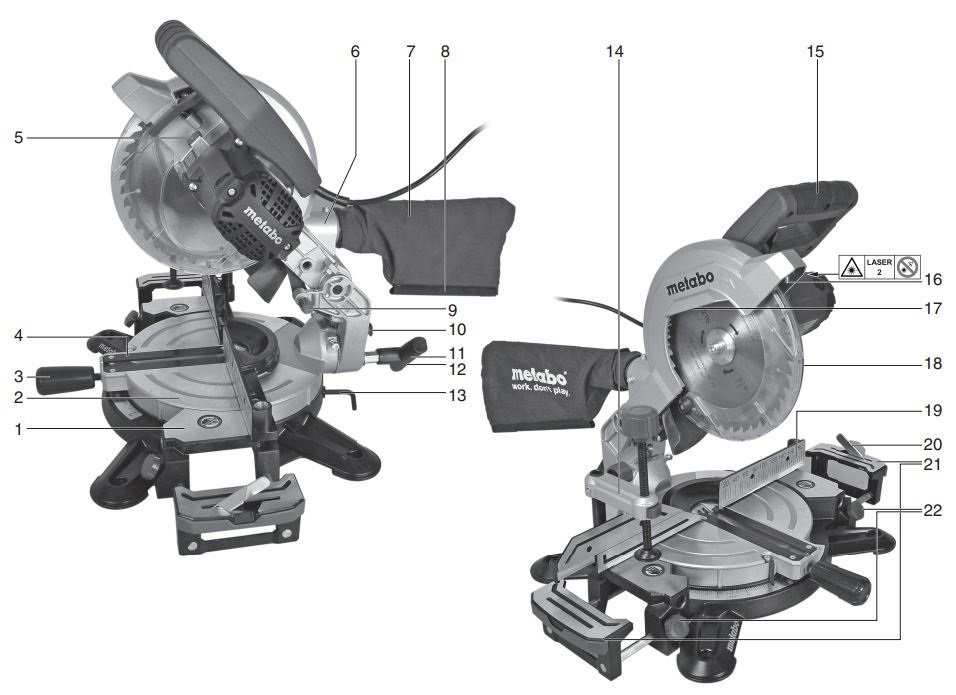
Overview
See page 2.
- Table
- Turntable
- Locking lever for turntable
- Table insert
- Saw blade lock
- Chip extraction nozzle
- Chip bag
- Closing the chip bag
- Transport lock
- Locking button (to extend the angle of inclination by +/- 2 °)
- Locking lever for setting the angle of inclination
- Handle
- Allen key / tool storage for Allen key
- Work clamp
- Saw handle
- Laser beam egress point
- Cutting line illumination
- Retractable blade guard
- Parallel guide / ripping fence
- Longitudinal stop
- Table extension
- Locking screw of the table width extension
- On/off switch of the cutting line illumination
- On/off switch of the cutting laser
- On/off switch of the saw
- Safety lock
- Battery pack*
- Capacity and signal indicator *
- Capacity indicator button *
- Battery pack release button *
* depends on model / equipment
Setup and transport
Install table width extension (21) if required (depending on model)
- Remove right and left table width extension from the transport packaging.
- Remove screws (33) at the guide rails of the right and left table width extension.
- Push the guide rails of the table width extensions completely into the recesses. Insert the table width extension with folding length guide (20) on the right side.
- Lift the device at the front legs, carefully tilt it backwards and put it down so it will not fall over.
- Tighten again the screws (33) at the guide rails.
- Take the front legs of the device, carefully tilt it forwards and put down.
- Set the desired table width and lock the table width extensions with locking screws (22).
Installation
The device has to be mounted on a stable support for safe working.
– The support can be either a firmly mounted work top or work bench.
– Even when machining larger workpieces the device has to have a secure stand.
– Long workpieces must get additional support with suitable accessories.
ℹ️ Note:
For mobile use, the device can also be fixed to a plywood or coreboard panel (500 mm x 500 mm, at least 19 mm thick) using screws. During use, the panel has to be fixed to a work bench using screw clamps.
- Fix device to the support using screws.
- Loosen transport lock (9): Push saw head slightly downwards and hold. Pull out transport lock (9).
- Swivel saw head slightly upwards
Transport
1. Swivel saw head downwards and push in transport lock (9).
 Caution!
Do not hold the saw at the protective installations during transport.
2. Lift the device at the handle (12) and carry it.
The device in detail
1. On/Off switch motor (25)
Switching on the motor:
- Press the on/off switch and keep pressed. Switching off the motor:
- Let go of the on/off switch.
2. On/off switch cutting line illumination (23)
Switching on/ off the illumination of the cutting line.
⚠️Danger!
Do not direct the light beam into the eyes of people or animals.
ℹ️ Note:
Cordless devices: During a short break the cutting line illumination goes off (sleep mode) and is automatically reactivated when resuming work. In case of a long break the cutting line illumination switches off automatically. Reactivation: Use switch (23).
3. On/off switch cutting laser (24)
Switching on/off of the cutting laser.
The cutting laser marks a line to the left of the saw’s cut. Make a trial cut to become familiar with the positioning.
⚠️Danger!
LASER BEAM
DO NOT LOOK INTO THE BEAM
LASER CLASS 2
EN 60825-1:2014
P<1mW, λ=650nm
ℹ️ Note:
Cordless devices: During a short break the cutting laser goes off (sleep mode) and is automatically reactivated when resuming work. In case of a long break the cutting laser switches off. Reactivation: Use switch (24).
4. Setting the angle of inclination
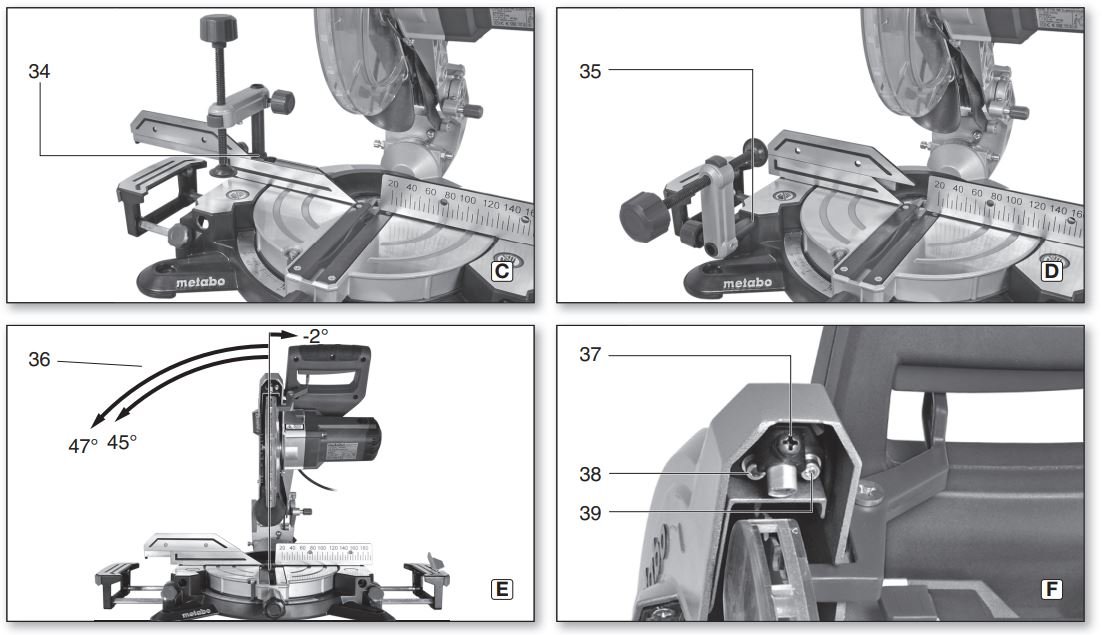
After loosening the locking lever (11), the saw can be infinitely inclined between 0° and 45° to the left of the vertical position (36).
Press the locking button (10) during the adjustment process in order to also set angles up to 47° to the left of the vertical/ up to 2° to the right of the vertical.
⚠️Danger!
In order for the angle of inclination not to change when cutting, the locking lever (11) of the swivel arm has to be tightened.
5. Turntable
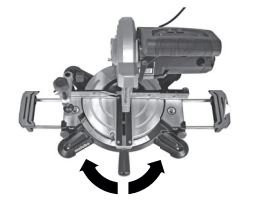
For mitre cuts the turntable can be turned by 47° to the left or by 47° to the right after loosening the locking handle (3). In this manner the cutting angle to the support edge of the workpiece is adjusted.
⚠️Danger!
In order for the mitre angle not to change during cutting, the locking handle (3) of the turntable has to be tightened (also in the stop positions!).
Commissioning
1. Connect chip sack / chip and dust
extraction unit
⚠️Danger!
Dust of certain timber species (e.g. beech, oak, ash) can cause cancer when inhaled.
– Only use a suitable dust extraction unit or installed dust sack.
– In addition, use a dust mask, as not all saw dust is collected or extracted.
– Regularly empty the dust sack. Wear a dust mask while emptying the sack.
If you operate the device with the supplied dust sack:
- Attach the dust sack (7) to the chip extraction adapter nozzle (6). Ensure that the closure (8) of the dust sack is closed. If you connect the device to a dust extraction unit:
- Use a suitable adapter to connect it to the chip extraction adapter nozzle (see chapter 12. “Accessories”).
- Ensure that the dust extraction unit meets the requirements stated in chapter 16. “Technical Specifications”.
- Observe the dust collector’s operating instructions as well!
2. Installing the workpiece clamping device
The workpiece clamping device (14) can be installed in two positions:
– For wide workpieces:
Insert the workpiece clamping device into the rear drilling (34) of the table.
– Fornarrow workpieces:
Insert the workpiece clamping device into the front drilling (35) of the table.
3. For mains powered machines only
⚠️Danger! High voltage
Operate machine only on a power source meeting the following requirements (see also chapter 16. “Technical Specifications”):
– Mains voltage and system frequency must conform to the voltage and frequency shown on the machine´s rating label;
– fuse protection by a residual current operated device (RCD) of 30 mA sensitivity;
– outlets properly installed, earthed or grounded, and tested.
- Position power supply cable so it does not interfere with the work and is not damaged.
- Use only rubber-jacketed extension cables with sufficient lead cross-section (3 × 1.5 mm2).
- Use extension cables for outdoor areas. When working outdoors, only use the correspondingly marked extension cable approved for this purpose.
- Avoid accidental start-up. Ensure that the on/off switch is switched off when inserting the plug in the socket.
4 For cordless machines only
- Avoid accidental start-up. Before fitting the battery pack, make sure that the machine is
switched off. Battery pack Charge the battery pack (27) before use. If performance diminishes, recharge the battery pack.
The ideal storage temperature is between 10°C and 30°C.
Li-Ion battery packs “Li-Power” have a capacity and signal indicator (28):
– Press the button (29), the LEDs indicate the charge level.
– If one LED is flashing, the battery pack is almost flat and must be recharged.
Removing and inserting the battery pack
Removal: Press the battery pack release button (30) and pull out the battery pack (27) towards the rear. To insert: Slide the battery pack (27) in until it engages.
Operation
- Before starting work, check to see that the following are in proper working order.
- Assume proper operating position:
– at the front of the saw;
– in front of the saw;
– next to the line of cut.
⚠️Danger!
If possible, fix the workpiece using the workpiece clamping device (14).
⚠️Danger of crushing!
When inclining or swivelling the saw head, never reach into the hinge area or below the device!
- Hold the saw head during inclination.
- Use during work:
– workpiece support – for long workpieces, if otherwise workpiece would fall off the table after cutting;
– dust sack or dust extraction unit. - Cut only stock of dimensions that allow for safe and secure holding while cutting.
- Always hold the workpiece down on the table and do not jam it. Do not attempt to stop the saw blade by pushing the workpiece against its side. Risk of personal injury if the saw blade is blocked.
1. Straight cuts
Initial position:
– Transport lock (9) pulled out.
– Saw head swivelled upwards.
– Turntable is in 0° position, locking button (3) for turntable is tightened.
– The inclination of the swivel arm to the vertical is 0°, locking lever (11) for inclined position is tightened.
Saw workpiece:
- Push the workpiece against the parallel guide/ ripping fence and clamp using the workpiece clamping device (14).
- Activate the safety lock (26) ,press on/off switch (25) and keep pressed.
- Slowly lower the saw head all the way down at the handle. During the sawing process press on the workpiece just enough for the motor speed not to lower too much.
- Cut the workpiece in one operation.
- Release the on/off switch (25) and slowly let the saw head swivel back into the upper starting position.
2. Mitre cuts
Starting position:
– Transport lock (9) pulled out.
– Saw head swivelled upwards.
– Inclination of the swivel arm to the vertical is 0°, locking lever (11) for inclination setting is tightened.
Cutting the workpiece:
- Unscrew the locking button (3) of the turntable.
- Set the desired angle.
- Tighten the locking button (3) of the turntable.
- Cut workpiece, as described for “Straight cuts”.
3. Inclined cuts
Starting position:
– Transport lock (9) pulled out.
– Saw head swivelled upwards.
– Turntable is in 0° position, locking button (3) for turntable is tightened.
Cutting the workpiece:
- Loosen the locking lever (11) for the inclination setting at the rear side of the saw.
- Slowly tilt the swivel arm into the desired position.
- Tighten the locking lever (11) for the inclination setting.
- Cut the workpiece, as described for “Straight cuts”.
4. Double mitre cuts
ℹ️Note:
The double mitre cut is a combination of mitre cut and inclined cut. This means, the workpiece is cut at an angle to the rear contact edgeand at an angle to the top.
⚠️Danger!
With a double mitre cut, the saw blade is easier accessible due to the steep inclination – this results in a higher risk of injury. Always keep sufficient distance to the saw blade!
Starting position:
– Transport lock (9) pulled out.
– Saw head swivelled upwards.
– Lock the turn table in the desired position.
– Swivel arm inclined at desired angle to the workpiece surface and locked.
Cutting the workpiece:
- Cut the workpiece, as described in “Straight cuts”.
Care and maintenance
⚠️Danger!
Prior to all maintenance and cleaning jobs pull the mains plug or remove the detachable battery pack (27).
– Repair and maintenance work other than described in this section should only be carried out by qualified specialists.
– Replace damaged parts, in particular safety installations, only with original parts. Parts not approved by the equipment manufacturer can cause unforeseeable damage.
– Check that all safety devices are operational again after each service.
1. Saw blade change
⚠️Risk of burning!
Directly after cutting the saw blade can be very hot. Let a hot saw blade cool down. Do not clean the hot saw blade with combustible liquids.
⚠️Risk of injury, even with the blade at standstill!
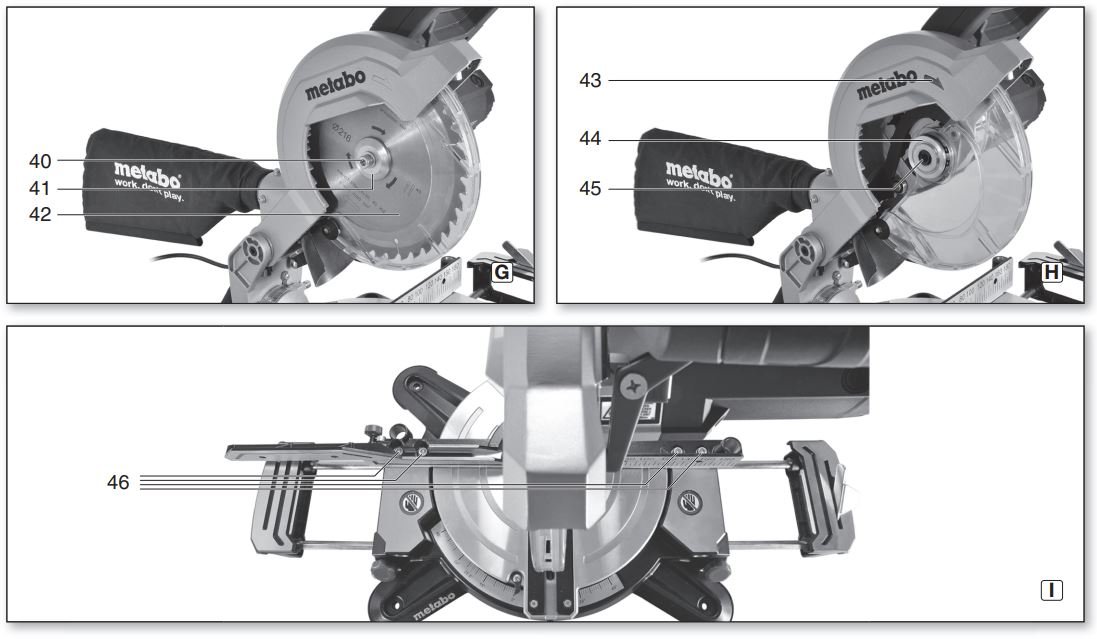
When loosening and tightening the tensioning screw (40) the retractable blade guard (18) has to be swivelled over the saw blade. Wear gloves when changing blades.
- Pull the mains plug or remove the detachable battery pack (27).
- Put the saw head in the upper position.
- Lock saw blade: press the locking button and turn the saw blade with the other hand until the locking button engages. Hold down the locking button.
- Remove the tensioning screw with washer (40) on the saw blade shaft with Allen key (13) in clockwise direction (left-hand thread!).
- Loosen safety lock (26) (only for mainspowered devices) and push retractable blade guard (18) upwards and hold.
- Carefully remove outer flange (41) and saw blade (42) from the saw blade shaft and close again the retractable blade guard.
⚠️Danger!
Do not use cleaning agents (e.g. to remove resin residue) that could corrode the light metal components of the saw; the stability of the saw would be adversely affected. - Cleaning the clamping surfaces:
– Saw blade shaft (45),
– saw blade (42),
– outer flange (41),
– inner flange (44).
⚠️Danger!
Place inner flange properly! If this is not the case, the saw can block or the saw blade could work loose. The inner flange is in the correct position if the ring groove points towards the saw blade and the flat side to the motor. - Put on inner flange (44).
- Loosen safety lock (26) (only for mainspowered devices) and push the retractable blade guard (18) upwards and hold.
- Place a new saw blade – pay attention to direction of rotation: Seen from the left (open) side, the arrow on the saw blade has to correspond to the direction of the arrow (43) on the saw blade cover!
⚠️Danger!
Use only saw blades, which fulfil the requirements and specifications listed in these operating instructions. Use only saw blades designed for the maximum speed (see “Technical Specifications”) – if unsuitable or damaged saw blades parts are used, parts can be ejected due to centrifugal force in an explosive-type manner. Saw blades intended for cutting wood or similar materials have to conform to EN 847-1.
Do not use:
– saw blades made of high-alloy speed steel (HSS);
– damaged saw blades;
– cut-off wheel blades.
⚠️Danger!
– Mount saw blade using only genuine parts.
– Do not use loose-fitting reducing rings; the saw blade could work loose.
– Saw blades have to be mounted in such way that they do not wobble or run out of balance and cannot work loose during operation. - Close again retractable blade guard (18).
- Slide on outer flange (41) – The flat side has to point towards the motor!
- Put on the tensioning screw with the washer
(40)in anti-clockwise direction (left-hand thread) and tighten by hand. - Lock saw blade: press the locking button (5) and turn the saw blade with the other hand until the locking button engages. Hold down the locking button .
⚠️Danger!
– Do not extend the hexagon wrench.
– Do not tighten the tensioning screw by hitting the hexagon wrench. - Firmly tighten the tensioning screw (40) using the hexagon wrench (13).
- Check function. Loosen the safety lock (26)
(only for mains-powered devices) and fold the saw downwards:
– when folding down the retractable blade guard, it has to provide free access to the saw blade without touching other parts.
– When folding the saw upwards into the starting position, the retractable blade guard has to cover the saw blade automatically.
– Rotate the saw blade manually. You should be able to rotate the saw blade into any possible position without touching other parts.
2. Table insert change
⚠️Danger!
With a damaged table insert (4) there is a risk of small parts getting stuck between table insert and saw blade, blocking the saw blade. Replace damaged table inserts immediately!
- Remove screws at table insert. If required, rotate turntable and incline saw head to be able to reach the screws.
- Remove table insert.
- Insert new table insert.
- Tighten the screws at the table insert.
3. Adjust parallel guide/ripping fence
- Loosen Allen screws (46).
- Adjust the parallel guide/ripping fence (19) in such a way that it is exactly perpendicular to the saw blade when the turntable engages in the 0° position.
- Tighten the Allen screws (46).
4. Adjust the cutting laser
Align the laser perpendicularly
– Loosen the middle screw (37). Rotate laser. Tighten the middle screw (37).
Align laser laterally
– Loosen the right (39) and the left screw (38).
Shift the laser horizontally. Tighten the right (39) and left screw (38).
5. Cleaning the tool
Remove chips and saw dust with vacuum cleaner or brush from:
– adjustment installations
– controls;
– motor vent slots;
– space under table insert;
– cutting laser;
– illumination of cutting line
6. Storage of device
⚠️Danger!
- Store the device in such a way that it cannot be put into operation by unauthorised personnel.
- Ensure that the stationary device cannot cause injury.
 Caution!
 - Do not store the tool outdoors or in damp conditions without protection.
7. Maintenance
Prior to each use
- Remove saw chips with vacuum or brush.
- Check power cable and power cable plug or battery pack for damage; if necessary have damaged parts replaced by a qualified electrician.
- Check all movable parts if they can be moved freely across the entire range of movement. Regularly, depending on conditions of use
- Check all screwed joints, retighten if necessary.
- Check reset function of the saw head (saw head has to return to the upper starting position by means of spring force), if required have spring replaced.
- Slighly oil guide elements
Tips and Tricks
– Use appropriate supports on the left and right of the saw for long workpieces.
– Hold workpiece on the right of the saw blade for suitable cuts.
– When cutting small pieces, use additional guide (a suitable wooden board attached with screws to the guide of the device, can be used as additional guide).
– When cutting a curved (contorted) board (47) place the convex side at the parallel guide/ ripping fence.
– Do not cut workpiece upright, but flat on the turntable.
Accessories
Use only genuine Metabo accessories. Use only accessories which fulfil the requirements and specifications listed in these operating instructions.
- Spray for maintenance and care for the removal of resin residues and to preserve the metal surfaces. 0911018691
- Extraction adapter “Multi” for the connection of extraction hoses with 44, 58 or 100 mm adapter 0910058010
- Metabo all-purpose vacuum cleaner (see catalogue)
- Stands:
Universal machine stand UMS 6.3131700
Mobile stand KSU 250 Mobile 6.3131800
Stand KSU 400 0910066110 - Roller stand:
RS 420 0910053353
RS 420 G 0910053345
RS 420 W 0910053361
Saw blades for KS 216 M Lasercut: - Saw blade Power Cut 6.28009
216 × 2.4 / 1.8 × 30 24 WZ 5° neg for longitudinal and transverse cuts in solid wood - Saw blade Precision Cut Classic 6.28060
216 × 2.4 / 1.8 × 30 40 WZ 5° neg for longitudinal and transverse cuts in solid wood and chipboard - Saw blade Multi Cut Classic 6.28066
216 × 2.4 / 1.8 × 30 60 FZ/TZ 5° neg for longitudinal and transverse cuts in coated materials, laminate, plastic and aluminium profiles
Saw blades for KS 18 LTX 216: - Saw blade Precision Cut Classic 6.28065
216 × 1.8 / 1.2 × 30 40 WZ 5°
for longitudinal and transverse cuts in solid wood and chipboard For a complete range of accessories, see www.metabo.com or the catalogue.
Repairs
⚠️Danger!
Repair of power tools must be carried out by qualified electricians only!
If you have Metabo power tools that require repairs, please contact your Metabo service centre. For addresses see www.metabo.com.
You can download a list of spare parts from www.metabo.com.
Environmental Protection
Observe national regulations on environmentally compatible disposal and on the recycling of disused machines, packaging and accessories.
![]() Only for EU countries: Never dispose of power tools in your household waste! In accordance with European Directive 2002/ 96/EC on waste electrical and electronic equipment and its implementation in national legal systems, used power tools must be collected separately and handed in for environmentally compatible recycling.
Only for EU countries: Never dispose of power tools in your household waste! In accordance with European Directive 2002/ 96/EC on waste electrical and electronic equipment and its implementation in national legal systems, used power tools must be collected separately and handed in for environmentally compatible recycling.
Troubleshooting
Following you will find a description of problems and faults that you may remedy yourself. If the corrective measures described here do not help, kindly refer to chapter 13. “Repairs”.
⚠️Danger!
There are particularly many accidents in connection with problems and faults. Therefore keep in mind:
- Prior to each correction of faults, pull the mains plug or remove the detachable battery pack (27).
- Check that all safety devices are operational again after each fault service.
No trimming function
Transport lock activated:
- pull out transport lock. Safety lock activated:
- loosen safety lock.
Cutting power too low
Saw blade blunt (possibly tempering marks on blade body);
Saw blade unsuitable for the material (see chapter 12. “Accessories”);
Saw blade contorted:
- Replace saw blade (see chapter 10. “Maintenance”).
Saw vibrates a lot
Saw blade contorted:
- Replace saw blade (see chapter 10. “Maintenance”). Saw blade not installed properly:
- Install saw blade properly (see chapter 10. “Maintenance”).
Turntable hard to turn
Chips under turntable:
- remove chips.
Technical Specifications
Explanatory notes on the specifications on page 3. Changes due to technological progress reserved.
U =mains voltage / voltage of battery pack
I =rated power
F =min. fuse protection
P1 =rated input power
IP =protection class
n0 =no-load speed
v0 =max. cutting speed
D =saw blade diameter (outer)
d =saw blade hole (inside)
b = max. tooth width of the saw blade
A =dimensions (lxwxh)
m =weight
Requirements for chip and dust extraction unit:
D1 =connection diameter of the extraction nozzle
D2 =minimum air throughput
D3 =minimum negative pressure at extraction nozzle
D4 =minimum air speed at extraction nozzle
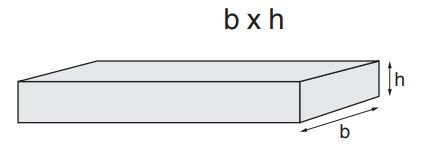
Maximum cross-section of workpiece, see table
on page 4.
~ AC Power
![]() Direct current
Direct current
![]() Machine in protection class II
Machine in protection class II
The technical specifications quoted are subject to tolerances (in compliance with the relevant valid standards).
⚠️Emission values
These values make it possible to assess the emissions from the power tool and to compare different power tools. Depending on the operating conditions, the condition of the power tool or the accessories, the actual load may be higher or lower. For assessment purposes, please allow for breaks and periods when the load is lower. Based
on the adjusted estimates, arrange protective measures for the user e.g. organisational measures.
Typical A-effective perceived sound levels:
LpA =sound-pressure level
LWA =acoustic power level
KpA, KWA= uncertainty
⚠️Wear ear protectors!
Download Manual PDF
metabo KS 216 M LASERCUT 619216000 MITRE SAW
User Manual PDF Download
