CaddxFPV Peanut Action FPV Camera User Manual
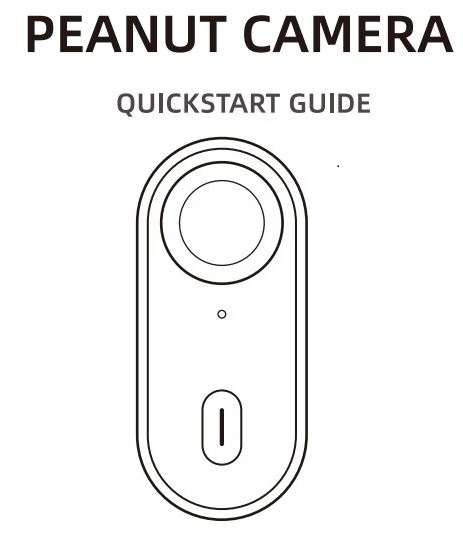
Button Instructions
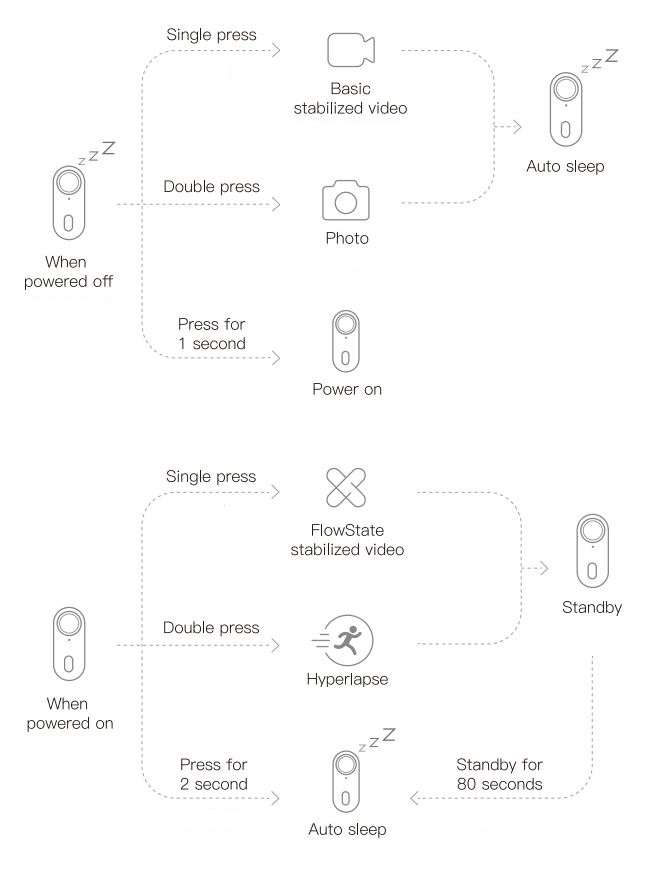
* Connect the camera to the app to customize the button functions.
* If camera is unresponsive press for 6s seconds power off
Packing List
1* Peanut Camera
1* Mount Adapter
1* Power Connector
1* USB Connector
2* Mx1.25 3-Pin Power Cable
1* 2S-6S Step-down Module
1* ND 8 Filter
1* ND 16 Filter
1* Pack of Camera Mount Screws and Nuts
1* User Manual
1* Wiping Cloth
Introduction
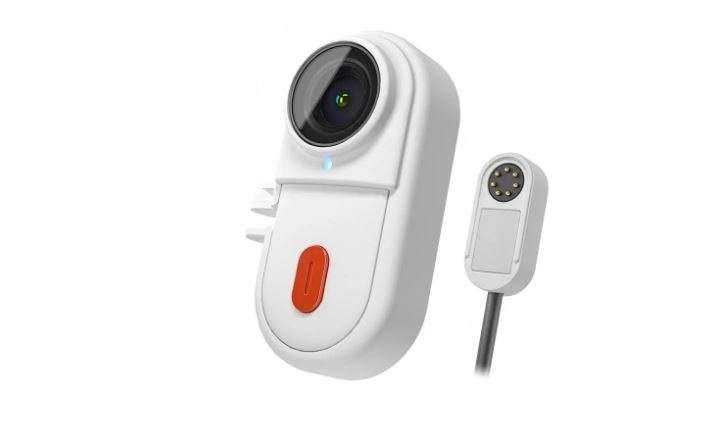
Peanut is developed and customized based on the lnsta360 go2 product, and its functions are roughly the same. You can refer to the official instar tutorial.
■ Peanut camera

■ Power connector

■ USB connector

Wiring
The power connector can be powered by an external power supply and remotely control the camera, please read the relevant precautions.
■ Remote Control Configuration
Peanut camera uses two power supply modes: built-in battery and 5V external power supply. The Peanut camera supports remote control of the camera’s power on/off and start/stop of the video recording through the controller. The following example uses the Betaflight F405 flight controller to explain how to configure the remote control to turn the video recording function on/off. The connection diagram is shown in the figure below. Use the TX1 pin on the flight controller to control the recording. and connect the white wire. If you use a different flight controller, different TX pads may be available instead of TX1 and they may use different resource assignments. You will need to adjust the configuration accordingly for your specific flight controller.
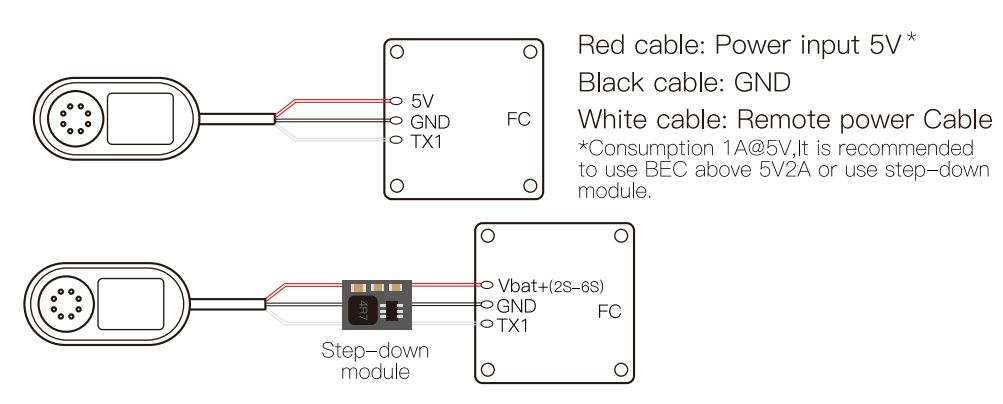
Configure the PINIO function of TX1 pin through the following Betaflight commands.
resource SERIAL_ TX 1 NONE // Turn off the serial port function of TX1 spindle
resource PINIO 1 A09 // Configure the TX1 pin (A09 pin) as the No. 1 PINIO function
set pinio_box = 40,255,255,255 //Set PINIO function interval
save //Save configuration
The following diagram configures the PINIO function mapping relationship between the remote control and the flight control. In Betaflight Configuration, the PINIO function No. 1 (ie USER1 in the figure below) corresponds to the AUX channel of the remote control.

To activate or deactivate functions on the camera, you will need to move the switch from inactive (white area) to the active state (yellow areal and then back to the inactive state (white area).
Your f1ight controller and radio controller switch configuration must match the setup of your own equipment. Make sure you know what you are doing before configuring. If you do not use the remote control function, cut or insulate the White wires separately and do not connect to any location.
■ Mounting connection
Attach the power connector and USB connector to the back cover of the Peanut fuselage to connect. Avoid debris on the surface of the magnet from affecting the contact effect. The power connector is not suitable for drones with violent movements and severe vibrations. Otherwise, accidents will occur if Mounting falls off.

Specification
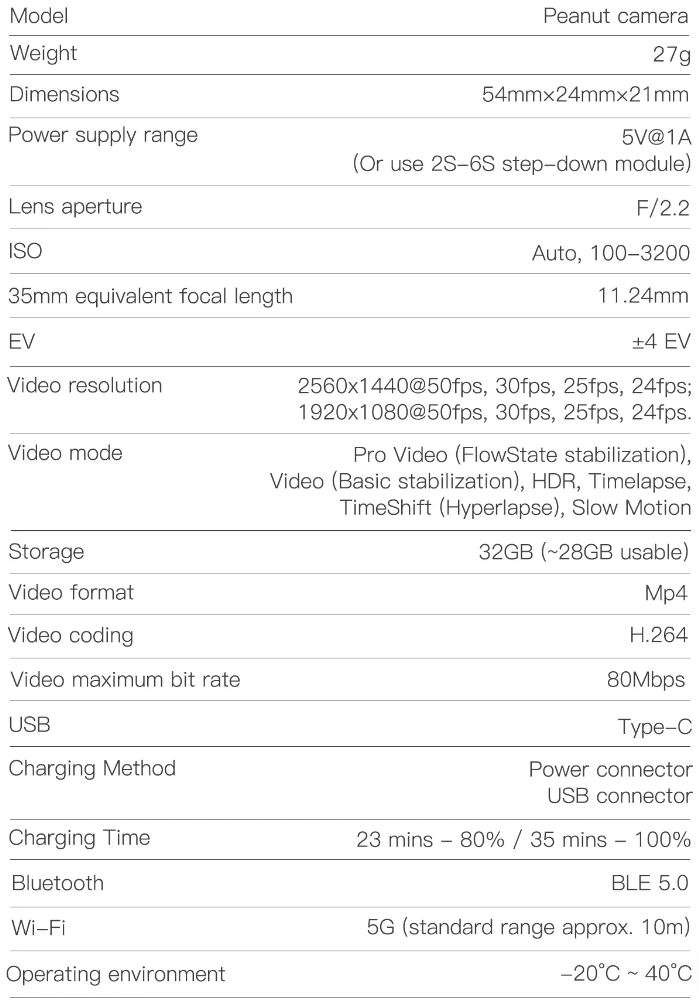
Downloading the App & Activating
Step1: Scan the QR Code (https://www.insta360.com/download/insta360-go2) or search “Insta360” in the App Store or other Android App Stores to download the Insta360 App.

Step2: Turn on your mobile device’s WiFi Then long press the Action Button for 1 second to power on camera
Step3: Open the lnsta360 app, tap the camera icon at the bottom of the app homepage, swipe until you see GO 2 and tap “Connect Now”. Select the device you want to connect to and follow the onscreen instructions to complete the connection. The name of your camera is “GO 2****-k-k”, The first time you connect to camera, please single press its Action Button to confirm your connection.
Step4: After successfully connecting the camera, follow the app prompts to activate your camera. The app will prompt you to update the firmware if there is a new version available. Please follow the on-screen prompts to update the firmware of camera.
Shooting
Refer to the “Button Instructions” card included in the box for instructions on how to use peanut Action Button .You can customize the Action Button’s basic functions to your preference in the app. For more product information, visit: https://www.insta360.com/support/product-support
Previewing via the App
After shooting, connect your camera to the lnsta360 app and go to the Album page to view your clips. You can also take photos or videos via the app and preview your shot in real-time. Note! As system flies and cache take up some memory, the actual available storage space will be slightly less than the total memory.
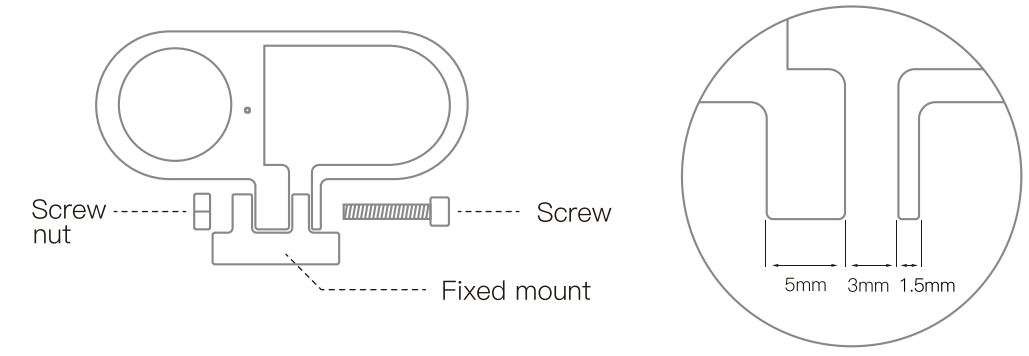
Mount Adapter
The camera mount adapter can protect the camera from falling to damage . You need to choose a suitable base to install it when you use it .
Notes
Accessories:
- peanut and its accessories contain small objects. Keep them out of children’s reach to prevent swallowing.
- Avoid using all accessories in high-speed or high-intensity environments, otherwise your camera or accessories may fall off.
- Keep the surface of the magnet clean to prevent poor contact.
Updating the firmware:
- Before use, please update the firmware of camera.
- Before updating, ensure camera remaining power is not less than 1 0%.
- How to update via your computer(U-disk mode):
Step 1: Download the latest firmware from lnsta360’s official website.
Step 2: usb connection to your computer, Make sure the camera is turned on
Step 3: Copy the “lnstaGo2FW.pkg”flle you’ve downloaded to your camera directly. Delete the old “pkg” file first if there in one.
Step 4: When disconnected from the computer, the camera will automatically turn off. Turning on the camera again will automatically start the upgrade, and a slow f1ashing cyan light will appear .. (For more information on updating the firmware, visit: https://onlinemanual.lnsta360.com/go2/en-us/camera/flrmware)
Indicator status:
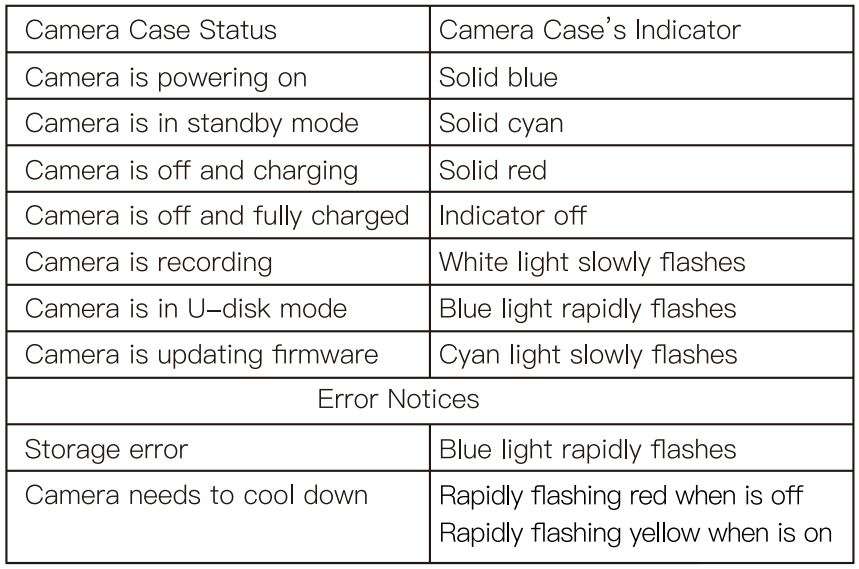
WiFi Connection:
The effective WiFi connection range range is 33 feet (10 meters) in optimal conditions.(For more information on updating the firmware, visit: https://onlinemanual.insta360.com/go2/en-us/faq/connecting/WiFi)
This content is subject to change.
Download the latest version from https://www.caddxfpv.com/pega/download
Download PDF
CaddxFPV Peanut Action FPV Camera User Manual PDF Download
