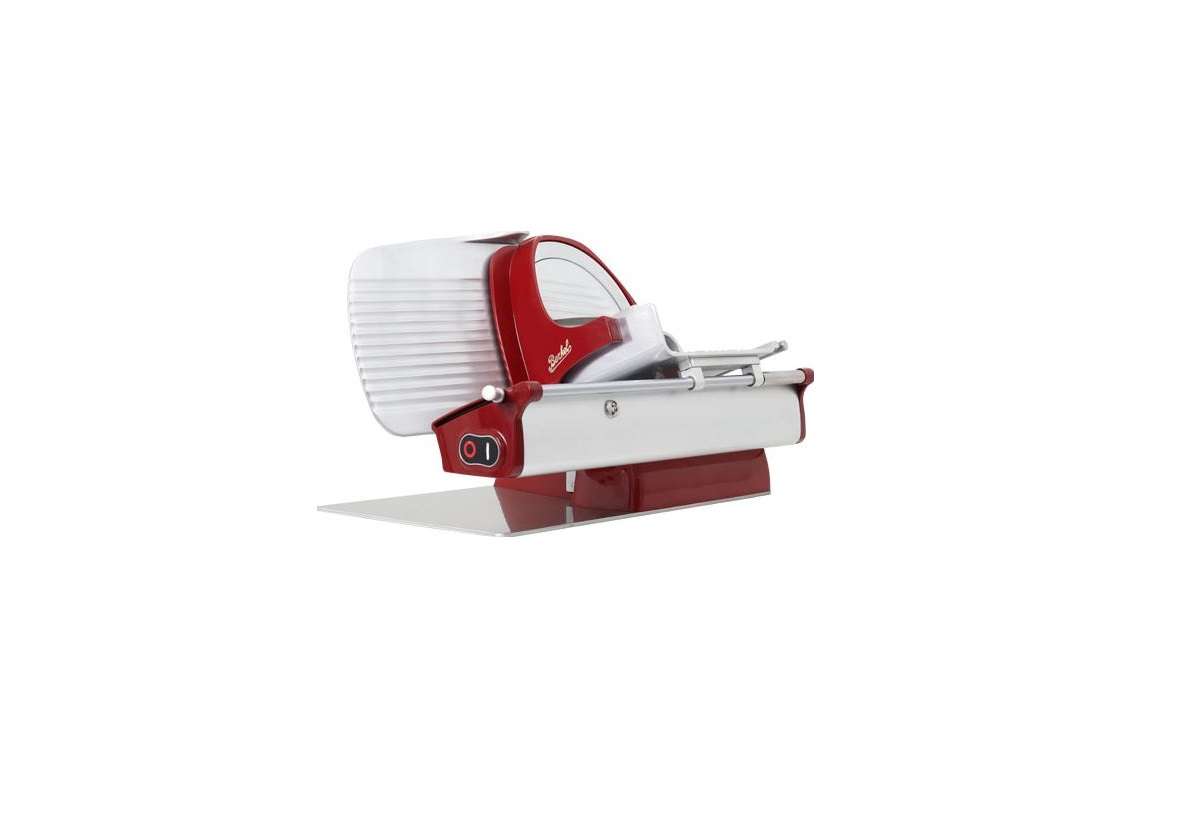
OMCAN 10-INCH HOME LINE 250 MEAT
SLICER RED User Manual

[email protected]
www.omcan.com
General Information
Omcan Manufacturing and Distributing Company Inc., Food Machinery of America, Inc. dba Omcan and Omcan Inc. are not responsible for any harm or injury caused due to any person’s improper or negligent use of this equipment. The product shall only be operated by someone over the age of 18, of sound mind, and not under the influence of any drugs or alcohol, who has been trained in the correct operation of this machine, and is wearing authorized, proper safety clothing. Any modification to the machine voids any warranty, and may cause harm to individuals using the machine or in the vicinity of the machine while in operation.
CHECK PACKAGE UPON ARRIVAL
Upon receipt of an Omcan shipment please inspect for external damage. If no damage is evident on the external packaging, open carton to ensure all ordered items are within the box, and there is no concealed damage to the machine. If the package has suffered rough handling, bumps or damage (visible or concealed), please note it on the bill of lading before accepting the delivery and contact Omcan within 24 hours, so we may initiate a claim with the carrier. A detailed report on the extent of the damage caused to the machine must be filled out within three days, from the delivery date shown in the shipping documents. Omcan has no recourse for damaged products that were shipped collect or third party.
Before operating any equipment, always read and familiarize yourself with all operation and safety instructions.
Omcan would like to thank you for purchasing this machine. It’s of the utmost importance to save these instructions for future reference. Also save the original box and packaging for shipping the equipment if servicing or returning of the machine is required.
Safety and Warranty
WARNING! CUTTING RISK
WARNING: The blade is very sharp, like a knife. For any cleaning and maintenance operation that involves dismantling of the blade, make sure to pay extra attention to keep hands far away from the edge of the blade itself. Always use protective, cut resistant gloves. To remove the blade, always use the blade extractor. Always hold the blade by the blade extractor only. Make sure nobody gets close to the blade when extracted.
SAFETY
Please observe the following instructions for your safety:
- Carefully read all instructions before using the machine.
- The product is not intended to be used by children.
- Use the machine only if you have been properly trained and are in perfect psychological and physical condition.
- Do not use the machine in any way other than as described in this manual.
- Install the machine in conformity to the instructions indicated in the “Installation” section.
- Install the machine in a location out of the reach of personnel not authorised to operate it.
- Stay highly concentrated when using the machine and avoid any distraction during use.
- Do not allow the machine to be used by personnel who have not read and fully comprehended the content of this manual.
- Do not wear baggy clothing or clothing with open sleeves.
- Do not allow anyone besides the operator to approach during product cutting operations.
- Do not remove, cover or modify the tags located on the machine body and, in case of damage of these, replace them promptly.
- Do not remove the transparent protections and do not modify or bypass the mechanical and electrical protective devices.
- Slice only the permitted products. Do not attempt cuts on prohibited type products.
- Always keep the sliced product resting surface, the work area all around the machine and the operator floor area clean and dry.
- Do not use the machine as a resting surface and do not place any objects on it which are foreign to normal cutting operations.
- Do not use the slicer when, due to normal wear, the distance between the edge of the blade and the blade protection exceeds 5 mm.
- In this case, contact the manufacturer or an Authorised Service Centre to change the blade.
- Do not use the machine with “movable” type electrical connections, with temporary or non insulated cables.
- Periodically check the condition of the power cable and the cable gland on the machine body. Replace it promptly when necessary, requesting operation by qualified personnel.
- Immediately stop the machine in the event of a defect, abnormal operation, suspicion of breakdown, incorrect movement, unusual noises.
- Before cleaning or carrying out maintenance, disconnect the machine from the electrical mains.
- Use protective gloves for the cleaning and maintenance operations.
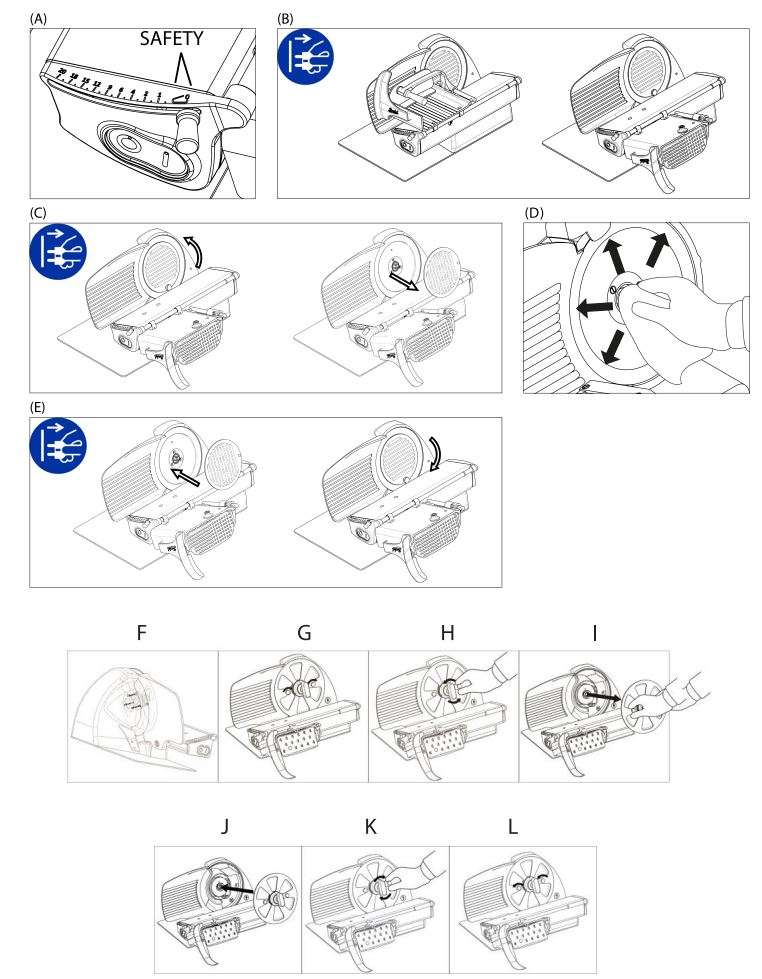
- Place and remove the goods to be sliced on the sliding meat table only with the carriage completely pulled back and with the thickness adjustment lever placed in the safety position (Fig. A).
- For movement of the meat table during cutting operations use only the manoeuvring handle located on the arm or the product holder grip.
- Use of cutting accessories which were not provided by the manufacturer with the machine is prohibited.
- The device cannot be used without the meat table or product holder.
The manufacturer declines any direct and indirect responsibility stemming from inappropriate use, unauthorized modifications and/or repair carried out on the machine, or use of non original accessories and replacement parts. The machine may not be used in open areas and/or areas which are exposed to atmospheric agents and in environments with vapors, fumes or corrosive and/or abrasive powders, with risk of
fire or explosion and in any case where the use of anti-explosive components is required.
ENVIRONMENTAL CONDITIONS OF USE:
- Temperature from -5°C to +40°C.
- Humidity 95%.
DO NOT SLICE:
- Frozen food products.
- Deep frozen food products.
- Any other product not intended for food use.
WARNING! The motor may overheat! After 15 minutes of continuous use, switch off the machine and let the motor cool.
The blade can sever parts of the body. For this reason, never extend hands into the cutting area between the gauge plate and the blade if the thickness adjustment lever (5) is not in the safety position (in position 0) (Fig. A).
Take extreme care to keep hands as far away as possible from the cutting area during blade cleaning and sharpening. The use of protective gloves is recommended.
RESIDENTIAL USERS: Vendor assumes no liability for parts or labor coverage for component failure or other damages resulting from installation in non-commercial or residential applications. The right is reserved to deny shipment for residential usage; if this occurs, you will be notified as soon as possible.
1 YEAR PARTS AND LABOUR WARRANTY
Within the warranty period, contact Omcan Inc. at 1-800-465-0234 to schedule an Omcan authorized service technician to repair the equipment locally.
Unauthorized maintenance will void the warranty. Warranty covers electrical and part failures not improper use.
Please see https://omcan.com/disclaimer for complete info.
WARNING:
The packaging components are classified as normal solid urban waste and can therefore be disposed of without difficulty.
In any case, for suitable recycling, we suggest disposing of the products separately (differentiated waste) according to the current norms.
DO NOT DISCARD ANY PACKAGING MATERIALS IN THE ENVIRONMENT!
Technical Specifications
| Model | MS-IN-0250H-R | MS-IN-0250H-BK |
| Color | Red | Black |
| Power | 0.19 kW | |
| Electrical | 115V / 60Hz / 1 | |
| Blade | 9.8” / 250mm | |
| Cutting Size | 7.9” x 7.2” / 200 x 183mm | |
| 7.2” / 183mm | ||
| Cut Thickness | 0 – 0.9” / 0 – 20mm | |
| Dimensions | 13.4” x 17.7” x 13.9” / 340 x 450 x 353mm | |
| Weight | 32 lbs. / 14.5 kgs. | |
| Item Number | 47111 | 47113 |
Installation
Install the machine on a level, smooth and dry surface suitable for supporting the weight of the machine itself plus the products to be sliced.
WARNING: Verify that there are no obstacles to table travel and to the loading of products to be sliced onto the table itself.
The machine must be installed in the immediate vicinity of an EEC standard outlet connected to a system which is in conformity with the prevailing regulations and which has:
- Magneto-thermic protection.
- Automatic differential switch.
- Earthing system.
Before carrying out electrical hook up verify that the characteristics of the electrical power mains are in agreement with those indicated on the machine information plate.
Operation
WARNING! Blade is sharp, cutting hazard! Check that the slice thickness adjustment knob (5) is in the safety position (in position 0) (Fig. A).
- Pull the meat table (8) back all the way toward the operator, in the loading position.
- Lift the product holder (9) and put it into the standby position.
- Rest the product to be sliced on the table near the vertical edge of the table (8) on the operator side. Block it with the product holder, applying slight pressure.
- Adjust the slice thickness. Activate the blade (10) by pressing the on button. Grip the product holder handle (14) and begin alternative cutting motion.
- At the end of cutting operations return the slice thickness adjustment knob to the safety position and pull the carriage back. Stop the blade motion by pressing the off button (2).
Maintenance
CLEANING
Keep the machine thoroughly clean. If used, it should be cleaned at least once a day and more often if necessary. After a period of inactivity, the machine should also be cleaned before use.
Risk of electric shock! Before cleaning the machine, disconnect the plug from the electrical mains socket and return the slice thickness adjustment knob to the safety position.
WARNING! Blade is sharp, cutting hazard! Check that the slice thickness adjustment knob (5) is in the safety position (in position 0) (Fig. A).
CLEANING PRODUCTS
Use only water and biodegradable foaming detergent for dishwashers with PH 7-8, using a soft, spongy cloth and a semi-rigid nylon brush for the sharp areas of the table and product holder. Do not clean the machine with jets of water or steam or similar methods.
TABLE TILTING FOR CLEANING OPERATIONS
- Make sure that the machine is switched off.
- Make sure that the lever is closed.
- Pull the meat table (8) back all the way toward the operator.
- Gradually push the table upward, rotating it clockwise.
WARNING! Blade is sharp, cutting hazard! Always return the table to its initial position so that the protection (7) is as close to possible as the gauge plate (Fig. B).
REMOVING
THE BLADE COVER
- Rotate the blade cover 90° anticlockwise using the special knob
- A spring facilitates the extraction of the blade cover (Fig. C),
THE PRODUCT HOLDER
- Unscrew the product holder handle in the anticlockwise direction until the product holder is completely removed.
WARNING! Blade is sharp, cutting hazard! Use protective gloves when cleaning sharpening areas, the table, the product holder and the blade.
CLEANING THE BLADE
Press a damp cloth on the surface of the blade and move it slowly from the centre toward the outside, as shown in the figure (Fig. D), on the blade cover side and the opposite side. In the same way, dry it using a dry cloth.
CLEANING THE MACHINE BODY
Clean the machine body with a damp cloth or a sponge, rinsing with water. Dry carefully.
ASSEMBLE THE BLADE COVER
- Replace the blade cover as in the figure.
- Rotate the blade cover 90° clockwise until it locks into its initial position (Fig. E).
ASSEMBLE THE MEAT TABLE
Lift the meat table and move it to the cutting position, pressing down lightly until it clicks.
BLADE MAINTENANCE
Cleanse the blade regularly to keep it sharp and functional. Do not wash the blade in the dishwasher.
BLADE EXTRACTION
Extract the blade and clean the inside. Handle the blade with great care and always use the specific extractor.
Remove the blade cover from the machine and apply the blade extractor following the steps below:
- Align the three pins of the blade extractor with the three holes of the blade-locking ring (Fig. F).
- Screw the two knobs into the threaded holes on the blade (Fig. G).
- Turn the blade extractor knob counterclockwise while holding one of the two knobs (Fig. H).
- Remove the blade using the extractor two knobs (Fig. I)
Insert the blade proceeding as follows:
- Insert the blade on the pulley using the blade extractor (Fig. J).
- Turn the blade extractor knob clockwise while holding one of the two extractor knobs (Fig. K).
- Unscrew the two knobs and remove the blade extractor (Fig. L).
WARNING: The blade is very sharp, like a knife. For any cleaning and maintenance operation that involves dismantling of the blade, make sure to pay extra attention to keep hands far away from the edge of the blade itself. Always use protective, cut resistant gloves. To remove the blade, always use the specific blade extractor as indicated in this instruction manual. Always hold the blade by the blade extractor only. Make sure nobody gets close to the blade when extracted.
SHARPENING
SAFETY
For your safety, we recommend that you carefully read the instructions in the machine Operating manual before using the sharpener.
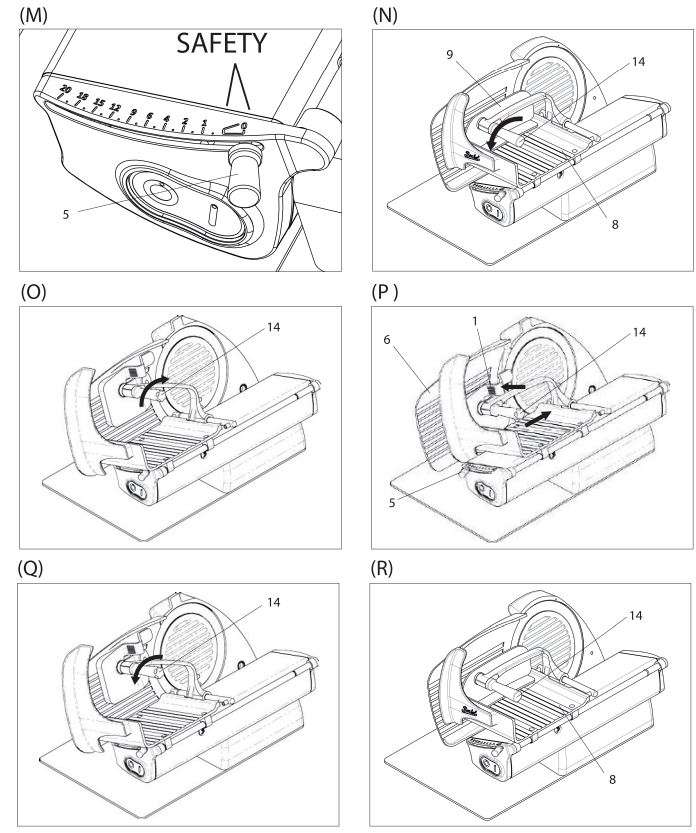
CAUTION! Blade can cut body parts! Never place hands in the cutting area between the gauge plate and the blade if the thickness adjustment lever (5) is not in the safety position (Fig. M). During blade cleaning and sharpening, be extremely careful to keep hands as far away from the unprotected area as possible. Use of protective gloves is recommended.
USE OF THE SHARPENER
Follow the instructions below for sharpening:
- Position the slice thickness adjuster knob (5) (Fig. M) in the safety position (in position 0).
- Pull the meat table (8) all the way back toward the operator.
- Start removing the meat table, unscrewing the meat table clamp (14) in the anticlockwise direction until the meat table has been completely removed (Fig. N).
- Assemble the sharpener in position, screwing the meat table clamp (14) (Fig. O) in the clockwise position.
- Set the slice thickness adjustment knob (5) in position 20 and move the sharpener toward the gauge plate (6).
- Activate the blade by pressing the start button.
- Sharpen the blade, moving the sharpening wheel against the blade for 10-15 seconds, using the meat table clamp (14) and applying slight pressure (Fig. P).
CAUTION! Excessive pressure may affect sharpening. - Press the finishing wheel button (1) for 2-3 seconds and pull the meat table (8) all the way back toward the operator.
- Move the sharpener away from the gauge plate (6), position the slice thickness adjuster knob (5) in the safety position (in position 0) (Fig. M).
- Start removing the sharpener, unscrewing the meat table clamp (14) in the anticlockwise direction until the sharpener has been completely removed (Fig. Q).
- Start assembling the meat table (9), screwing the meat table clamp (14) (Fig. R) in the clockwise position.
SERVICE
No replacement parts are supplied in the package. All repair and replacement activities (such as replacement or repair of the blade, belt, electrical components, structural parts, etc.) must be carried out solely by persons authorised by Omcan. If a repair is required, it is advisable to return the machine to Omcan or to an Authorised Service Centre. For information about services centres, contact: [email protected]
WARNING! The blade must be replaced when the distance between the edge of the blade itself and the internal edge of the protection exceeds 5mm.
Troubleshooting
| PROBLEM | PROBABLE CAUSE | REMEDY |
| The machine does not start when the on button is pressed. | No power or defective control circuit. | Check if the plug has been inserted correctly. Contact a Service Centre if the problem persists. |
| When the start button is pressed, the machine starts but the operation indicator light does not switch on. | Defective indicator light. | Do not use the machine with the indicator light off. Contact a service centre. |
| When the stop button is pressed, the machine does not stop. | Defective control circuit. | Immediately stop the machine by pulling the plug out of the socket and immediately contact a service centre. |
| Excessive resistance to sliding component movement (product holder, carriage). | Sliding guide lubrication not performed periodically. | Perform periodic lubrication. |
Figure Drawings

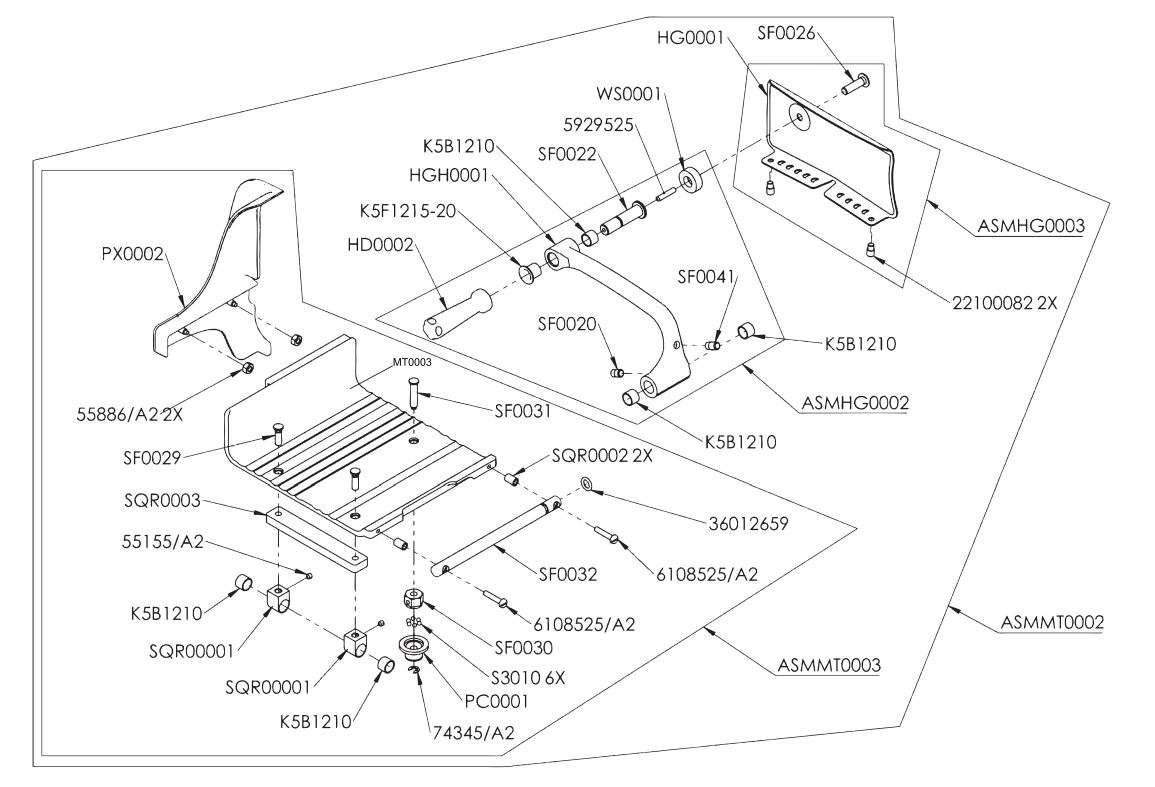
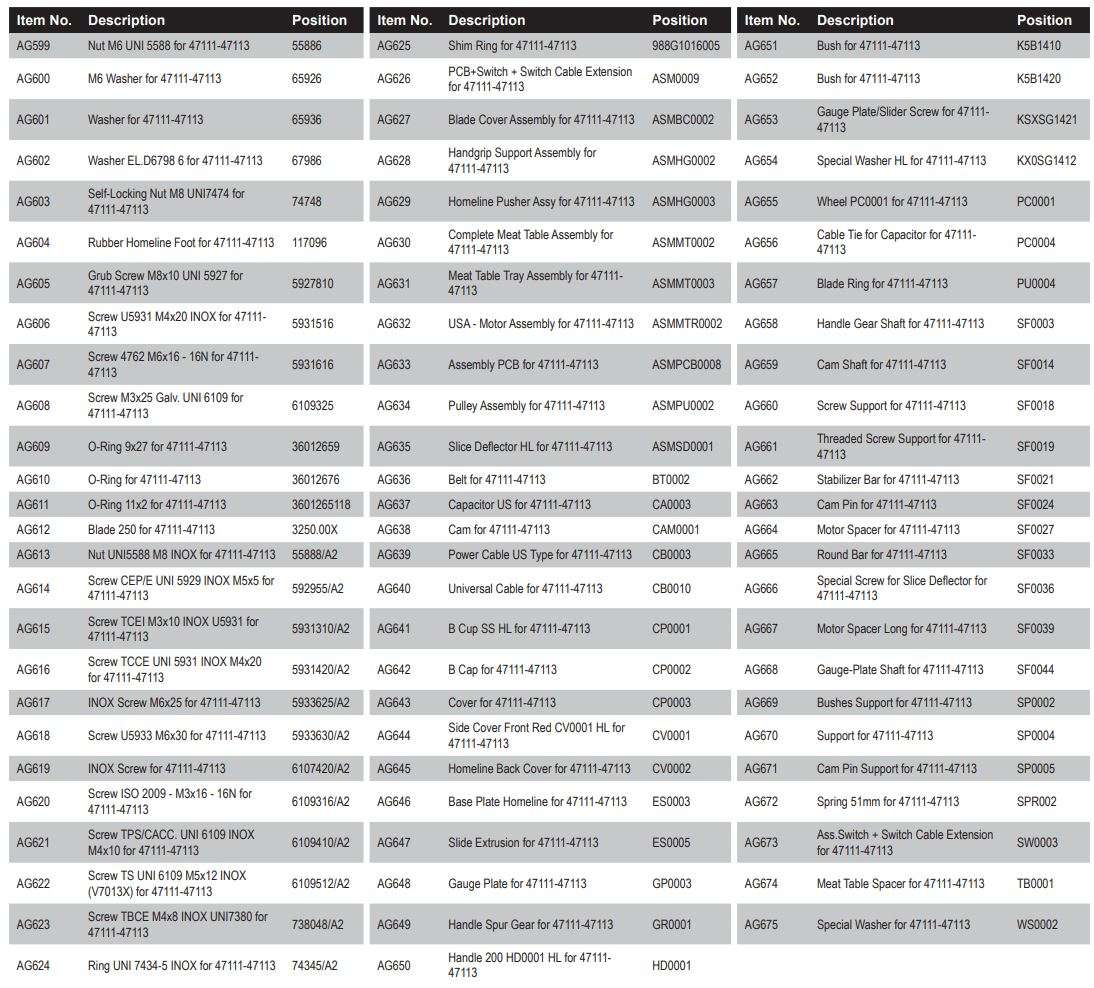
Parts Breakdown
Model MS-IN-0250H-R 47111
Model MS-IN-0250H-BK 47113
Model MS-IN-0250H-R 47111
Model MS-IN-0250H-BK 47113
Model MS-IN-0250H-R 47111
Model MS-IN-0250H-BK 47113
Model MS-IN-0250H-R 47111
Model MS-IN-0250H-BK 47113
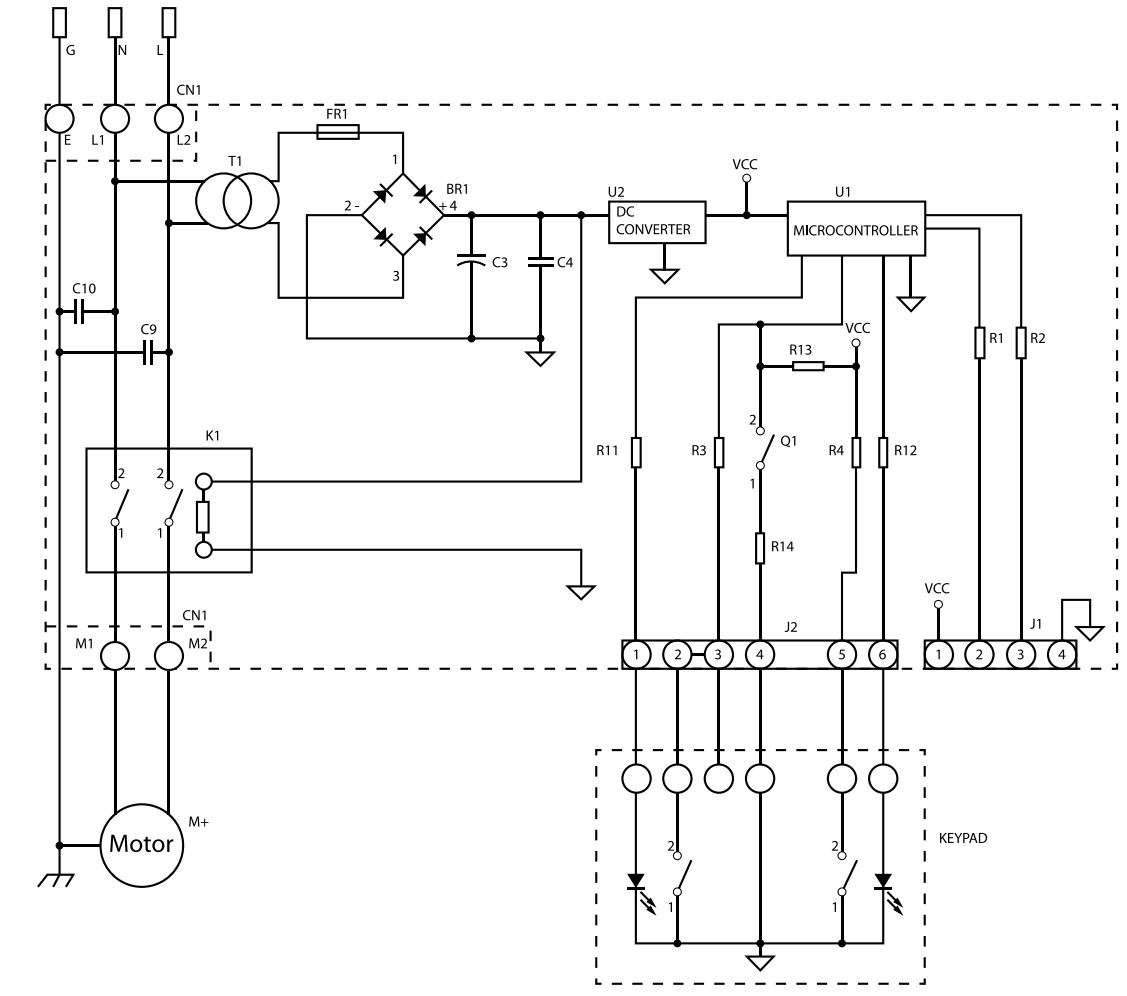
Electrical Schematics
Model MS-IN-0250H-R 47111
Model MS-IN-0250H-BK 47113
Notes
___________________________________________________________________________________________________________________________________________________________________________________________________________________________________________________________________________________________________________________________________________________________________________________________________________________________________________________________________________________________________________________________________________________________________________________________________________________________________________________________________________________________________________________________________________________________________________________________________________________________________________________________________________________________________________________________________________________________________________________________________________________________________________________________________________________________________________________________________________________________________________________________________________________________________________________________________________________________________________________
Warranty Registration
Thank you for purchasing an Omcan product. To register your warranty for this product, complete the information below, tear off the card at the perforation and then send to the address specified below. You can also register online by visiting: https://omcan.com/warranty-registration/
For mailing in Canada
OMCAN
PRODUCT WARRANTY REGISTRATION
3115 Pepper Mill Court,
Mississauga, Ontario Canada, L5L 4X5
For mailing in the US
OMCAN
PRODUCT WARRANTY REGISTRATION
4450 Witmer Industrial Estates, Unit 4, Niagara Falls, New York
USA, 14305
or email to: [email protected]


Since 1951 Omcan has grown to become a leading distributor of equipment and supplies to the North American food service industry. Our success over these many years can be attributed to our commitment to strengthen and develop new and existing relationships with our valued customers and manufacturers. Today with partners in North America, Europe, Asia and South America, we continually work to improve and grow the company. We strive to offer customers exceptional value through our qualified local sales and service representatives who provide convenient access to over 5,000 globally sourced products.


Download PDF
OMCAN 10-INCH HOME LINE 250 MEAT
SLICER RED User Manual PDF Download
