Tunstall my Portal Software User Manual
Welcome to myPortal
Designed just for Tunstall customers, myPortal keeps you connected with our care technology. Tunstall customers are entitled to a complementary account with access to all standard features. With myPortal you can be certain that your clients are receiving the best of care. myPortal enables care providers to view clients across all their regions or focus on individual homes. The power of myPortal is its uniform reporting across all Tunstall manufactured and thirdparty approved devices, a unique approach for the industry.
How can I access myPortal?
myPortal is a fully responsive web application which means you can use it on any type of device without installing any special software. All you need is a web browser and an internet connection.
Creating an account
You can talk to the Tunstall Key Accounts team to have your first account issued.
Logging in
- Navigate to this website with either a Google Chrome or Apple Safari browser: https://myportal.tunstallhealthcare.com.au/login
- Enter your work email address that you use to correspond with Tunstall. Important: make sure you use all lowercase.
- Enter the password you were issued by your Tunstall Key Accounts contact.
- Press Login.
What can it do?
Notifications
Our notification feature will send you an optional email and/or SMS as soon as Tunstall responds to a request for assistance. From here you can access myPortal and see a summary of what happened.
Real-time Situational Awareness
A real-time recent activations map populates with animated dots to highlight any user initiated activity with our care technology. Green dots are non-emergency activity and red dots highlight that an incident has occurred at that location. Our incident view shows a chronological list of all resident interactions that have resulted in assistive action. This can be drilled down to detail each of the steps that Tunstall took to deliver care.
Report Types
Standard reporting
Four standard reports that can be tweaked to suit your needs:
- People Monitored – a list of all residents and their contact details.
- No Contact – A list of all residents who have not used their alarms.
- User Activations – A list of every user-initiated interaction with our care technology e.g. fall detector, integral button, pendant.
- Status Updates – A list of hardware-initiated events from our care technology e.g. Mains failed, Mains restored.

Each of these reports can be run at any time over a day, week, month, 2 months, or 3 months. They can also be instantly filtered and searched as well as exported to CSV for ultimate flexibility.
1 – People Monitored
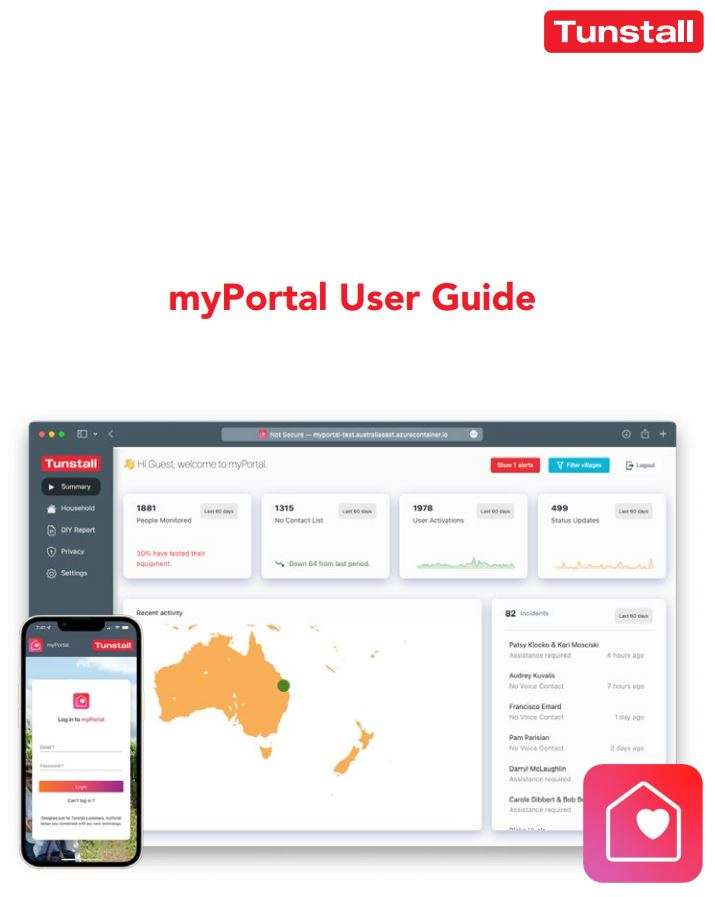
This is the first standard report and is available from the first widget at the top left of the myPortal Home Screen.
Widget
In the example image above we can see there are 3 pieces of information available from the widget.
- The total number of residents monitored by Tunstall. “1881” in the example.
- The period over which this report has been run. “Last 60 days” in the example.
- The percentage of residents who have tested their equipment in the last period. “30% in the last 60 days” in the example.
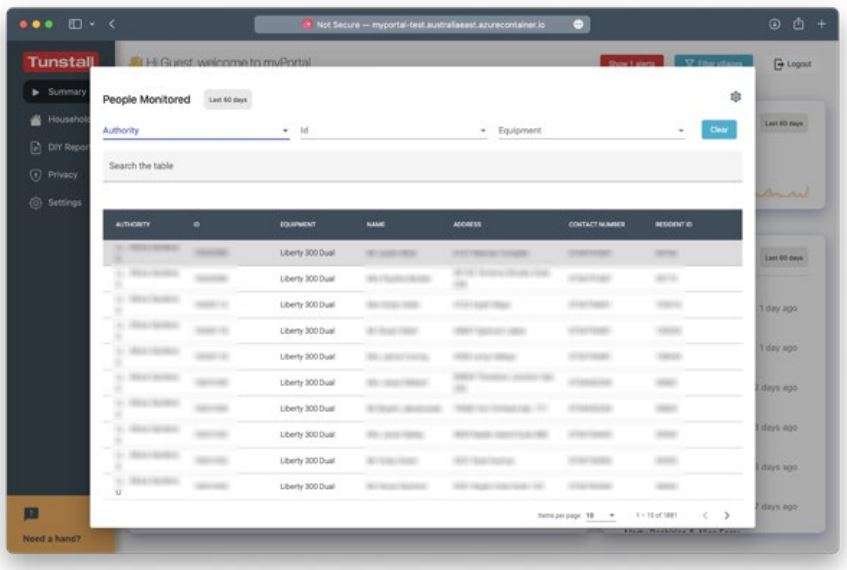
Clicking on the People Monitored widget will launch the report:
Report Features
The report can be filtered by Authority, ID or Equipment type. It can also be searched to find specific customers or addresses – or any other information in the report. Press the blue Clear button to remove any previous filters or searches. By default the report is paged with 10 entries per page. This can be increased using the dropdown selector at the bottom of the report. Alternatively you can export the entire report to CSV by clicking the red export button (scroll down on the report if you cannot see it). If you click on an individual row of the report you will be taken to the myportal Household view to see additional information about this resident/equipment.
Customising
Pressing the cog in the top right of the report will allow you to perform the following edits:
- Rename the report from “People Monitored” to anything you like.
- Choose which of the default columns to show/hide.
- Authority – Usually the Village name as used by Tunstall.
- ID – A unique Tunstall identifier for this customer.
- Equipment – The name for the type of device this customer has.
- Name – The name of the customer our service is registered to.
- Address – The address our service is registered to.
- Contact Number – The mobile contact number listed for this resident/address.
- Resident ID – A secondary ID for identifying this customer.
2 – No Contact List
This is the second standard report and is available from the second widget at the top left of the myPortal Home Screen.
Widget
There are 3 pieces of information available from the widget.
- The number of residents who did not test in the last period. “1315” in the example at top of page.
- The period over which this report has been run. “Last 60 days” in the example at top of page.
- The change in residents who tested this period compared to last. 71 additional residents tested this period in the example at top of page.
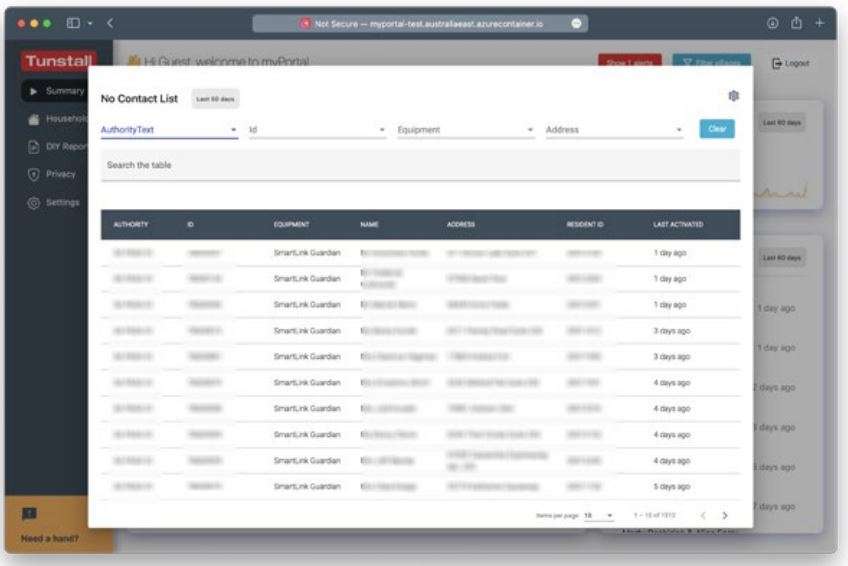
Clicking on the No Contact widget will launch the report:
Report Features
The report can be filtered by Authority, ID, Equipment type, and Address. It can also be searched to find specific customers – or any other information in the report. Press the blue Clear button to remove any previous filters or searches.
By default the report is paged with 10 entries per page. This can be increased using the dropdown selector at the bottom of the report. Alternatively you can export the entire report to CSV by clicking the red export button (scroll down on the report if you cannot see it).
If you click on an individual row of the report you will be taken to the myportal Household view to see additional information about this resident/equipment. 6
Customising
Pressing the cog in the top right of the report will allow you to perform the following edits:
- Rename the report from “No Contact List” to anything you like.
- Choose which of the default columns to show/hide.
- Authority – Usually the Village name as used by Tunstall.
- ID – A unique Tunstall identifier for this customer.
- Equipment – The name for the type of device this customer has.
- Name – The name of the customer our service is registered to.
- Address – The address our service is registered to.
- Resident ID – A secondary ID for identifying this customer.
- Last Activated – The date and time of the last user activation of this device.
3 – User Activations
This is the third standard report and is available from the third widget at the top left of the myPortal Home Screen.
Widget
There are 3 pieces of information available from the widget.
- The number of resident activations in the last period. “1978” in the example at top of page.
- The period over which this report has been run. “Last 60 days” in the example at top of page.
- A day-to-day sparkling showing the history of activations over the period. Clicking on a peak or trough on this line will open the User Activations report with it pre-filtered to show just that day.
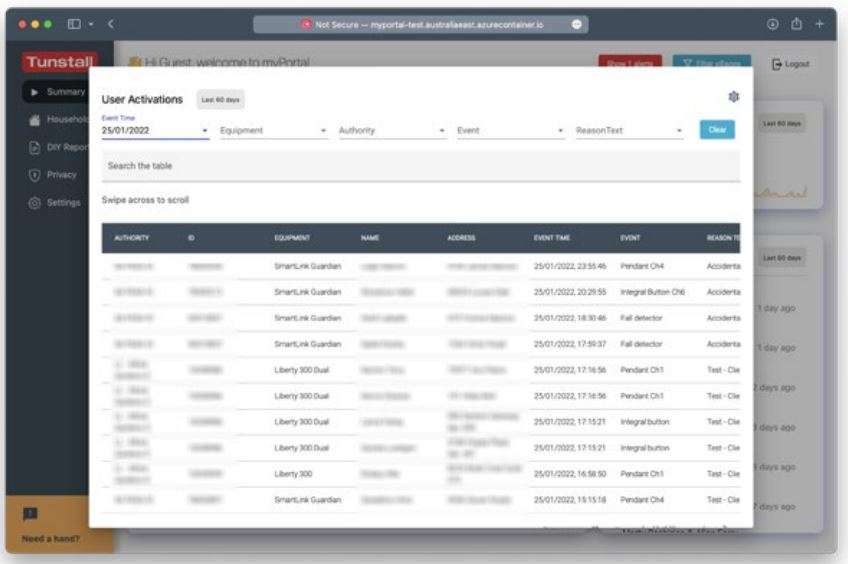
Clicking on the User Activations widget will launch the report:
Report Features
The report can be filtered by Event Time, Equipment, Authority, Event and Reason Text. It can also be searched to find specific customers – or any other information in the report. Press the blue Clear button to remove any previous filters or searches.
By default the report is paged with 10 entries per page. This can be increased using the dropdown selector at the bottom of the report. Alternatively you can export the entire report to CSV by clicking the red export button (scroll down on the report if you cannot see it).
If you click on an individual row of the report you will be taken to the myportal Household view to see additional information about this resident/equipment.
Customising
Pressing the cog in the top right of the report will allow you to perform the following edits:
- Rename the report from “User Activations” to anything you like.
- Choose which of the default columns to show/hide.
- Authority – Usually the Village name as used by Tunstall.
- ID – A unique Tunstall identifier for this customer.
- Equipment – The name for the type of device this customer has.
- Name – The name of the customer our service is registered to.
- Address – The address our service is registered to.
- Event Time – The timestamp of the event.
- Event – A simple description of what raised the event.
- Reason Text – A simple description of why the event was raised.
- Resident ID – A secondary ID for identifying this customer.
4 – Status Updates
This is the fourth and final standard report and is available from the fourth widget at the top left of the myPortal Home Screen.
Widget
There are 3 pieces of information available from the widget.
- The number of status updates in the last period. “499” in the example at top of page.
- The period over which this report has been run. “Last 60 days” in the example at top of page.
- A day-to-day sparkling showing the history of status updates over the period. Clicking on a peak or trough on this line will open the Status Updates report with it pre-filtered to show just that day.
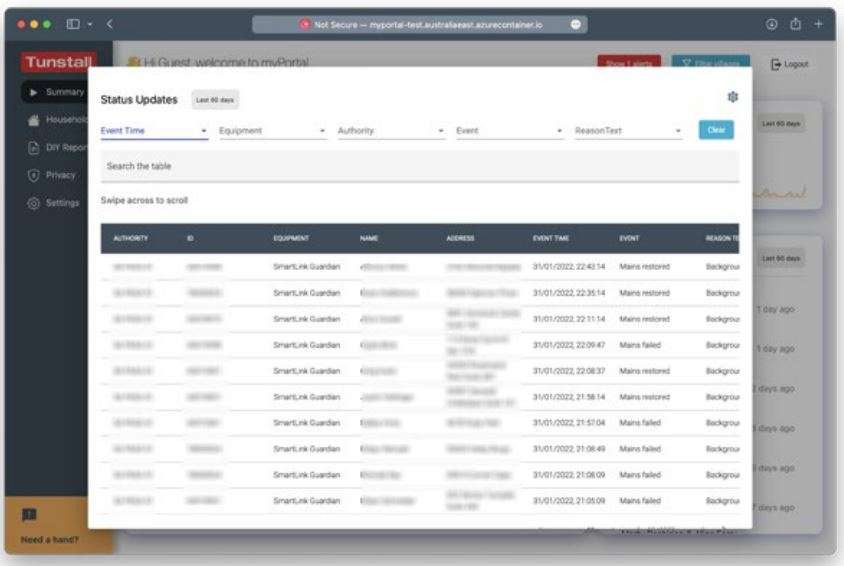
Clicking on the Status Updates widget will launch the report:
Report Features
The report can be filtered by Event Time, Equipment, Authority, Event and Reason Text. It can also be searched to find specific customers – or any other information in the report. Press the blue Clear button to remove any previous filters or searches. By default the report is paged with 10 entries per page. This can be increased using the dropdown selector at the bottom of the report. Alternatively you can export the entire report to CSV by clicking the red export button (scroll down on the report if you cannot see it). If you click on an individual row of the report you will be taken to the myportal Household view to see additional information about this resident/equipment.
Customising
Pressing the cog in the top right of the report will allow you to perform the following edits:
- Rename the report from “Status Updates” to anything you like.
- Choose which of the default columns to show/hide.
- Authority – Usually the Village name as used by Tunstall.
- ID – A unique Tunstall identifier for this customer.
- Equipment – The name for the type of device this customer has.
- Name – The name of the customer our service is registered to.
- Address – The address our service is registered to.
- Event Time – The timestamp of the event.
- Event – A simple description of what raised the event.
- Reason Text – A simple description of why the event was raised.
- Resident ID – A secondary ID for identifying this customer.
myPortal Incidents
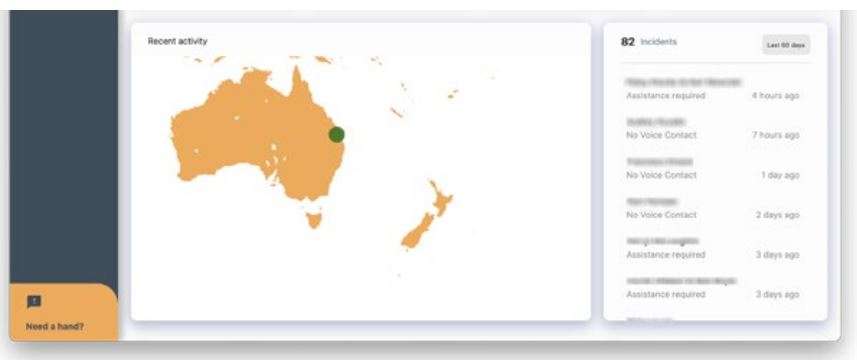
The bottom half of the myPortal dashboard shows a Recent activity and Incident widget.
Recent activity
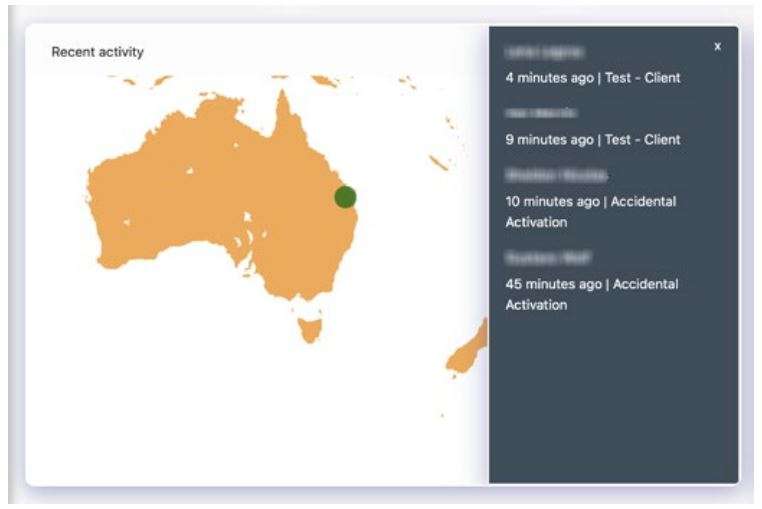
This widget shows all activity from your villages in the last hour. Any activation (accidental, test or assist) will show as a geolocated dot on the map. Clicking on a dot will open a side bar that details all the activity that occurred in the area.
Green dots will appear for non-emergency activity, red dots will appear if Tunstall took assistive action. The map can be panned and zoomed using the mouse and scroll wheel.
Incidents
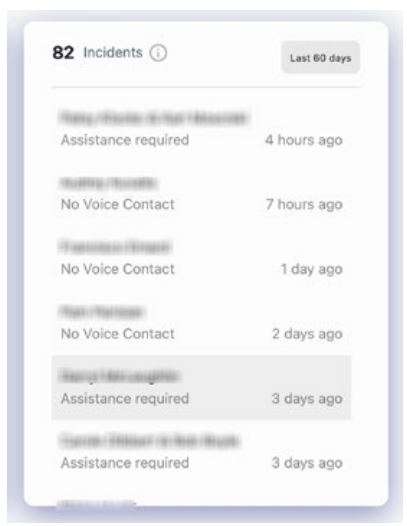
The incident widget shows the total number of incidents that have occurred in the last period. That is 82 in the last 60 days in the example above. Incidents are defined as events that required Tunstall to take assistive action;
- Confirming wellbeing of resident, and/or
- Contacting emergency contacts or village manager, and/or
- Organising emergency services.
Clicking on an incident from the list will drill down to show you the timeline of events. The incident duration is the amount of time that elapsed from the first contact with Tunstall (i.e. button push or fall detected) until the completion of assistance. Incident timelines can be exported to CSV. For privacy reasons Tunstall will not share details of the care provided (i.e. you will might that we contacted an Emergency Contact, but not who or what was said).
DIY reporting
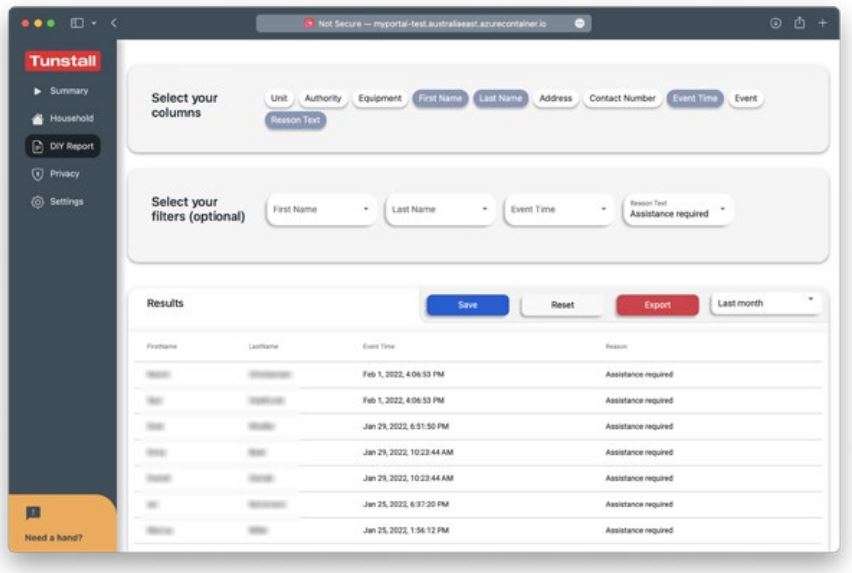
A DIY report tool to generate specific reports, exactly as you need them. This tool enables you to run reports whenever you like, save a favourite template, and export data to CSV.
Creating a custom report
myPortal allows customers to use a simple interface and create an entirely custom report. Depending on the number of residents and timeframe it might take a while for data to be fetched securely. Reports can be created on desktop or tablet, there is typically not sufficient screen space to do this on mobile.
Reports can be edited and generated at any time – and can be exported to CSV. Your report will be automatically generated in real-time as you make column and filtering choices.
- Click on “DIY Report” in the menu on the left.
- As guided by the interface you can select the columns of interest for your report.
- Next you will be asked to choose any filters for the columns. These are not required but may help you make a specific type of report.
- There is a combo box on the right of the Results table that allows you to choose the time period over which to run the report (last day, last 3 days, last week, last month, last 2 months, last 3 months). Changing this will cause your page to disappear if more data needs to be fetched. The page will return once data has loaded.
- Press Save to keep the columns, filters and timeframe saved for next time. Or click Reset to return the report to default settings.
- You may Export the data in the report as CSV by pressing Export.
Household view
This part of myPortal is improving all the time and shows detailed information about the resident and their device/s.
Household allows village managers to search for individual homes and see more detail on the residents and their hardware.
This view is intended to form the basis of a new “End User” account type. Tunstall customers and their carers will be able to log in to myPortal and just see information about themselves and their hardware.
Finding a household
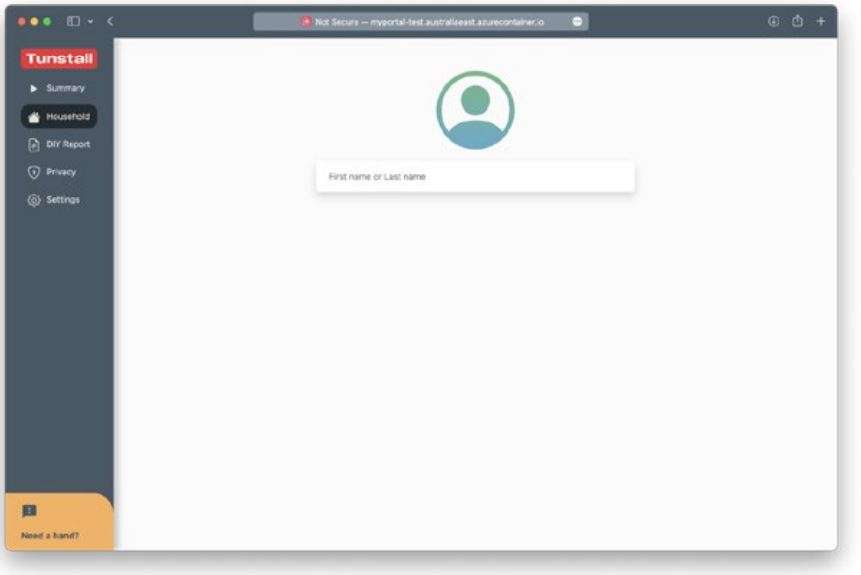
Household view is accessible from the menu on the left (or bottom of the screen for mobile users). Typing the first or last name of a resident in the search box will autocomplete and suggest names and addresses. Click or press enter to select that household.
Alternatively clicking a row in any of the four standard reports on the myPortal homepage will automatically load household view for that resident.
Understanding Households
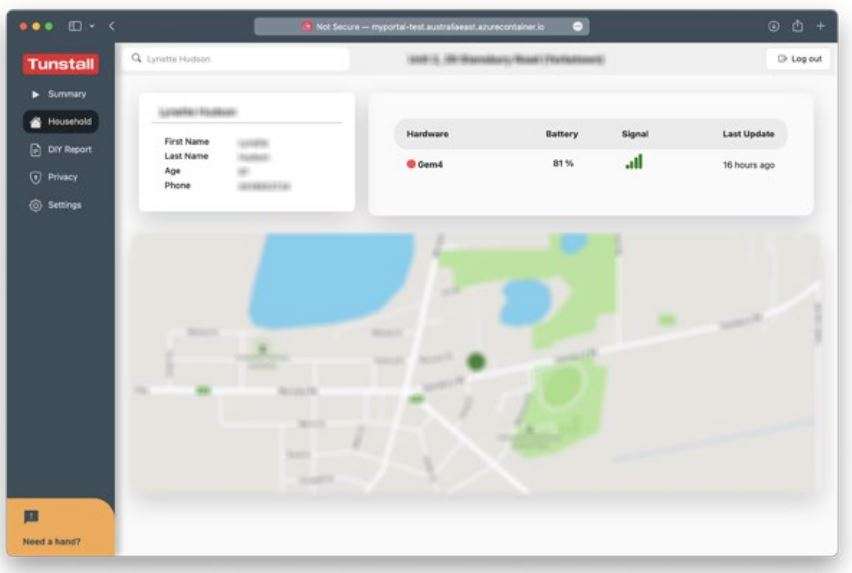
Households currently contain limited information – but this will be enhanced over time. Today you can see:
- 1x card for each resident in the household.
- Resident name
- Resident age
- Contact number 13
- 1x card for each piece of hardware in the household.
- Gem4 supports status information including location.
- Support for status information for PERS dependent on model type.
A coloured indicator next to each piece of hardware will indicate its overall status. Green means good, yellow means an update is overdue, red means the device is offline. Grey means that no status information is available.
myPortal User Settings
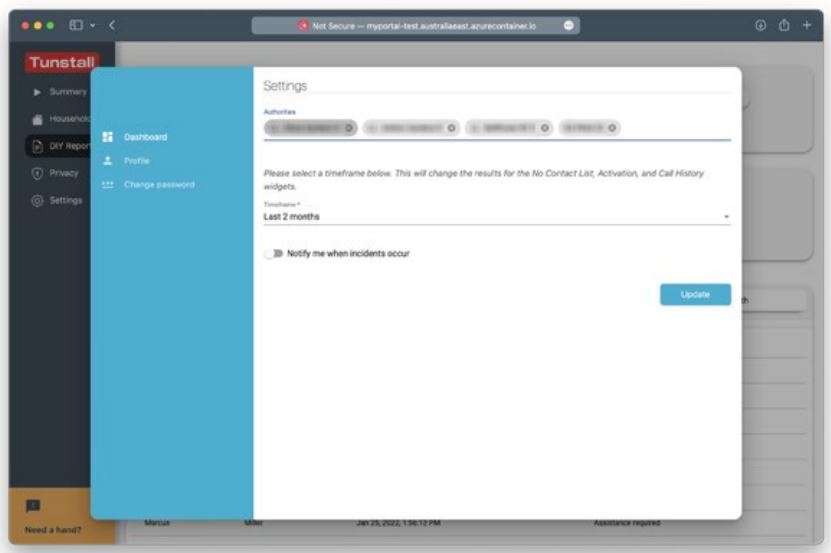
Enabling notifications myPortal can send you an email or SMS when a new incident occurs. Only one mobile number or email address is supported – and it is the one attached to the myPortal account.
- Click Settings in the menu on the left (on the bottom for mobile users).
- Click the slider next to “Notify me when incidents occur.”
- Choose either Email or SMS from the dropdown menu that appears.
Adjusting reporting period
The default reporting period used for the four standard myPortal reports may be configured to either last day, last 3 days, last week, last month, last 2 months, or last 3 months.
- Click Settings in the menu on the left (on the bottom for mobile users).
- Choose your preferred period from Timeframe dropdown menu.
Updating personal details
- Click Settings in the menu on the left (on the bottom for mobile users).
- Click the Profile menu option.
- Update your name, mobile, landline and email address as required.
- Press Update.
Changing password
- Click Settings in the menu on the left (on the bottom for mobile users).
- Click the Change password menu option.
- Enter a new password into both fields.
- Press Update.
myPortal Troubleshooting
Incorrect email or password
The email address field is case sensitive. Users must enter their email address exactly as it was registered with myPortal. This usually means all lower case letters.
Confirm weblink
Be sure that this address is used: http://myportal.tunstallhealthcare.com.au/login (it is important to confirm the URL includes “/login”).
Clearing web browser cache
Generally problems accessing or logging into myPortal can be resolved by clearing the web browser cache. This forces the device used to download all myPortal files again – which can help resolve problems after a myPortal update.
Google Chrome
On PC:
- At the top right, click More .
- Click More tools Clear browsing data.
- At the top, choose a time range. To delete everything, select All time.
- Next to “Cookies and other site data” and “Cached images and files,” check the boxes.
- Click Clear data.
Safari
On Mac:
- Close the myPortal tab in Safari.
- Click Safari in the menu bar and click Preferences…
- Click the Privacy tab.
- Click the Manage Website Data… button.
- Search for “myPortal”.
- Click Remove All.
On iPhone/iPad:
- Close the myPortal website in Safari.
- Open the Settings app.
- Swipe down to find Safari.
- Swipe down to find Advanced.
- Touch Website Data.
- Use the search bar to find “myPortal”.
- Swipe from right to left on any myPortal entries and touch Delete.
Microsoft Edge
On PC:
- Open Microsoft Edge, select Menu (3 dots icon on top right corner of the browser) > Settings > Privacy & services.
- Under Clear browsing data, select Choose what to clear.
- Select “Cached images and files” and “Cookies and other site data” check box and then select Clear.
Internet Explorer
Customers should be encouraged to use Chrome or Safari browsers. Internet Explorer is a retired browser.
How is privacy handled?
myPortal is an ultra-secure web application built leveraging the latest cloud technologies. All sessions are encrypted, and customer data is firewalled. Updates to the core platform are pushed regularly and silently to everyone is always using the latest features and most secure version.
myPortal accounts are linked to single users and are not to be shared amongst staff. myPortal will also automatically lock itself if left unattended for even a short period of time.
Contact Details
Tunstall Australasia Pty Ltd ABN 44 059 121 863
Locked Bag 1, 985 Kingsford Smith Drive Eagle Farm QLD 4009 AUSTRALIA
Telephone: 1800 603 377
Fax: 1800 435 570
Sales enquiries: [email protected]
Support enquiries: [email protected] www.tunstallhealthcare.com.au
Tunstall New Zealand Ltd Business No. 3502431
PO Box 13153
Tauranga 3110 NEW ZEALAND
Telephone: 0800 488 678
Fax: 07 571 2685
Sales enquiries: [email protected]
Support enquiries: [email protected]
www.tunstall.co.nz
Our policy of continual development means that product specifications and appearance may change without notice. Tunstall does not accept any responsibility for any errors and omissions contained within this document.
© 2021 Tunstall Australasia Pty Ltd
®Tunstall is registered trademark.


