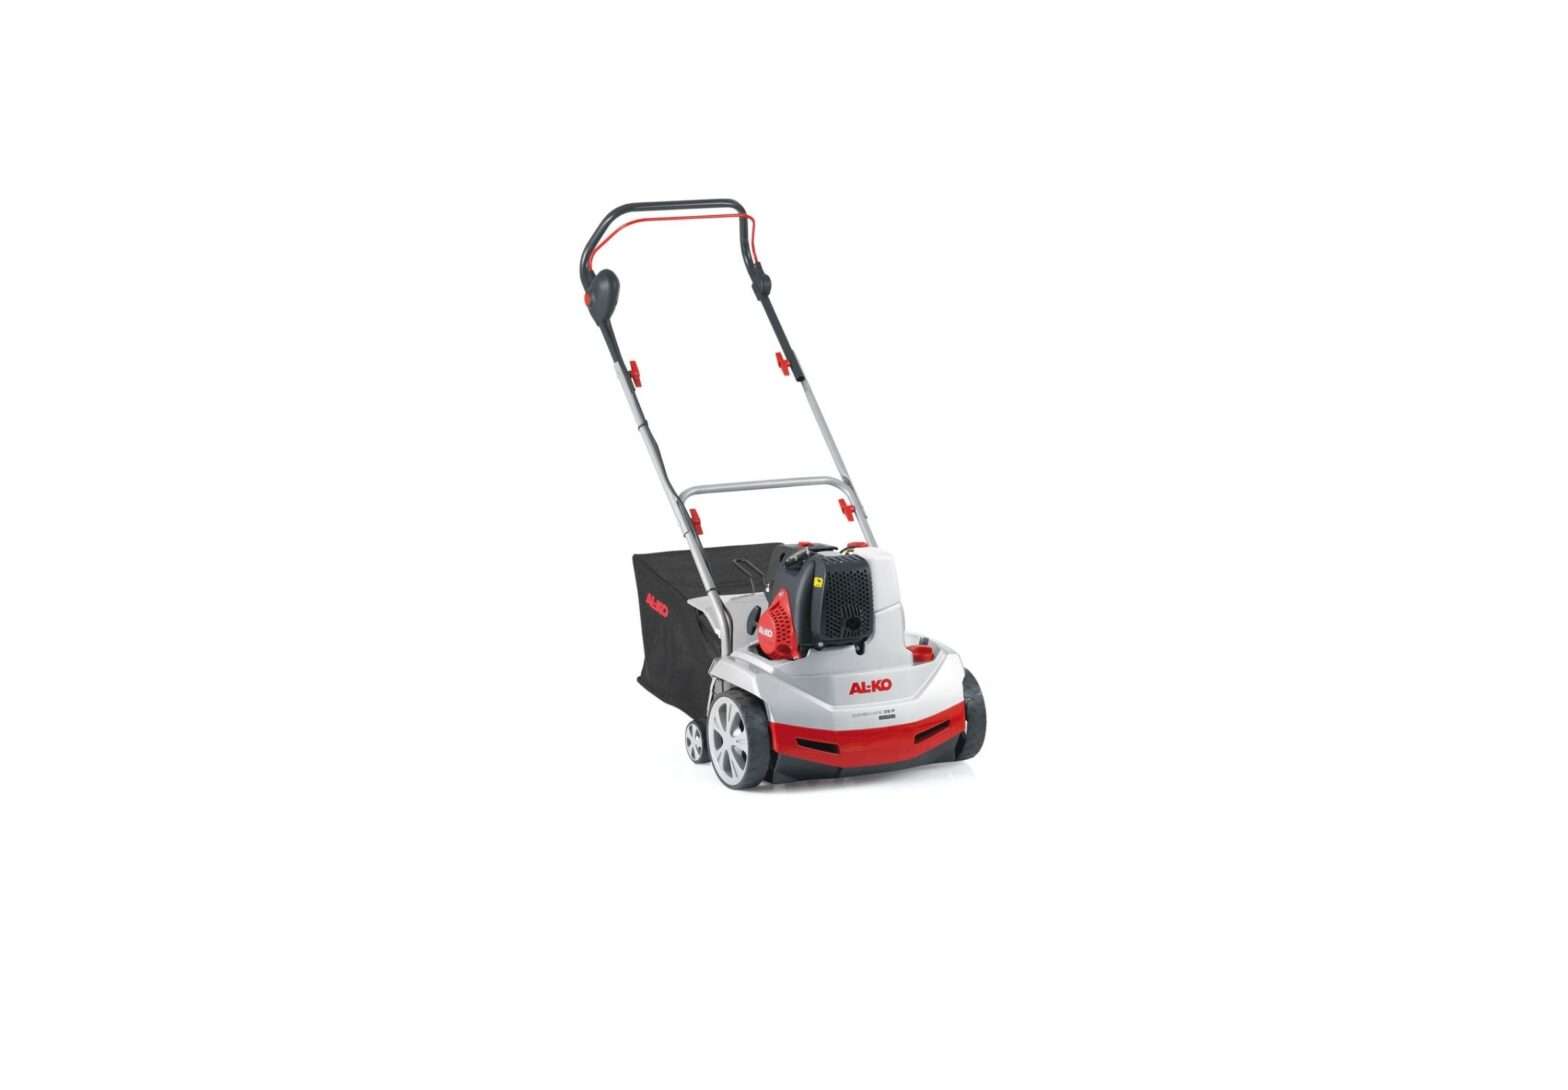
AL-KO Combi Care 38 P Comfort Petrol Scarifier User Manual

combi care 38p comfort
![]()
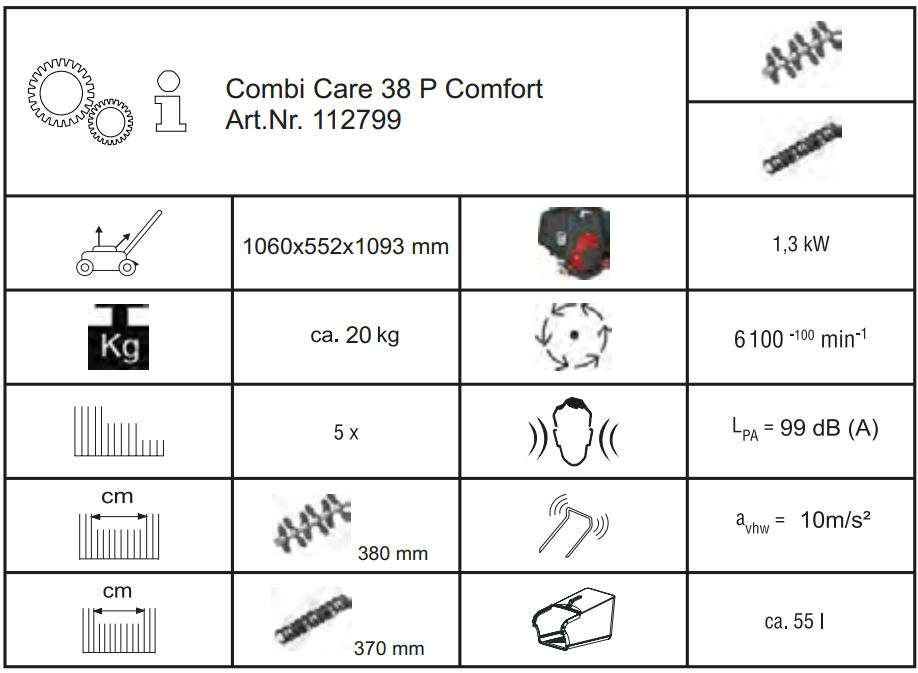
Technical Data
Push the spark plug connector onto the spark plug.
ABOUT THIS HANDBOOK
- Read this documentation before starting up the machine. This is a precondition for safe working and flawless operation.
- Observe the safety warnings in this documentation and on the product.
- This documentation is a permanent integral part of the product described and must be passed on to the new owner if the product is sold.
Explanation of symbols
⚠ NOTICE! Following these safety warnings carefully can prevent personal injury and/or material damage.
ℹ Special ADVICE instructions for greater ease of understanding and improved handling.
PRODUCT DESCRIPTION
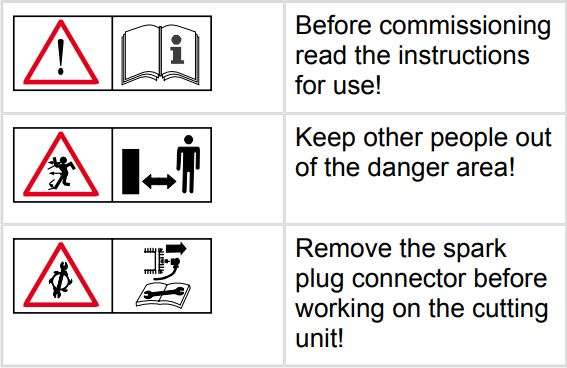
Symbols on the device

Designated use
The equipment is designed to scarify and aerate (thatch) your home lawn. It should be used only on dry and short grass. Any different use does not constitute an intended use.
⚠ NOTICE!
The equipment is intended for domestic use only.
SAFETY INSTRUCTIONS
- The equipment should be used only if in good order and condition
- Do not deactivate safety and protection devices
- Wear protective glasses and hearing protection
- Wear long trousers and sturdy shoes
- Keep hands and feet away from the cutting unit
- Keep other people out of the danger area
- Remove all foreign objects from the work area
- Before leaving the equipment unattended:
- Turn the engine off
- Wait for the cutting unit to stop
- Remove the spark plug connector
- Do not leave the equipment unattended
- Children and other persons who are unfamiliar with the operating instructions must not operate the machine
- Observe local regulations regarding minimum age requirements for operating the machine
Safety and protection devices
Safety control bar The equipment is equipped with a safety control bar. When this bar is released, the equipment immediately stops.
Back cover
The equipment is equipped with a back cover.
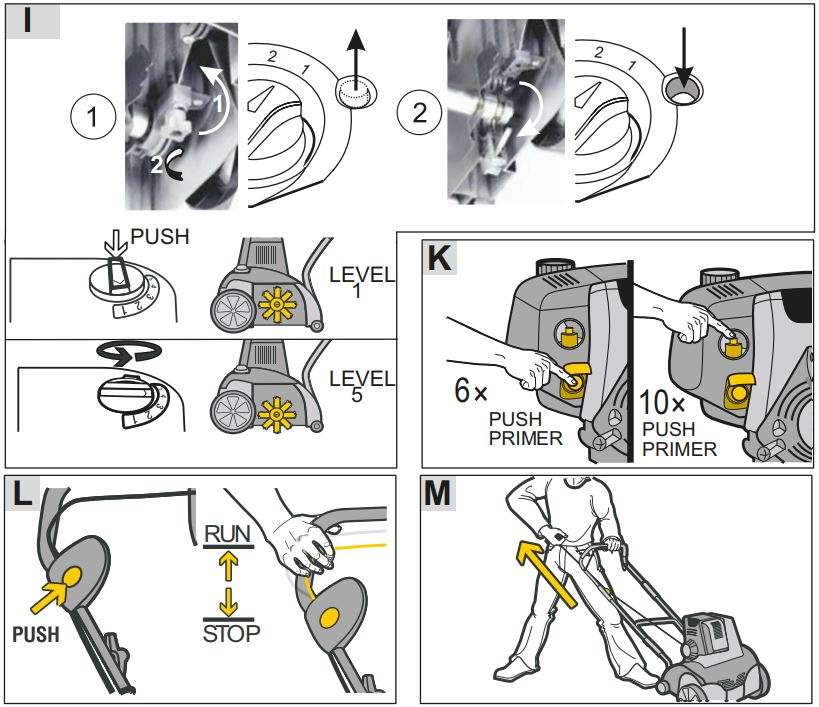
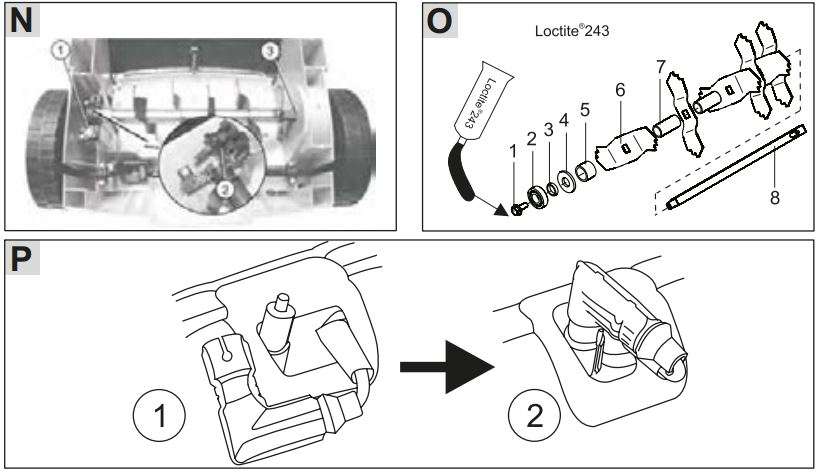
Visual safety indicator (picture I) The visual safety indicator shows whether the shaft is properly fitted and secured. Approx. 5 mm of the green mark are visible: the shaft is correctly fitted and secured (picture I 1). The green mark is not visible anymore, a red mark is visible: the fastening of the shaft has loosened (picture I 2). The fastening of the shaft must be checked and the screws must be tightened (picture N).
ASSEMBLY
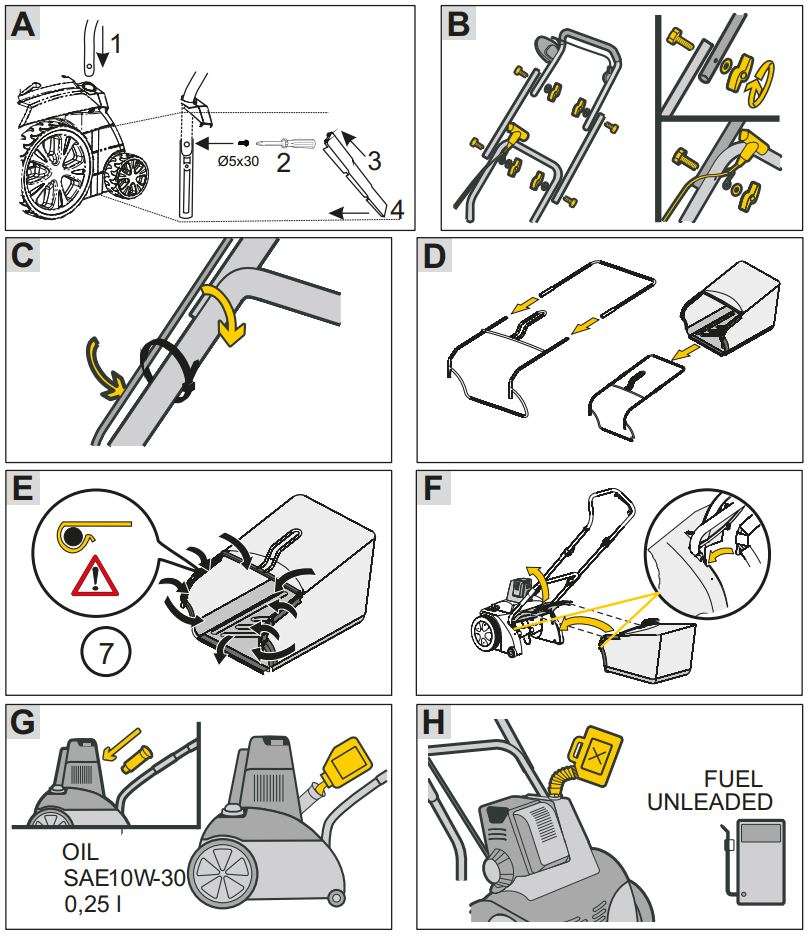
Assemble the machine as shown in the figures (pictures A-F, P).
⚠ NOTICE! The machine must not be put in operation before it has been assembled completely.
STARTUP
⚠ NOTICE! Always make a visual inspection of the equipment before using it. The equipment should not be used if the cutting unit and/or mounting components are loose, damaged or worn.
- Comply with any national regulations regarding operating times.
- Always observe the operating instructions supplied by the engine manufacturer.
Safety
⚠ WARNING! Fire danger! Petrol is highly flammable!
- Store petrol in designated containers only.
- Only refuel in open air.
- Never smoke while refilling!
- Do not open the tank cap while the engine is running or if the machine is hot.
- Replace a damaged petrol tank and/or tank cap.
- Always close the tank cap.
- If petrol has been spilt:
- Do not start the engine
- Do not start the equipment
- Clean the equipment
⚠ WARNING! Never leave an engine running in an enclosed space. Toxic hazard!
Refilling
Before switching on the machine for the first time, fill it up with oil and petrol.
Petrol:
Engine oil: unleaded regular-grade petrol
observe the operating instructions supplied by the engine manufacturer. Oil: SAE 10W-30, capacity: 0,25 l
Oil filling (picture G)
- Remove the oil dipstick and screw in the filler neck.
- Fill oil.
- Remove the filler neck and screw in the oil dipstick.
Petrol filling (picture H)
ℹ The ADVICE tank cap is on the petrol tank. It is marked with the symbol “petrol station”.
Setting the cutting height (picture I)
⚠ WARNING! The cutting height can be adjusted when the engine is not running and the cutter spindle is stopped.
Adjust the cutting height of the cutter spindle with the knob.
- Push the beam downwards and tilt the scarified.
- Push the knob downwards and rotate to position ,,2″.
Knob positions: 1 – 5 = cutting height settings
ℹ With ADVICE new blades, turn the knob to position 2 max.!
The correct cutting height depends on:
- lawn conditions
- blade wear In case the cutting height is not correct:
- the scarifier stands still
- the engine does not pull through IIn this case, set the knob to a lower cutting height.
ℹ Before ADVICE mowing the lawn scarifying forever.
Starting the engine
Starting with a cold engine, after longer periods of storage and temperatures under 10°C:
- Press pimer button “a” 6 times. (picture K).
- Press pimer button “b” 10 times. (picture K).
- Press control button and simultaneously pull engine bar up to handle bar and hold it there (picture L).
ℹ You ADVICE must hold the engine control bar tight during use. - Quickly pull out the starter cord and then allow it to slowly roll up (picture M).
- Let the engine run until it is warm.
ℹ Do ADVICE not press primer buttons when engine is warm. Engine speed (rpm value) is fixed. Engine speed cannot be adjusted.
Turn the engine off
- Release the control bar (picture L).
⚠ WARNING! Risk of injuries due to turning spindles! The cutter spindle does not stop turning immediately. Do not touch the bottom of the equipment shortly after switching off.
Installing and removing the grass catcher
- Turn the engine off before installing/removing the grass catcher.
- Wait until the cutter spindle has come to a complete stop!
General operation instructions
- To start the equipment, the cutting unit must be freely movable.
- Keep hands and feet away from rotating parts.
- Control the equipment only through the handle. Thus the safety distance is guaranteed.
- Keep exhaust and engine clean.
- Always ensure you have a good foothold on slopes.
- Move across slopes, never up or down.
- Do not use on steep slopes.
- Guide the machine at walking pace.
- Never tilt or transport the device with the engine running.
- Have a professional check:
- after bumping against an obstacle
- if the engine stops suddenly
- if the blade is bent
- if the cutter spindle is bent
- if the belt is damaged.
MAINTENANCE AND CARE
⚠ DANGER!
Risk of injury at the cutter spindle. Wear protective gloves!
- Remove the spark plug connector before any maintenance or cleaning jobs!
- Do not spray water on the equipment! Water infiltration (ignition system, carburettor) can cause faults.
- Clean the equipment after each use (spatula, cloth).
Removing the scarified roller (picture N)
- Remove the bearing screw (1).
- Tilt the bearing halves (2) upwards.
- Lift the scarifier roller from the lower bearing half and extract it out from the drive side (3). Assembly is carried out in reverse order.
Removing the aerating roller
Removal of the aerating roller and replacement of steel spring hooks are similar to scarifier roller.
Removing the blades (picture O)
ℹ Before ADVICE removing the blades observe the mounting position!
- Unscrew the hexagonal bolt (1).
- Carefully remove the ball bearing (2) from the spindle (8).
- Remove thrust collar (3), washer (4) and short spacer sleeve (5) from the spindle.
- Remove the blades (6) and the long spacer sleeves one after another.
Assembly is carried out in reverse order.
Care of the engine
- Air filter
- Spark plug
- Oil change
ℹ Drain ADVICE used oil when the motor is warm. Warm oil drains quickly and completely.
- To collect oil, place a suitable container under the engine.
- Remove the oil dipstick.
- Screw in the filler neck.
- Push the beam downwards and tilt the equipment, until the beam touches the floor. Drain the oil completely.
- Pull the equipment up and fill with oil (SAE 10W-30, quantity: 0,25l)
- Remove the filler neck.
- Screw in the oil dipstick.
ℹ Dispose ADVICE of used engine oil in a manner that is compatible with the environment! We recommend to collect the used oil in a closed container and to deliver it to a suitable recycling or service station.
Used oil should not be
- disposed of with domestic rubbish
- poured into the sewage water system or drain pipes
- poured on the ground
Observe the operating instructions supplied by the engine manufacturer.
Storage
⚠ NOTICE! Do not store motor near open flames or heating sources – Burn and/or explosion danger!
- Let the engine cool down.
- Store the scarified in a dry place.
- To save storage space, unscrew the butterfly nuts on the beam and fold it in.
DISPOSAL
![]() Do not dispose of old equipment, batteries or accumulators as household waste! Packaging, machine and accessories are manufactured using recyclable materials and must be disposed of accordingly.
Do not dispose of old equipment, batteries or accumulators as household waste! Packaging, machine and accessories are manufactured using recyclable materials and must be disposed of accordingly.
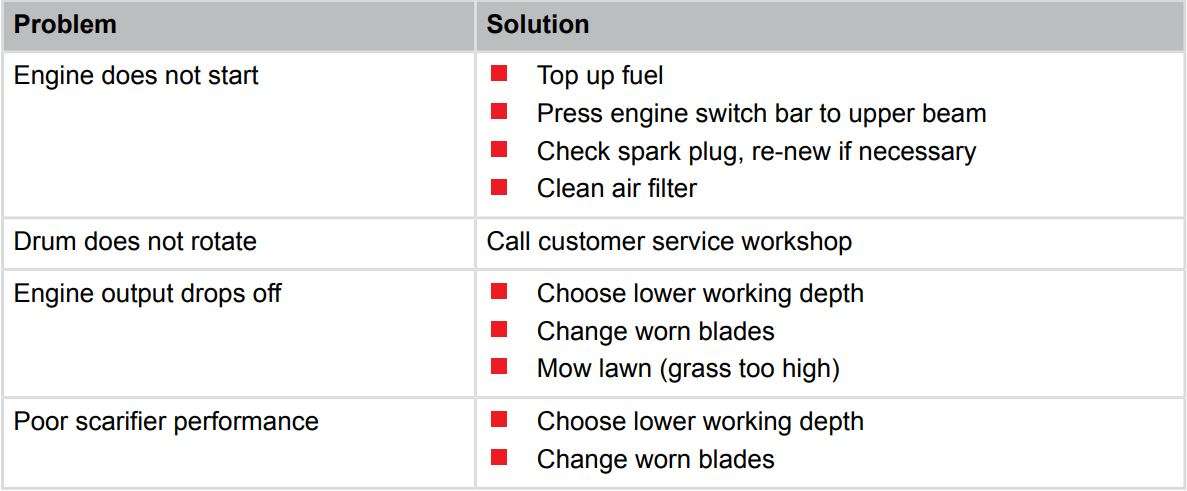
TROUBLESHOOTING

WARRANTY
If any material or manufacturing defects are found during the statutory customer protection period, we will either repair or replace the equipment, whichever we consider the more appropriate. This statutory period may vary according to the legislation in force in the country where the equipment was purchased.
Our warranty is valid only if:
- The equipment has been used properly
- The operating instructions have been followed
- Genuine replacement parts have been used
The warranty is no longer valid if:
- The equipment has been tampered with
- Technical modifications have been made
- The equipment was not used for its intended purpose
The following are not covered by warranty:
- Paint damage due to normal wear
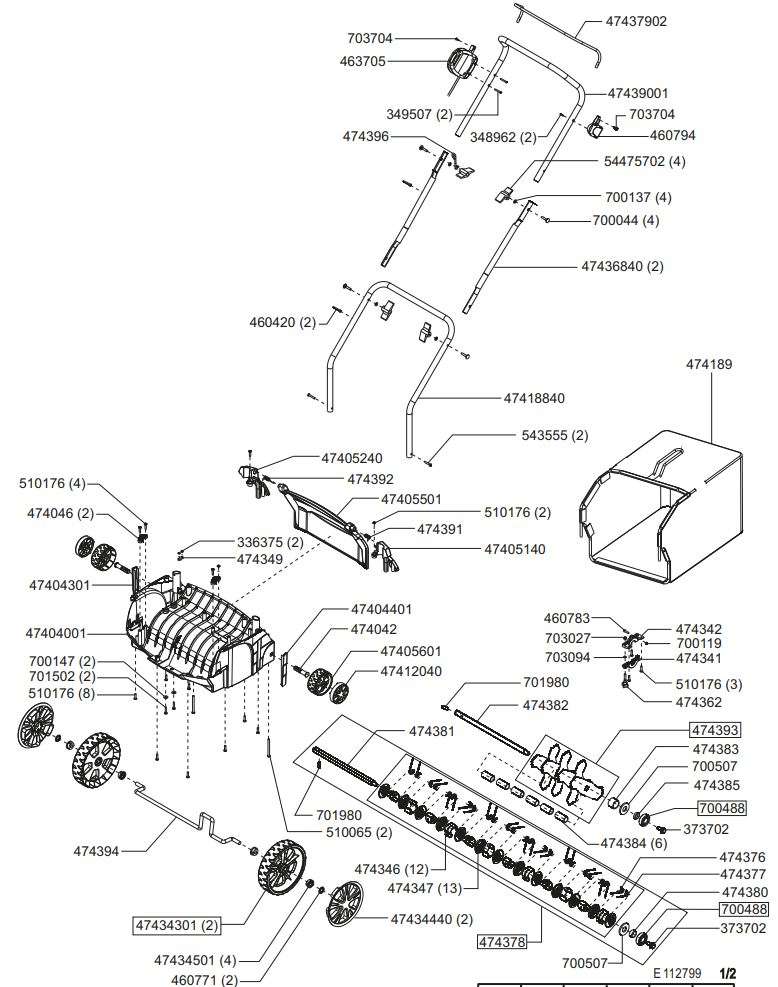
- Wear parts identified by a border [xxx xxx (x)] on the spare parts list
- Combustion motors (these are covered by a separate warranty from the manufacturer concerned)
The warranty period begins on the purchase by the first end user. Decisive is the date on the receipt. To make a claim under warranty, please take this statement of warranty and proof of purchase to the nearest authorised customer service centre. This warranty does not affect the usual statutory rights of the customer relative to the seller.
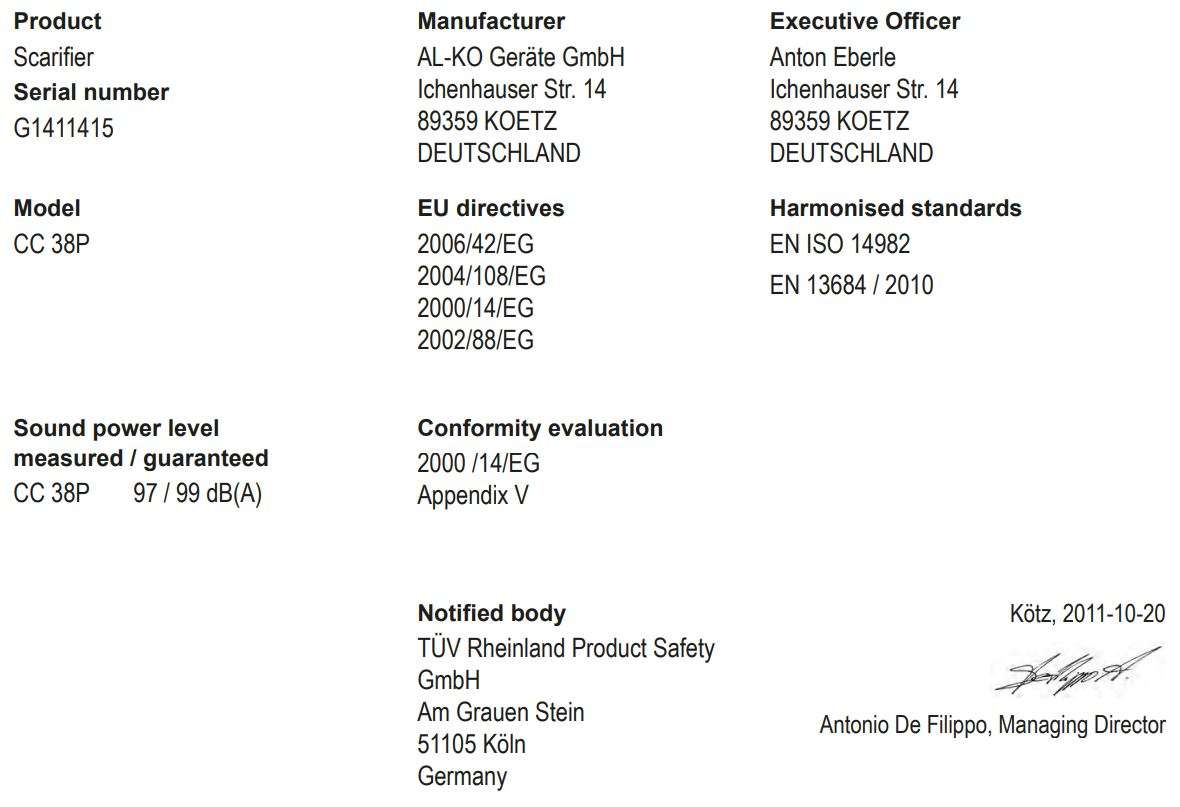
EC declaration of conformity
We hereby declare that this product, in the form in which it is marketed, meets the requirements of the harmonised EU
guidelines, EU safety standards, and the product-specific standards.
Warranty
If any material or manufacturing defects are found during the statutory customer protection period, we will either repair
or replace the equipment, whichever we consider the more appropriate. This statutory period may vary according to the
legislation in force in the country where the equipment was purchased.
Our warranty is valid only if:
- The equipment has been used properly
- The operating instructions have been followed
- Genuine replacement parts have been used
The warranty is no longer valid if:
- The equipment has been tampered with
- Technical modifications have been made
- The trimmer was not used for its intended purpose
(for example, used for commercial or communal applications)
The following are not covered by warranty:
- Paint damage due to normal wear
- Wear parts identified by a border xxx xxx (x) on the spare parts list
- Combustion motors – these are covered by a separate warranty from the manufacturer concerned
To make a claim under warranty, please take this statement of warranty and proof of purchase to the nearest authorised customer service centre. This warranty does not affect the usual statutory rights of the customer relative to the seller.

AL-KO Geraete GMBH l Head Quarter l Ichenhauser Str. 14 l 89359 Koetz l Deutschland Telefon: (+49)8221/203-0 l Telefax: (+49)8221/203-138 l www.al-ko.com
