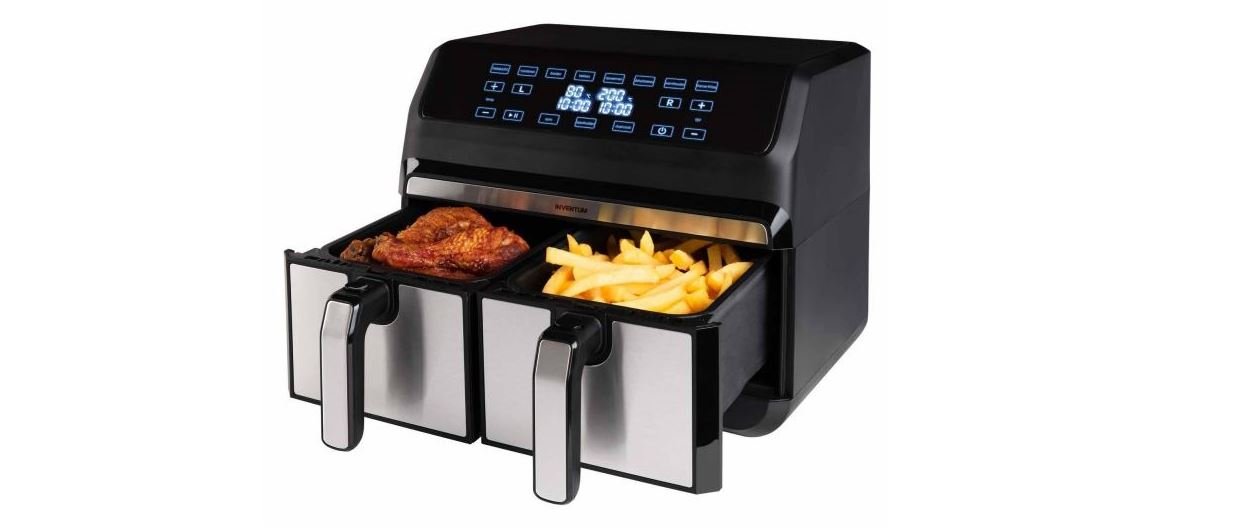
INVENTUM GF800HLD Double Air Fryer User Manual
1 safety instructions
- First carefully read the instruction manual in full prior to using the appliance and store the manual in a safe place for future reference.
 Caution! Avoid contact with hot surfaces within the appliance, when it is switched on.
- Never cover the air inlet and outlet openings when the appliance is being used.
- Always place the ingredients to be fried in the basket, to prevent them from making contact with the heating elements.
- Never fill the appliance with oil, this could cause a fire hazard.
- Never submerge the appliance, cord or plug in water.
- Only use this appliance for the purposes described in the instruction manual.
- Only connect the appliance to alternate current, to an earthed wall socket, with a mains voltage that corresponds with the information provided on the information plate of the appliance.
- Keep the appliance out of reach of children. Children do not see the dangers associated with handling electrical appliances. Therefore, never allow children to operate electrical appliances without supervision. Keep the appliance and cord out of reach of children younger than 8 years of age.
- The appliance can be used by children of 8 years and older and by persons with limited physical, sensory or mental capacities or lack of experience or knowledge, provided they use the appliance under supervision or have been instructed about its safe use and understand the hazards it may involve.
- Children must not play with the appliance.
- The appliance may not be cleaned or maintained by children, unless this is done under supervision.
- Do not use the appliance if the plug, cord or appliance are damaged, or if the appliance no longer functions properly or if it is damaged in any other way. If this is the case, consult the retailer or our maintenance service. Never replace the plug or cord yourself.
Repairs to electrical appliances should only be performed by skilled persons. - Incorrect repairs could cause considerable hazards for the user. Never use the appliance with parts that are not recommended or supplied by the manufacturer.
- Never bend the power cord sharply or allow it to run across hot parts.
- Connect the appliance only to an earthed socket. Always check that the plug is properly inserted in the socket.
- Do not pull the cord and/or appliance to remove the plug from the wall socket. Never touch the appliance with wet or damp hands.
- Never connect the appliance to an external timer or a separate remote control system, in order to prevent hazardous situations.
- Never place the appliance near appliances that give off heat, such as ovens, gas cookers, hotplates, etc. Keep the appliance away from walls or other objects that may catch fire, such as curtains, towels (cotton or paper, etc.).
- Place the appliance on a sturdy, flat surface and make sure there is enough space around it for sufficient ventilation. A minimum space of 15 cm is required between the appliance and the walls. Place nothing on top of the appliance.
- Do not leave the appliance unsupervised if the appliance is operational.
- Caution! A lot of steam is released via the outlet openings during hot air frying. Keep your hands and face away from the steam coming out of the outlet openings. Watch out for the steam, when removing the baskets.
- After use, the interior is very hot. Therefore avoid contact with the interior.
- Always make sure the appliance is placed on an even, flat surface and is only used indoors.
- This appliance is only intended for household use and not for use:
– in staff kitchens, in shops, offices and other work environments.
– by guests of hotels, motels and other residential environments.
– in Bed & Breakfast type environments
– farms - If the appliance is not being used, or is being cleaned, fully switch off the appliance and remove the plug from the socket.
- Allow the appliance to cool down for 30 minutes before storing or cleaning it.
- Ensure that the ingredients being prepared in the appliance come out golden-brown and not dark or brown. Remove burnt parts.
- In case of a breakdown, never make repairs yourself; a tripped safety device in the appliance could indicate a defect that cannot be remedied by removing or replacing this safety device. Only original parts should be used.
- This appliance is only suitable for household use. If the appliance is not used as intended, no compensation can be claimed in case of defects or accidents and the warranty will be invalidated.
- If you decide to cease using the appliance due to a defect, we recommend cutting off the cord after removing the plug from the wall socket. Take the appliance to the waste processing department concerned of your municipality.
overheating protection
This appliance has been provided with an overheating safety system. If the interior temperature is too high, the appliance is switched off automatically by the safety system. In that case, the appliance can no longer be used. Remove the plug from the socket, allow the appliance to cool down and contact the service department of Inventum or your retailer.
automatic deactivation
This appliance has been provided with a timer. Once the timer is on 00:00, it will count down 20 seconds again. During that time, the fan continues to run to cool the appliance. After that, a sound signal can be heard and the appliance automatically switches to stand-by. Remove the plug from the socket to switch off the appliance completely. Extra: when removing a basket while frying, the appliance also switches to stand-by automatically.
electromagnetic fields (EMF)
This appliance complies with all requirements relating to electromagnetic fields (EMF).
2 product description
- Control panel
- Removable basket
- Power cord (not in figure)
- Non-slip feet (not in figure)
- Insert grille
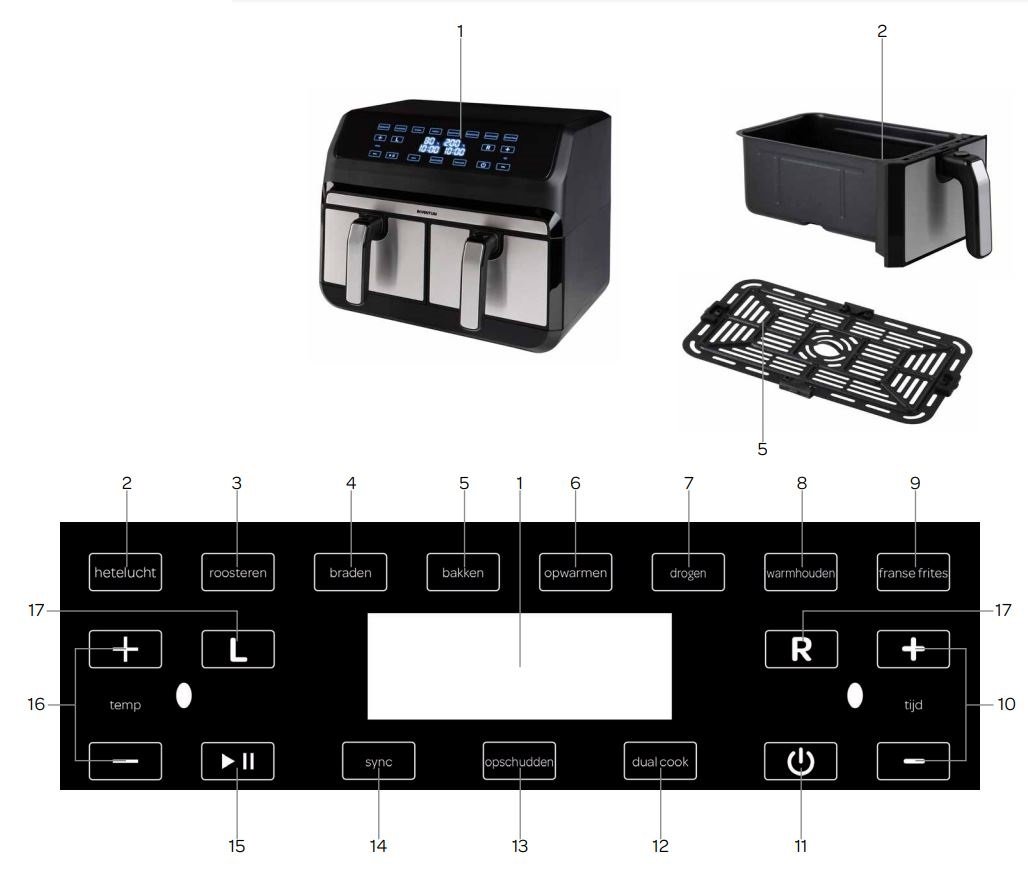
- Display time/temp
- Hot air
- Roasting
- Frying
- Baking
- Heating
- Drying (dehydrating)
- Keeping warm
- French fries
- Time +/-
- On/off, stand-by
- Dual cook
- Shaking
- Synchronizing
- Start/pause
- Temperature +/-
- Left / right basket selection key
3 prior to first use
Before using the appliance for the first time, proceed as follows: Carefully unpack your appliance and remove all packaging material and possible promotional stickers. Keep the packaging (plastic bags and cardboard) out of reach of children. After unpacking the appliance, carefully check it for external damage that may have occurred during transport. Place the appliance on a sturdy, flat and heat-resistant surface.
The control keys are touch controls. Carefully touch the controls with a finger to activate them. At each touch of a touch control, you can hear a sound signal.
STAND-BY
When the plug is inserted in the socket, a sound signal can be heard. The stand-by key lights up. The appliance automatically switches to stand-by mode when:
- inserting the plug in the socket;
- no keys are touched for 1 minute;
- the time set on the timer has passed;
- when pressing [STANDBY] while the appliance is working.
SWITCHING ON/OFF
Switch the appliance on and off with [STANDBY].
- The appliance will only function when the basket is in the appliance correctly.
- Once the timer is on 00:00, it will count down 20 seconds again. During that time, the fan continues to run to cool the appliance.
After that, a sound signal can be heard.
PRIOR TO FIRST USE
Check the voltage. The appliance will only work safely on alternate current with a voltage that is indicated on the information plate of the appliance. Only insert the plug of the appliance into a earthed socket The heating element has been provided with a protective layer. Switch on the appliance and allow it to operate at maximum level without food for 10 minutes. In this way, the protective layer around the heating element is burned off perfectly. A little bit of smoke may be created during this action. Therefore ensure sufficient ventilation. When the protective layer has disappeared, switch off the appliance.
Remove the plug from the socket and clean the insert grille and baskets before you actually start using the appliance. Wash the insert grilles and baskets with soapy water or in the dishwasher. The inside and outside of the appliance itself can be wiped with a soft, damp cloth. The appliance works with hot air.
This means that you should never use oil, other liquids or frying fat for preparing food.
- Place the appliance on a sturdy, flat and heat-resistant surface.
- Place one of the insert grilles in each basket. Make sure you place the insert grille correctly: with the rubbers pointing down.
- Place the baskets in the appliance.
CAUTION! If the baskets are not placed correctly, the appliance will not function. Do not fill the baskets with oil or other liquids. Place nothing on top of the appliance. Do not cover air inlet or outlet openings. Covered air openings will disrupt the air circulation and will have a negative effect on the frying result.
SETTING TEMPERATURE AND TIME
Press [+] and [-] on the left side of the control panel to set a higher or lower temperature. The temperature changes in steps of 5 °C. Press [+] and [-] on the right side of the control panel to set a longer or shorter time. The time changes in steps of 1 minute. Automatic menus Press one of the menu keys from the table:
| Preparation method | Standard temperature °C | Standard time | Dual cook time | Temperature range °C | Time range | Shaking | |
| Hot air | [HOT AIR] | 200 | 20 min | 23 min | 80-200 | 1-60 min | 2/3 time 1x |
| Roasting | [ROASTING] | 200 | 35 min | 37 min | 180-200 | 1-60 min | 2/3 time 1x |
| Frying | [FRYING] | 200 | 10 min | 13 min | 200 | 1-30 min | Not recommended |
| Baking | [BAKING] | 180 | 16 min | 19 min | 80-200 | 1-60 min | 2/3 time 1x |
| Heating | [HEATING] | 120 | 6 min | 9 min | 80-200 | 1-60 min | Not recommended |
| Drying | [DRYING] | 55 | 8 hours | 8 hours | 35-80 | 1-24 hours | Not recommended |
| Keeping warm | [KEEPING WARM] | 80 | 60 min | 60 min | 70-100 | 1-60 min | Not recommended |
| French fries | [FRENCH FRIES] | 200 | 18 min | 21 min | 80-200 | 1-60 min | 2/3 time 1x |
The temperatures and times in the table are standard settings. Depending on size and weight, it may be necessary to adjust temperature and time.
4 general operation
General
- Place the appliance on a sturdy, flat and heat-resistant surface, near an earthed socket.
- Place the insert grille in the basket. For drying, see `Drying (dehydrating)’ below.
- Fill the baskets with food to a maximum of two thirds of their capacity. In this way, sufficient hot air is allowed to circulate.
When preparing fresh vegetables or fruit, we recommend not placing more than 250 to 375 grimes in one basket. For dehydrating, see `Drying (dehydrating)’ below. - Place the filled basket in the appliance. Make sure you place the basket correctly: the correct basket on the right side and fully inserted.
Drying (dehydrating)
You can dehydrate a maximum of 750 grammes of vegetables/fruit per basket.
- Place a first layer of vegetables/fruit directly in the basket, i.e. without the insert grille.
- Place the insert grille on the first layer of vegetables/fruit.
- Now place the second layer of vegetables/fruit on the insert grille.
Switching on and switching off
When the plug is inserted in the socket, a sound signal can be heard. The control panel lights up briefly. The stand-by key lights up. When pressing [STANDBY], a sound signal can be heard and all keys light up. When the appliance is working, you switch off the appliance with [STANDBY]. As long as the plug is in the socket, the appliance will not switch off completely, but will remain in stand-by mode. Completely switch off the appliance when you will not be using it. For that purpose, you must remove the plug from the socket.
Selecting the left or right basket
When switching on the appliance with the stand-by key, a sound signal can be heard. You can then select the left basket, right basket or both baskets.
- For the left basket, press [L].
- For the right basket, press [R].
- For both baskets, press [DUAL COOK].
Once [L] or [R] is flashing, you select a preparation method. If you pressed [DUAL COOK], you can set the time and temperature for both baskets at the same time.
Setting temperature and time
Press [+] and [-] on the left side of the control panel to set a higher or lower temperature. The temperature changes in steps of 5 °C. Press [+] and [-] on the right side of the control panel to set a longer or shorter time. The time changes in steps of 1 minute. When using the drying program, the time changes in steps of 1 hour and not in steps of 1 minute.
You can set both the time and temperature for each basket separately. This can be done in advance, but also during the cooking process. Press [L] or [R]. Once the key starts to flash, adjust the required time or temperature. Once the timer is on 00:00, it will count down 20 seconds again. The fan continues to run to cool the appliance. A sound signal can be heard when it is safe to remove the food from the appliance. The preparation time depends on the volume, weight and density of the food. Keep in mind that smaller amounts of food require less time, which will be beneficial to the quality. Check the food halfway the cooking process and adjust time and temperature if necessary.
Start and pause
Once you have set the time and temperature, press [START/PAUSE] to start the cooking process. When the cooking process is taking place, press [START/PAUSE] to interrupt the process.
Synchronizing
First set the time and temperature for both baskets. If you want the dishes in both baskets to be ready at the same time, press [SYNC]. Then press [START/PAUSE] to start the cooking process. The cooking time is shown on both the left and right side, but counting down starts on the side with the longest cooking time. Once the remaining time is identical on both sides, both timers will continue to count down simultaneously. Once the cooking process is taking place, you are no longer able to synchronize.
Shaking
Once approximately two thirds of the cooking time have passed, the appliance will provide a sound signal 5 times. In this way, the appliance reminds you to shake the basket. Such a warning is provided for all preparation methods, except for frying, heating and drying. Press [SHAKING] to switch OFF this warning function. SHAKING will then no longer be visible on the display. When setting a cooking time that is shorter than 3 minutes, the shaking function will not be active.
Roasting
Insert a cooking thermometer in the centre of a piece of meat, so that you can be certain that the required level of doneness has been achieved. Roast the meat to 5 °C to 10 °C below the recommended temperature for the desired level of doneness, remove the meat from the appliance and let it rest for 15 to 20 minutes before serving. The temperature continues to rise while resting! For the best result, you will roast the meat as one piece. Season the meat prior to roasting. This ensures a better flavour and a delicious smell while roasting. A small layer of fat on the meat promotes browning. You can speed up the browning process by brushing the meat with a little oil, margarine or melted butter. First roast the meat with the fatty side upwards and turn it halfway the roasting time. The appliance gives a warning when two thirds of the roasting time have passed. If you do not want this warning, press [SHAKING].
Frying
Normally, you will use [FRYING] for thinly sliced tender meats or marinated meats such as pork chops, chicken or fish, but also for vegetables and fruit. Dab marinated meats dry before frying them. This stimulates the browning process and prevents excess vaporization. For a quicker browning process and a beautiful gloss, you can brush the meat with oil or melted butter. Remove excess fat and score the meat to prevent it from curling. Defrost meat and fish before frying it. The frying time depends on the level of doneness that you want to achieve for your meat. Always use a cooking thermometer. Use [FRYING] if you want to melt cheese or brown breadcrumbs.
Baking
When using [BAKING], it may be necessary to set the temperature lower than the recipe indicates. The maximum temperature for baking is 200 °C.
Drying
When manually selecting settings for drying (dehydrating), the time setting changes in steps of 1 hour. Use [DRYING] for fresh, ripe fruit to preserve nutrients and intensify flavour. During drying, the temperature is approximately 55 °C and a fan ensures a continuous air flow. For an even dehydration, you must regularly turn the products. Vegetables and fruit are only turned halfway the dehydration process. Rinse vegetables and fruit properly clean and cut fruit into slices just over half a centimetre thick. Do make sure that the slices do not make contact. In this way you can make sure that the air flow makes contact with all surfaces.
5 preparing food in simple steps
When using one basket
- Insert the plug into the socket.
- Press [STANDBY].
- Select [L] or [R].
- Select a preparation method ([HOT AIR], [ROASTING], [FRYING] etc.).
- If required, change the temperature using [+] or [-] on the left side of the control panel.
- If required, change the time using [+] or [-] on the right side of the control panel.
- Press [START/PAUSE] to start the cooking process.
When using two baskets with the same settings.
- Insert the plug in the socket.
- Press [STANDBY]
- Select [DUAL]
- Select a preparation method ([HOT AIR], [ROASTING], [FRYING] etc.)
- If required, change the temperature using [+] or [-] on the left side of the control panel
- If required, change the time using [+] or [-] on the right side of the control panel
- Press [START/PAUSE] to start the cooking process
When using two baskets with different settings
- Insert the plug into the socket.
- Press [STANDBY].
- Select [L].
- Select a preparation method ([HOT AIR], [ROASTING], [FRYING] etc.).
- If required, change the temperature using [+] or [-] on the left side of the control panel.
- If required, change the time using [+] or [-] on the right side of the control panel.
- Select [R].
- Select a preparation method ([HOT AIR], [ROASTING], [FRYING] etc.).
- If required, change the temperature using [+] or [-] on the left side of the control panel.
- If required, change the time using [+] or [-] on the right side of the control panel.
- If you want the cooking process in both baskets to be ready at the same time, press [SYNC]
- Press [START/PAUSE] to start the cooking process.
6 tips
- Smaller ingredients usually require a slightly shorter cooking time.
- A larger amount of ingredients only requires a little more time, and a smaller amount requires a little less cooking time.
- Shaking smaller ingredients several times during the cooking time results in a better and more even end result.
- Do not cook extremely fat ingredients such as sausages in the appliance.
- Snacks that you would cook in an oven, can also be cooked in the hot air fryer.
- The maximum amount is 2 times 800 grimes.
- If necessary, use an oil spray to lightly oil the ingredients. This will make them even more crispy.
- Use ready-made dough to prepare filled snacks quickly and easily. Ready-made dough also cooks faster than home-made dough.
- Place a baking tin or oven dish in the pan if you want to make a cake or quiche, or if you want to cook delicate or filled ingredients.
- You can also use the appliance to heat food. Select the program [HEATING]. The appliance heats your dish for 6 minutes at 120 °C.
- Add 3 minutes to the cooking time if the appliance is cold.
- The turbo technology immediately reheats the air in the appliance. For that reason, it makes no difference for the end result if you briefly remove the basket from the appliance. As ingredients can differ in origin, dimension, shape and brand, Inventum is unable to indicate the most optimum setting.
7 cleaning and maintenance
Clean the appliance as follows after each use. Allow the appliance to cool down before cleaning it. After frying, the metal interior is hot. Do not touch the interior immediately after frying. When cleaning the baskets and insert grilles, do not use metal kitchenware or abrasive agents, as these could damage the anti-stick coating.
- Remove the plug from the socket and allow the appliance to cool down fully before cleaning it. Instruction: cooling goes quicker if the baskets and insert grilles are removed from the appliance.
- Clean the exterior of the appliance with a damp cloth.
- Clean the baskets and insert grilles with hot water containing a little washing-up liquid and a sponge. You can also wash the baskets and insert grilles in the dishwasher. Instruction: stubborn dirt can be removed by filling the baskets with hot water and a little bit of washing-up liquid and allowing it to soak for 10 minutes.
- Clean the interior of the appliance with a damp soft sponge that you have first soaked in hot water and squeezed out.
- Remove any food residues from the heating element using a soft washing-up brush. Be careful with washing-up liquid. This could be left behind on the heating element and give a foreign taste to the ingredients.
Never submerge the appliance, cord or plug in water or other liquids. Before storing the appliance, allow it to cool down fully and remove the plug from the socket. Check that all components are clean and dry. Store the appliance in a clean and dry location.

8 breakdowns and solutions
| Failure | Possible cause | Solution |
| The appliance does not function | The plug is not in the socket | Insert the plug in an earthed socket. |
| The basket is not properly placed in the appliance | Properly slide the basket in the appliance | |
| The ingredients are not cooked. | There are too many ingredients in the basket. | Place smaller amounts of ingredients in the basket. Smaller portions can be fried more evenly. |
| The set temperature is too low. | Set the appliance to a higher temperature. | |
| The cooking time is too short | Set a longer time. | |
| The ingredients are not fried evenly | Some ingredients must be shaken halfway the cooking time. | Shake ingredients lying on top of one another (such as fries) halfway the cooking time. |
| Fried snacks are not crispy when they come out of the appliance | The snacks are not suitable for a hot air fryer and should be fried in an oil fryer. | Use oven snacks or cover the snacks with a little oil for a more crispy result. |
| It is not possible to slide the basket in the appliance properly | The basket is overfilled. | Do not fill the basket above the maximum, but observe the recommended amounts. |
| The insert grille is not properly placed in the basket. | Place the insert grill in the basket with the correct side up. | |
| There is white smoke coming from the appliance. | You are cooking fatty ingredients. | When fatty ingredients are being cooked in the appliance, it is possible that a lot of fat drips in the basket. This fat causes white smoke and the pan can become hotter than normal. This does not have an effect on the appliance or on the end result. |
| The basket still contains fat residues from a previous preparation. | Clean the basket after every use. Fat residues that become hot can cause white smoke. | |
| Fresh fries do not come out of the appliance evenly fried. | The type of potato is not suitable. | Use fresh potatoes that are a little floury when cooked. |
| The fries have not been properly rinsed prior to frying. | Properly rinse the cut fries to remove starch. | |
| Fresh fries are not crispy when they come out of the appliance. | The amount of oil and water in the fries determines how crispy they can be. | Dab the fries properly dry before adding oil. |
| Cut the fries more finely for a crispier result. | ||
| Add a little more oil for a crispier result. |
general terms and conditions of service and warranty
We do not need to remind you of the importance of service. After all, we develop our products to a standard so that you can enjoy them for many years, without any concerns. If, nevertheless, there is a problem, we believe you are entitled to a solution straight away. Hence our products come with an exchange service, on top of the rights and claims you are entitled to by law. By exchanging a product or part, we save you time, effort and costs.
2-year full manufacturer’s warranty
- Customers enjoy a 2-year full manufacturer’s warranty on all Inventum products. Within this period, a faulty product or part will always be exchanged for a new model, free of charge. In order to claim under the 2-year full manufacturer’s warranty, you can either return the product to the shop you bought it from or contact the Inventum costumer service department via the form at www.inventum.eu/service-aanvraag.
- The 2-year warranty period starts from the date the product is bought.
- In order to claim under the warranty, you must produce a copy of the original receipt.
- The warranty applies only to normal domestic use of Inventum products within the Netherlands.
Breakdowns or faults outside the warranty period
- Breakdowns or faults in small or large domestic appliances outside the warranty period, can be reported to the costumer services department via the form at www.inventum.eu/service-aanvraag or by calling the costumer services department.
- The costumer services department may ask you to send the product for inspection or repair. The costs of dispatch will be at your expense.
- The inspection to establish whether repair is possible involves a charge. You need to grant your permission for this, in advance.
- In the event of a large domestic appliance, Inventum, at your request, can send out a service engineer. In that case, you will be charged the call-out costs, as well as parts and labour.
- In the event of an instruction to repair, the repair costs must be paid in advance. In the event of a repair by a service engineer, the costs of the repair must be settled with the engineer onsite, preferably by means of PIN payment.
Warranty exclusions
- The following is excluded from the aforesaid warranties:
• normal wear and tear;
• improper use or misuse;
• insufficient maintenance;
• failure to comply with the operating and maintenance instructions;
• unprofessional installation or repairs by third parties or the customer himself;
• non-original parts used by the customer;
• use for commercial or business purposes;
• removal of the serial number and/or rating label. - In addition, the warranty does not apply to normal consumer goods, such as:
• dough hooks, baking tins, (carbon) filters, etc.;
• batteries, bulbs, carbon filters, fat filters etc.;
• external connection cables;
• glass accessories and glass parts such as oven doors;
• and similar items. - Transport damage not caused by Inventum is also excluded. Therefore, inspect your new device before starting to use it. If you detect any damage, you must report this to the store where you purchased the product within 5 working days, or to the Inventum customer service department via the form at www.inventum.eu/service-aanvraag. If transport damage is not reported within this period, Inventum does not accept any liability in this respect.
- The following are excluded from warranty and/or replacement: faults, loss of and damage to the device as a result of an event that is normally insured under the home contents insurance.
Important to know
- The replacement or repair of a faulty product, or a part thereof, does not lead to an extension of the original warranty period.
- If a complaint is unfounded, all costs arising from it will be at the customer’s expense.
- Following expiry of the warranty period, all costs of repair or replacement, including administration costs, dispatch and call-out charges, will be charged to the customer.
- Inventum cannot be held liable for damage caused by external events, unless this liability arises from mandatory statutory provisions.
- These warranty and service provisions are governed by Dutch law. Disputes will be settled exclusively by the competent Dutch court.

Inventum Huishoudelijke Apparaten B.V. Postbus 5023
6802 EA Arnhem www.inventum.eu
GF800HLD/01.0822 Modifications and printing errors reserved
