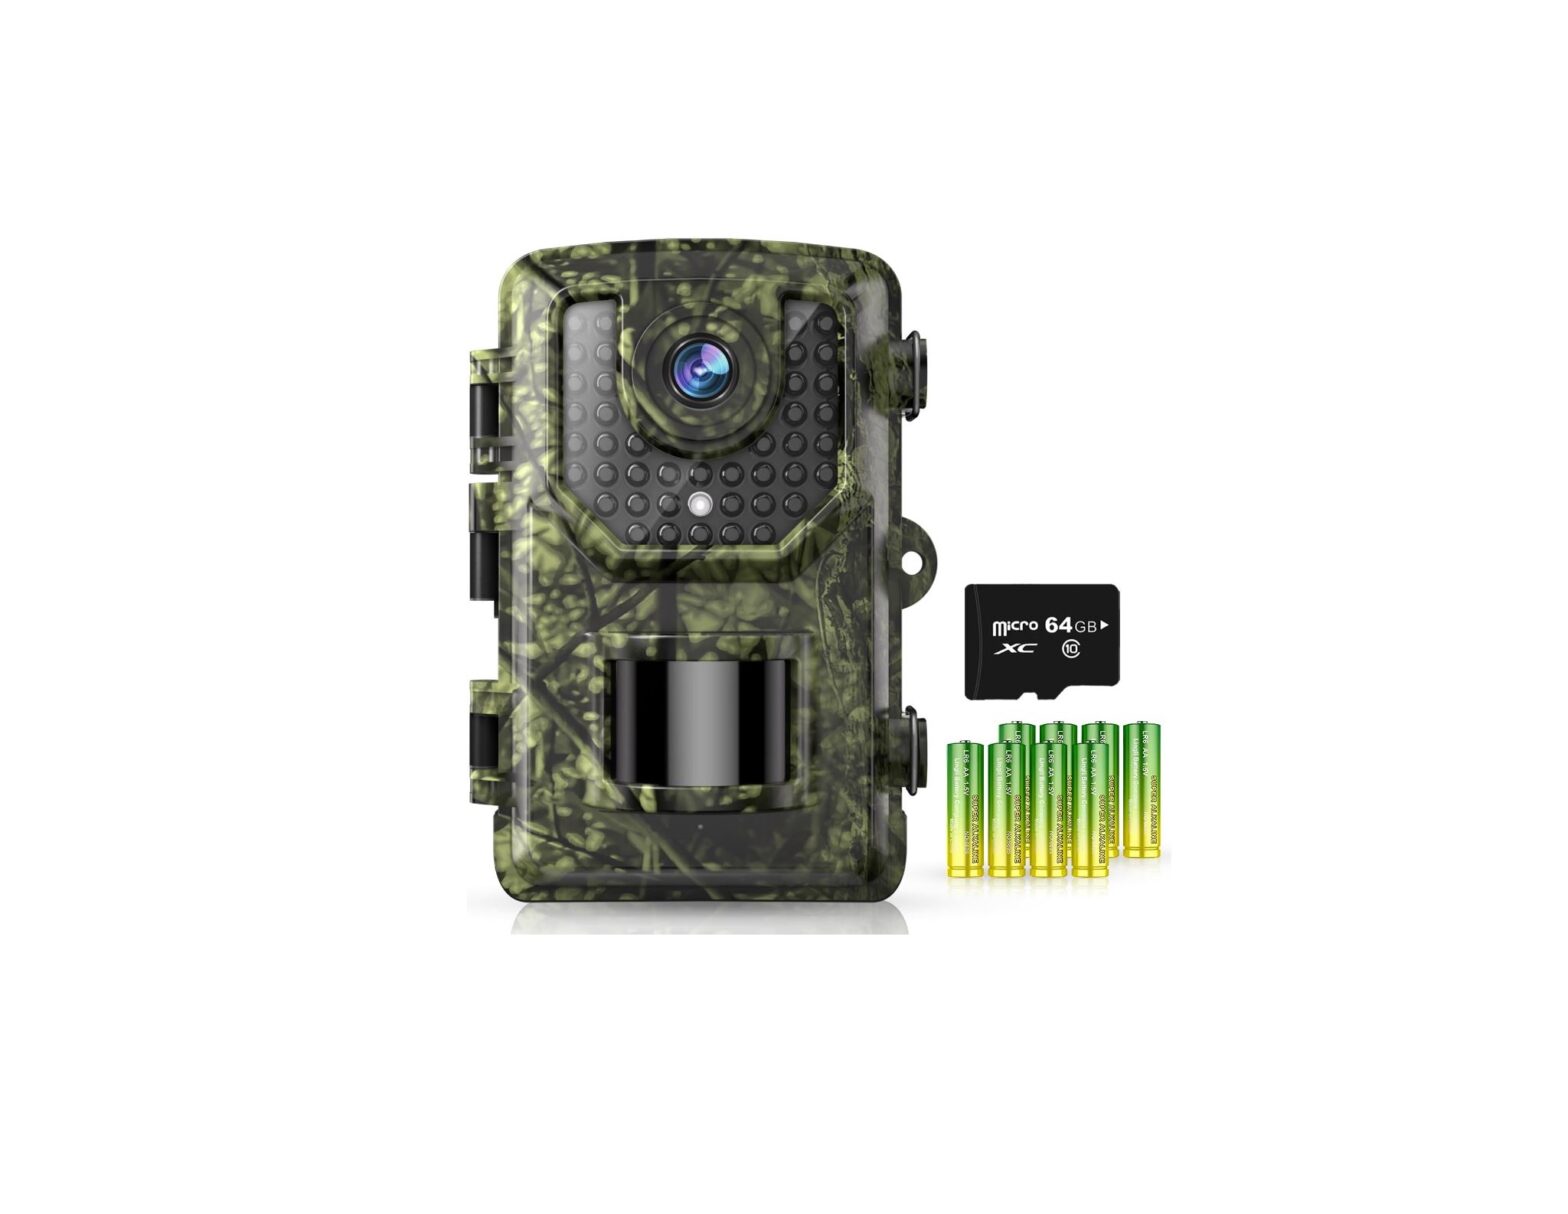
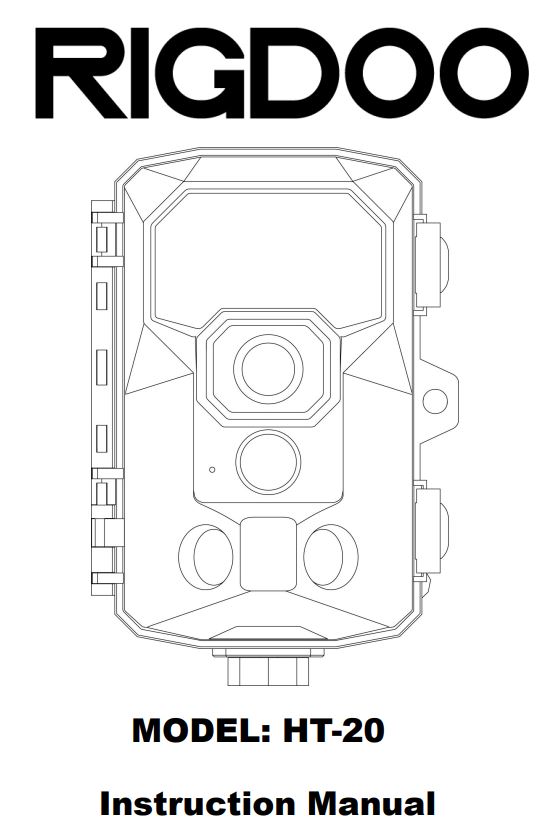
RIGDOO HT-20 4K 48MP Trail Camera
Instruction Manual

Scan the QR code above to join the wildlife photography group

Scan the QR code above and go to YouTube to watch the tutorial of RIGDOO camera
WARRANTY AND SERVICE
Authorized Service Centers for HT-20
Whether you are using the HT-20 for hunting, wildlife monitoring, or farm monitoring, having access to a reliable camera repair service is essential to ensure a seamless photography experience. If your HT-20 is not performing as expected, exhibiting unusual noises or behaviors, or if you are simply unsure about its functioning, we are here to assist you.
To expedite the resolution process, please provide a detailed description of the problem you are experiencing. Additionally, kindly include your order information and forward it to our dedicated customer service team. They will promptly attend to your query and provide the necessary assistance. In the event that you do not receive a response within 24 hours, please consider resending your email, as it may not have been delivered successfully. Rest assured, we value your feedback and are committed to addressing your concerns in a timely manner.
Warranty for HT-20 RIGDOO offers a 30-day free replace/refund and an 2-year warranty. RIGDOO offers a 30-day free replacement/refund and a 2-year warranty. Keep your order number or proof of purchase for efficient after-sales service. We cover quality issues, not corrosion or artificial damage. Our customer service team will verify issues based on customer-provided photos and provide repair or replacement for non-conformities or manufacturing defects.
RIGDOO Service Team
[email protected]
PACKAGE CONTENTS
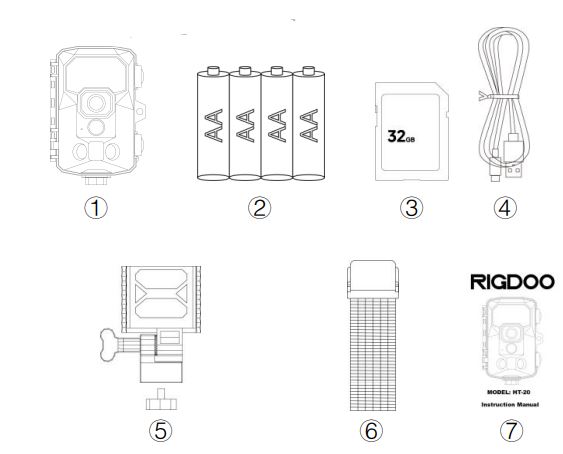
- 1x RIGDOO HT-20 Trail Camera
- 4x Alkaline battery
- 1x 32G SD Card ( Installed in card slot )
- 1x Type-C Cable
- 1x Adjustable angle bracket on the back
- 1x Installation Belt
- 1x User Guide
PRODUCT DIAGRAM
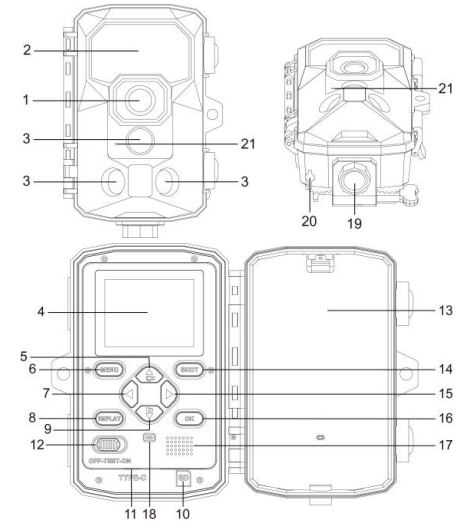
- Lens
- Infrared LEDs
- PIR motion sensor
- LCD screen
- Up/Video Mode
- Menu button
- Left button
- Replay button
- Down/Photo Mode
- SD card slot
- USB-C slot
- OFF/TEST/ON
- Battery Slots
- Shot button
- Right Button
- OK button
- Speaker
- automatic press switch
- Fixation port
- 6V 1.5A Power supply port
- MIC
QUICK START GUIDE
Please refer to the instructions below for a quick start of your HT-20 We hope you can know the mode below before trying to use HT-20.
Power switch mode
- “OFF”: Power off, HT-20 won’t do any things. “TEST”:
- This mode is primarily used for camera setup and function testing. In test mode, the HT-20 camera does not shoot automatically. Instead, you can manually perform a shoot test. The LCD screen will be bright in this mode.
- On the top left corner of the LCD screen, you will find an icon indicating the current work mode, and the number next to the icon represents the camera’s pixel parameter. Additionally, the number on the top right corner of the screen indicates the remaining capacity of the memory card, either in terms of recordable length or the number of photos that can be taken. This capacity figure is an estimate provided by the camera.
- “ON”: In this mode, the camera offers two shooting options based on your settings: motion-triggered shooting and time interval shooting. The shooting behavior depends on whether the TIME LAPSE function is enabled or disabled.
- If TIME LAPSE is turned off, the camera will capture photos or videos when it detects motion using the motion detection feature.
- If TIME LAPSE is turned on, the camera will capture photos or videos at regular time intervals, regardless of motion detection. Please adjust the TIME LAPSE setting according to your shooting preferences.
Innovative Design:
The camera features a unique design where, in TEST mode, the lid is closed and securely locked with a fixed buckle. This configuration allows the camera to enter ON mode effectively. When you wish to view the camera, simply turn it on, and the camera screen will awaken, enabling you to effortlessly view photos or make various settings as needed.
Getting Started (This tutorial is only a tutorial for recording video in motion detection mode)
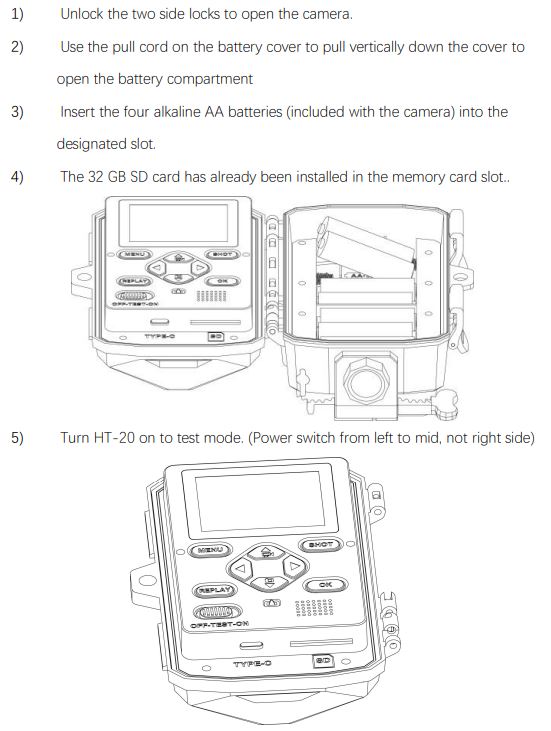
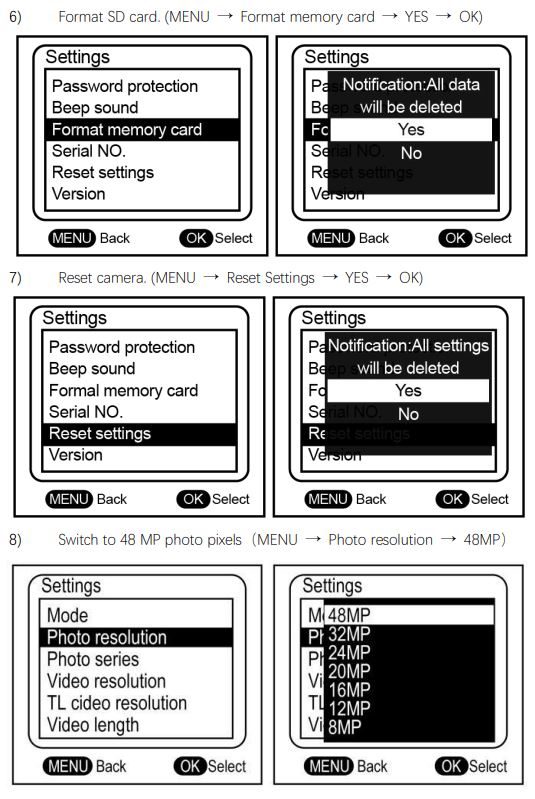
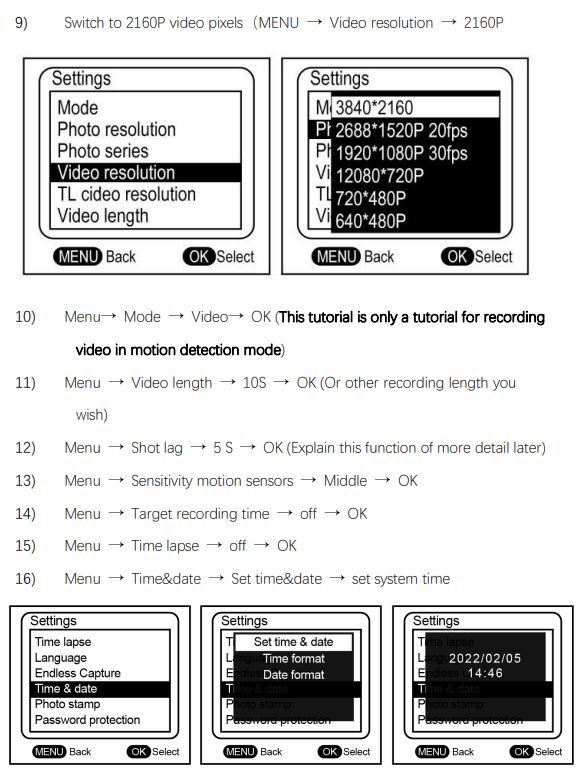
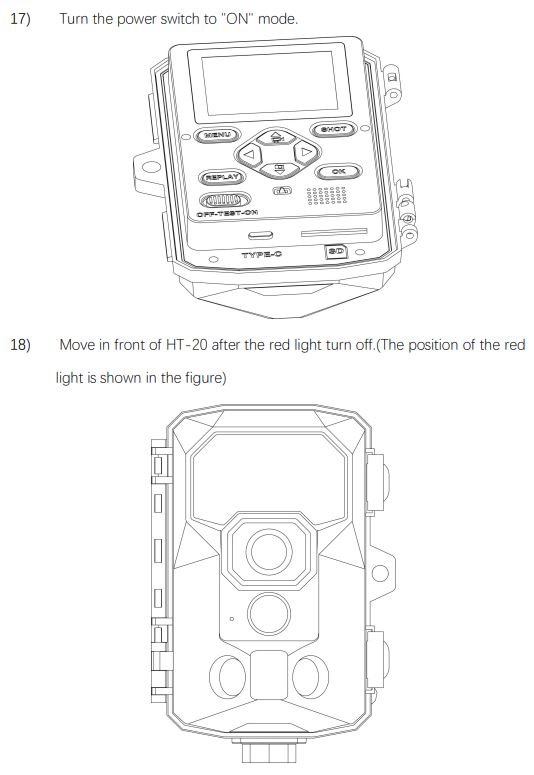
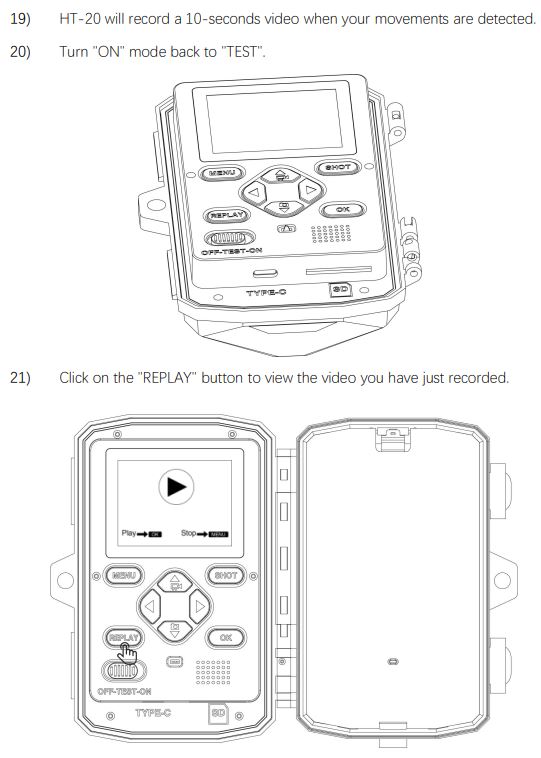
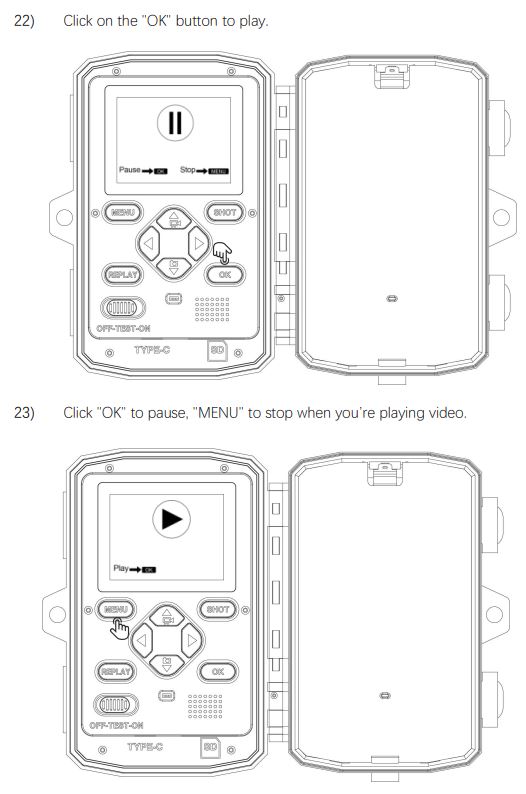
POWER SUPPLY
- A. 1.5V AA alkaline battery This camera requires either 4 or 8 AA 1.5V alkaline batteries. Please note that there is a voltage difference, and when using only 4 batteries, 1.2V rechargeable batteries are not compatible with this camera. Ensure that all batteries are placed either in the upper or lower part of the battery box. For optimal performance and longer battery life, we recommend choosing batteries from reputable, high-quality brands. These batteries will enable the camera to operate for an extended period of time.
- B. power adapter In addition to battery power, this camera can also be powered by an external 6V DC adapter. When using the power adapter, it is recommended to remove the alkaline batteries from the camera to prevent overcharging. This ensures the camera operates smoothly and avoids any potential issues caused by simultaneous battery and adapter power.
CAMERA PARAMETER
- Photo Resolution 8MP/ 12MP / 16MP/ 20MP/24MP / 32MP/48MP
- Video Resolution VGA / D1 / 720P / 1080P / 1520P/2160P
- Detection Angle Upto120°
- Fill Light LED Wavelength 940nm(No Glow)
- Fill Light LED Quantity 50PCS
- Trigger Time 0.05s
- Waterproof Level IP66
- Working Temperature -4°F-160°F
- Memory Card Type Up to 256GSDCard(Class10)
- Power Supply Type Battery / External power supply
- Battery Type AABattery( 4or8)
- Working Voltage 6V
- External Power Supply DC6V1.5A
- Standby Time Upto6Months
- Photo Format JPEG
- Video Format AVI
BUTTON FUNCTIONS
- [MENU] : Press to open or close the setup menu / replay menu. In Replay mode (video): Stop video
- [REPLAY]: Press to preview photos and videos on the LCD screen.
- [↑] : Cursor moves to previous item.
(In TEST mode) Switch current tests function to video function.
(In REPLAY mode) View next photo or video. - [↓] : Cursor moves to the next item.
(In TEST mode) Switch current tests function to photo function.
(In REPLAY mode) View previous photo or video. - [←] : Often used to move to the left when zooming in on a photo.
- [→] : Often used to move to the right when zooming in on a
photo. - [SHOT]: In TEST mode: Take a photo or record a video manually. In Replay mode (photo): Press once to zoom in.
- [OK]: In Menu: Confirm / enter In Replay mode (photo): Press and hold to zoom out
In Replay mode (video): Start or pause to replay
SETTING FUNCTIONS
- [Mode]: You should specify one of three operating modes for HT-20. Photos : HT-20 only take photos, not record videos. Videos(Default) : HT-20 only record videos, not take photos. Photos & Videos: HT-20 will take a photo, record a video, take a photo, record a video, and so on.
- [Photo Resolution]: You can choose different photo resolutions.
8MP (Default) | 12MP | 16MP | 20MP | 24MP | 32MP | 48MP - [Photo Series]: How many photos you want to take in one
shooting. 1 photo (Default) | 2 | 3 | 10 photos in series - [Video Resolution]: You can choose different video resolutions.
640*480P | 720*480P | 1280*720P (Default) | 1920*1080P | 2688*1520P | 3840*2160P - [TL Video Resolution]: Choose different Time-Lapse video resolutions.
3MP (2304*1296P) | 5MP (3072*1728P) (Default) | 8MP (3840*2160P) - [Video Length]: Adjust individual video lengths.
3 seconds (Min) | 10 seconds (Default) | 5 minutes (Max) - [Audio Recording]: Record sound or not.
On (Default) | Off - [Shot Lag] : The interval between each trigger
2 seconds (Min) | 5 seconds (Default) | 60 minutes (Max) - [Sensitivity Motion Sensors]: Adjust the sensitivity of motion sensor.
Low | Middle (Default) | High - [Target Recording Time]: Want to set HT-20 to work in a certain period? Off (Default) On HT-20 will ask you to set the work time period. (Requires entry of military time) Sample: Start:21:00 | Stop: 06:00. HT-20 only work from PM 9:00 to AM 6:00.
- [Time Lapse]: Change the camera from motion detection mode to interval photo mode. Off. (Default) Normal HT-20 will ask you to set the Interval time. Sample: 30 seconds. HT-20 will be take photo or record video per 30 seconds TL video HT-20 will ask you to set the Interval time. Similar with TL normal mode, but will automatically stitch the photos taken per 30 seconds into a video. Note: Motion sensors deactivate when time lapse is turned on. You can also bring HT-20 back into motion detection mode by turning off Time Lapse.
- [Language]: To set language of HT-20 English(Default) | Deutsch | Dansk | Suomi | Svenska | Español | Français | Italiano | Nederlands | Portugués | | |
- [Endless Capture]: Endless Capture determines whether HT-20 will stop shooting when the SD card is full.
Off (Default) HT-20 will stop shooting when the SD card is full.
On HT-20 will cover the oldest videos or photos to keep recording continuously when the memory card is full. - [Time & Date]: Set the current time and date & modify time format or date format.
Set time & date Set current time and date. (Requires entry of military time)
Time format 24h: Military time | 12h: Standard time (AM/PM)
Date format dd/mm/yyyy | yyyy/mm/dd | mm/dd/yyyy - [Photo Stamp] : Select the time stamp format you want to display on your photos. Time & Date (Default) Both display the date & time of recording. Date Only display the date of recording. Off No display any date & time info.
- [Password Protection]: Set a password to protect your HT-20.
Off (Default) No password. Everybody can turn on and view HT-20. On You’ll be prompted to enter a 1-9&A-Z numeric code. And you will need to enter this password every time you turn on HT-20.
Note: It is recommended that you write your password on a sticky note when you set it. If you forgot the password. Turn off HT-20 at first. Press replay button and up button at the same time (Don’t let go of your fingers) , then turn power switch from OFF to TEST. HT-20 will remove the password for you automatically. - [Beep Sound]: Turn the button beep sound on / off .
On (Default) To turn on the beep sound. (Press any button will beep)
Off To turn off the beep sound. - [Format Memory Card]: Decide carefully! If you format the memory card, you will lose all the data on the card.
Note: If there are photos or videos on the card that you want to keep, you should use the USB cable or SD card reader to read the data and back it up to your computer or other device before formatting.
No (Default) Won’t do any things. Yes Format the SD card and delete all files. - [Serial NO]: Give the current camera a 0-9&A-Z code name.
This 0-9&A-Z number will be displayed on the left side of Photo Stamp. It usually used to distinguish which camera the photo was taken from. (If you have more than one HT-20 camera) Off (Default) No Serial No.
On You’ll be prompted to enter a 0-9&A-Z Serial No. - [Reset Settings]: Reset HT-20 to its Factory Settings.
No (Default) Won’t do any things. Yes Reset to factory settings. - [Version]: Current firmware version
This firmware can be updated via the most recent firmware downloaded by contacting customer service.
OTHER FUNCTIONS
- [USB Boot]: When you find that the HT-20 does not turn on properly.
i. Connect the USB Cable to the computer (do not connect the camera yet)
ii. Press and hold the “UP” button.
iii. Plug in the USB Cable.
iv. LCD screen will light up and automatically enter the system.
v. When you find that the camera has successfully entered the system, you can release your fingers at this point.
vi. At this point, please put in 8 fresh batteries.
vii. Finally, unplug the USB Cable. - [Playback]: View photos or videos directly on the LCD screen.
Switch the power switch from OFF to TEST. When the screen turns on, click “REPLAY ” to enter the preview mode.
If viewing photos. Press and hold “SHOT” to zoom in. Press and hold “OK” to zoom out. If viewing videos. Press “OK” to play the video or pause the video. Press “MENU” to stop. (Click “REPLAY” again to exit preview mode) - [Delete Files]: Delete files directly by pressing the button.
In REPLAY mode, press MENU button to open the file menu. You can choose to delete the current file or delete all files in the file menu. - [Activate Slide Show]: Let HT-20 review files automatically.
In REPLAY mode, press MENU button to open the file menu. Select “Activate slide show”, each photo will be displayed for about 2 seconds and automatically switch to the next one. Press “OK” to stop and exit the “Activate slide show” function. - [Write Protection]: Protect individual files from accidental
deletion.
In REPLAY mode, press MENU button to open the file menu. Select “Write protect”. HT-20 will ask if you need to protect the current file or all files. Of course, unlock files are also in this menu. A key will be displayed in the status bar above the photo when you successfully protect a file, representing that the file is currently protected by the camera. This protection only applies to prevent users from accidentally clicking to the delete button to tech delete photos and cannot prevent data loss due to memory card failure. - [Export files]: Export files from the memory card to computer. Turn off the camera, connect the USB cable. HT-20 screen has displayed ” MSDC ” is indicated it has entered the connection mode. A new removable disk will be displayed in your computer. At this point you can access the files on the memory card , just like you would use any other storage device. HT-20’s USB port also supports smartphone connection. However. It requires you to purchase a separate OTG component for expanding the smartphone interface to ensure connection to the camera. (Type-C or Micro USB)
INSTALLATION
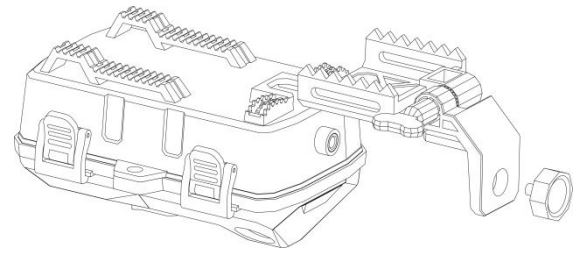
If you want to put the camera on a tree. To install the back bracket onto the camera, follow these steps: Locate the bottom nut on the camera. Align the back bracket with the bottom nut.
- Insert the back bracket onto the camera and secure it by tightening the bottom nut.

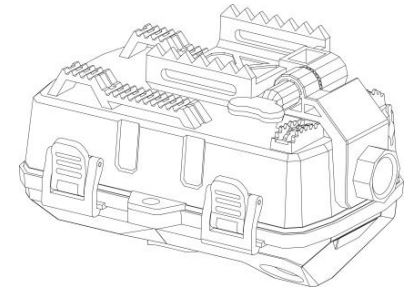
Adjust the angle of the bracket to the desired position. Once you have set the desired angle, fix the bracket in place to prevent it from moving or shifting. By following these steps, you will be able to properly install the back bracket onto the camera, adjust the angle, and securely fix it in place.
- Pass the strap through the gap in the northern bracket.
- Go to the other side of the tree, pass the belt through the buckles.
- Adjust the position of the camera then tightens the belt.
IMPORTANT INSTRUCTION
- The HT-20 uses a standard SD card instead of a Micro SD card (TF class 10).
- The HT-20 is compatible with SD cards up to 256GB.
- Format the SD card when you find that the camera does not recognize the memory card properly. Please ensure that the memory card is formatted successfully, if it is successful the upper right hand corner will show the current capacity for the duration of the recording. if not, the number shown in the upper right corner will be 00:00:00.( Format memory card → YES → OK )
- When you don’t know what happened to HT-20, try to reset camera. ( MENU → Reset settings → YES → OK )
- Camera must be turned off before inserting or taking out the SD card.
- Don’t take out SD card or disconnect the camera from USB port while formatting the SD card or transferring photo/video onto your computer, otherwise, photo/video in the memory card will be lost, even corrupt the SD card.
- HT-20 supports 6V/1.5A external power supplies. The size is 3.5mm x 1.35mm. For your reference – use keyword “6v dc 3.5mmx1.35mm” to search items on Amazon, look for which power adapter is the most suitable for you.
- Please remove the battery to prevent damage to the battery or the camera when you are using an external power supply.
- Remove the battery from the camera when it will not be used for a long period of time.
- Do not dip the camera in the water.
- The camera can work under 160°F but please keep the camera far enough from fire.
- Alkaline batteries are strongly recommended because alkaline batteries were able to provide stable power to the camera.
- Do not use dead batteries together with fresh batteries.
QUESTIONS&ANSWERS
- Q: Why can’t I open videos taken by HT-20 on my Windows computer?
A: Videos created by HT-20 may not be supported by the default Windows media player. We recommend using alternative media players such as VLC or IrfanView to open and play the HT-20 videos.
Please ensure that you download and use genuine software in compliance with local laws and regulations. - Q: Why do my photos appear with strange color blocks or lines? A: This issue may be related to the memory card being used. We suggest trying the following steps to troubleshoot the problem:
Format the memory card: Use the camera’s formatting option to format the memory card. This can help resolve any potential file system or compatibility issues. Replace the memory card: If formatting doesn’t resolve the issue, try using a different memory card. Sometimes, faulty or incompatible memory cards can cause visual artifacts in the photos.
If the problem persists even after trying these steps, please provide your order information and a detailed description of the problem to our customer service team. They will assist you further in resolving the issue. - Q: What should I do if my HT-20 camera suddenly freezes and becomes unresponsive?
A: If your HT-20 camera freezes and does not respond, please contact us immediately by sending an email to [email protected]. Our support team will provide remote assistance to help troubleshoot the issue and find a solution. - Q: What should I do if my HT-20 camera does not respond when connected to the computer? A: Please follow these steps to troubleshoot the issue:
Ensure that you can preview the photos directly on the camera’s LCD screen before connecting it to the computer. This confirms that the photos are accessible and not the cause of the issue.
Try using a different Type-C USB cable or connecting the camera to a different USB port on your computer. Faulty cables or USB ports can sometimes prevent proper communication between the camera and computer.
If the problem persists after trying these steps, please provide your order information and a detailed description of the issue to our customer service team. They will assist you further in resolving the problem.. - Q: Why does HT-20 has a white screen and cannot enter the system?
A: Please replace the battery, the current batteries are just about dead. - Q: Why does HT-20 take a photo/video every few second? A: Please check if the Time Lapse function is turned on, it will automatically turn off the sensor. Please check “Section” in SETTING FUNCTIONS.
- Q: HT-20 does not work at night or does not record at the set length? A: If the battery level is low (around 1/3 of its charge), the Night Vision function will be automatically turned off to conserve power. To resolve this issue, please replace the batteries with fresh ones. Once the new batteries are inserted, the Night Vision function will be automatically activated.
It is important to note that the current batteries are nearing depletion, which is likely impacting the camera’s performance. Replacing them with fully charged batteries will ensure optimal functionality, including night vision capabilities and the ability to record for the set duration. - Q: Why does the HT-20 camera have 8 battery slots if it can work with only 4 batteries? A: The HT-20 camera’s power module is divided into two groups: the upper and lower sections. It has the capacity to support up to eight batteries. They can alternate between using four batteries or all eight batteries in the HT-20 camera.
Please ensure that you purchase AA alkaline batteries from reputable brands with excellent quality. Note that the HT-20 camera does not support the use of lithium batteries. - Q: How do I get the camera to work for the specified time? A: Please refer to “Section10)-Target Recording Time” in SETTING FUNCTIONS.
- Q: What kind of memory card should I buy for HT-20? A: HT-20 uses SD card. Type: CLASS 10, Less than 256 GB. Most SD cards below 256GB can be used on the HT-20.
- Q: How to determine whether the camera sensor is working Properly? A: To check the functionality of the camera sensor, please follow these steps:
Refer to the instructions provided in the QUICK START GUIDE chapter to set up your HT-20 camera. Once the camera is configured, switch the power switch to the TEST mode. After approximately 15 seconds, walk in front of the camera within its monitoring range. Observe if the blue light on the camera flashes when motion is detected.(The primary PIR will light up in red and the secondary PIR will light up in blue) If the blue light flashes, it indicates that the camera’s infrared motion sensor is working correctly. This method also helps you adjust the direction and angle of the HT-20 camera and determine if the current location is within its monitoring range. By following these steps, you can assess the proper functioning of the camera sensor, ensure its motion detection capabilities, and verify the monitoring range of the HT-20 camera. - Q: How to use OTG? A: To connect the camera to an external device, an OTG-enabled external device and an OTG component are required. Here are the steps to follow:
Check the interface type on your external device (e.g., micro USB, Type-C, or Lightning). Visit an online marketplace such as Amazon and search for a USB-to-interface OTG accessory that matches the interface type of your external device. If your mobile phone has a Type-C interface, you can purchase a USB to Type-C OTG component specifically designed for Type-C connections. By obtaining the appropriate OTG component, you will be able to connect your camera to the external device and access its features and functions.. - Q: Why is my camera normal in test mode, but unable to take pictures in on mode? A: These cameras have exceptional target detection capabilities within the horizontal range. However, for targets within the vertical range, it is necessary to adjust the height and angle accordingly. If you have already determined the desired height, it is recommended to angle the camera sensor and lens towards the target area. This ensures that the camera captures the movement accurately within the expected range. By adjusting the angle, you can optimize the camera’s performance and enhance its effectiveness in detecting targets within the vertical range.
- Q: Why is there fog in my HT-20, is it leaking? A: The presence of fog inside the HT-20 camera is not a sign of leakage. It is caused by the temperature changes and the air trapped inside the camera. When the temperature fluctuates, the air inside can condense and form water droplets, resulting in foggy conditions. However, once the temperature stabilizes, the fog will dissipate naturally. This occurrence is normal and does not indicate any leakage or malfunction of the camera..
If these Q.A. don’t cover your problems. Please describe the problem in detail and send your order number to our customer service team. We will solve the problem with you as soon as possible. No matter what questions or suggestions you have, you can email us without hesitation.
WARRANTY AND SERVICE
Authorized Service Centers for HT-20
Whether you are using the HT-20 for hunting, wildlife monitoring, or farm monitoring, having access to a reliable camera repair service is essential to ensure a seamless photography experience. If your HT-20 is not performing as expected, exhibiting unusual noises or behaviors, or if you are simply unsure about its functioning, we are here to assist you. To expedite the resolution process, please provide a detailed description of the problem you are experiencing. Additionally, kindly include your order information and forward it to our dedicated customer service team. They will promptly attend to your query and provide the necessary assistance. In the event that you do not receive a response within 24 hours, please consider resending your email, as it may not have been delivered successfully. Rest assured, we value your feedback and are committed to addressing your concerns in a timely manner. Warranty for HT-20 RIGDOO offers a 30-day free replace/refund and an 2-year warranty. RIGDOO offers a 30-day free replacement/refund and a 2-year warranty. Keep your order number or proof of purchase for efficient after-sales service. We cover quality issues, not corrosion or artificial damage. Our customer service team will verify issues based on customer-provided photos and provide repair or replacement for non-conformities or manufacturing defects.
RIGDOO Service Team
[email protected]

Scan the QR code above to join the wildlife photography group

Scan the QR code above and go to YouTube to watch the tutorial of RIGDOO camera
