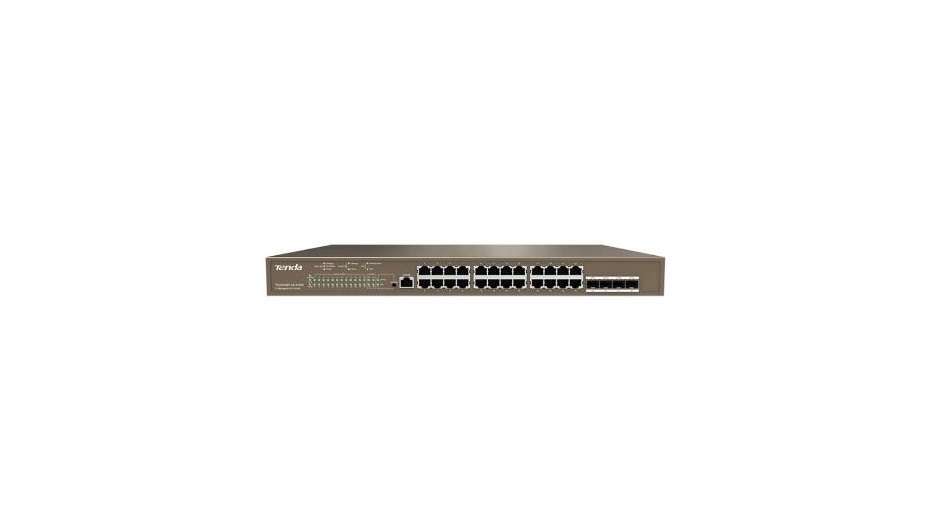
Tenda TEG5328P-24-410W L3 Managed PoE Switch
User Manual
Package contents
- Switch x 1
- Power cord x 1
- Console cable x 1
- L-shaped bracket x 2
- Screw x8
- Footpad x4
- Quick installation guide x 1
This quick installation guide instructs how to install, connect and log in to the device. For details, please download the user guide of the device.
1 Device installation
Installation notes
Follow the notes below to avoid device damages or personal injuries caused by mis operation.
- Wear the ESD bracelet or gloves before Installation and do not power on the switch before finishing installation.
- Use the included power cord to supply power to the switch.
- Make sure that the Input voltage matches the value of the switch specified in this guide.
- Do not block any ventilation openings.
- Do not remove the housing of the switch.
- Keep the air In the ambient environment clean. Regularly perform dedusting.
- Disconnect the switch from the power supply before cleaning it. Do not scrub the switch with any liquid. Clean only with dry cloth.
- Position the switch away from power line, electric lamp, or power system.
- Do not place any heavy things upon this switch.
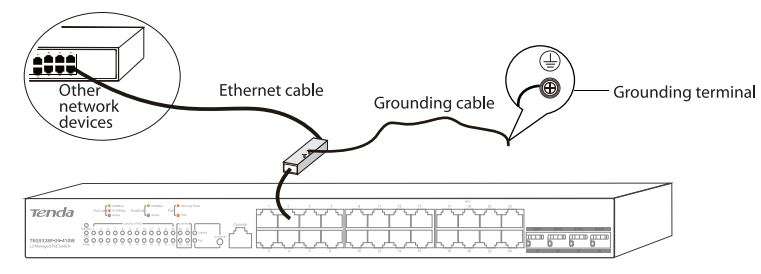
- If outdoor cabling is required, you are recommended to deploy a port lightning arrester (see the following figure for connection method) or AC power supply lightning arrester.
💡 Note
There is a void sticker covering one of the screws on the housing of the switch. Do not remove the sticker without permission of the local agent. Otherwise you shall be responsible for any damage.
Installation tools
- Desktop mounting: ESD bracelet (or gloves)
- Rack mounting: ESD bracelet (or gloves), Phillips screwdriver, Screws
Installation
■ Rack mounting
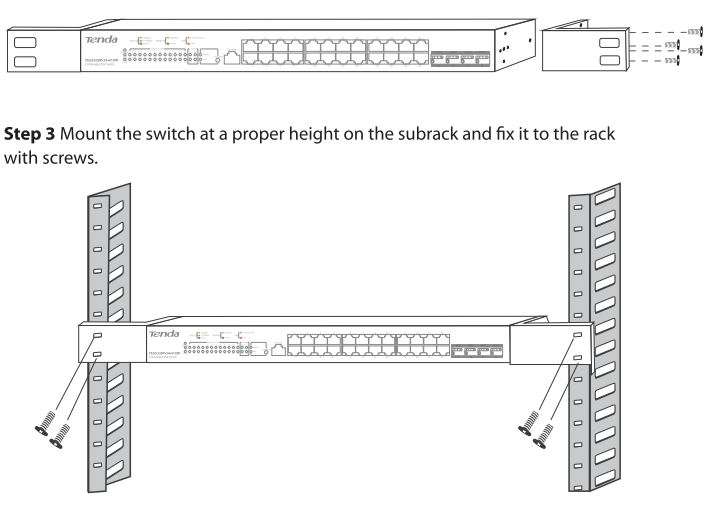
Step 1 Ensure that the subrack is stable and level, and is properly grounded.
Step 2 Fix L-shaped brackets to the switch with screws. See the following figure.
■ Desktop mounting
Paste the four footpad stickers to the corresponding four recesses on the bottom of the switch. Then place the switch right-side up on a big enough, clean, stable and flat desktop.

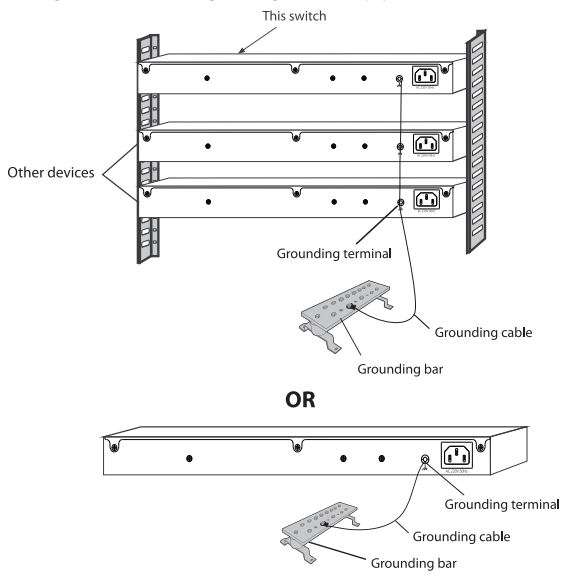
Grounding
Step 1 Connect one side of the grounding cable to the grounding terminal of the switch.
Step 2 Connect the other side of the grounding cable to the grounding terminal of other
grounded devices or a grounding bar in the equipment room.
💡 Note
Connect the grounding cable to the grounding system in the equipment room. Do not connect it to a fire main or lightning rod.
2 Physical connection
Refer to the following network topology to connect the switch to other network devices.
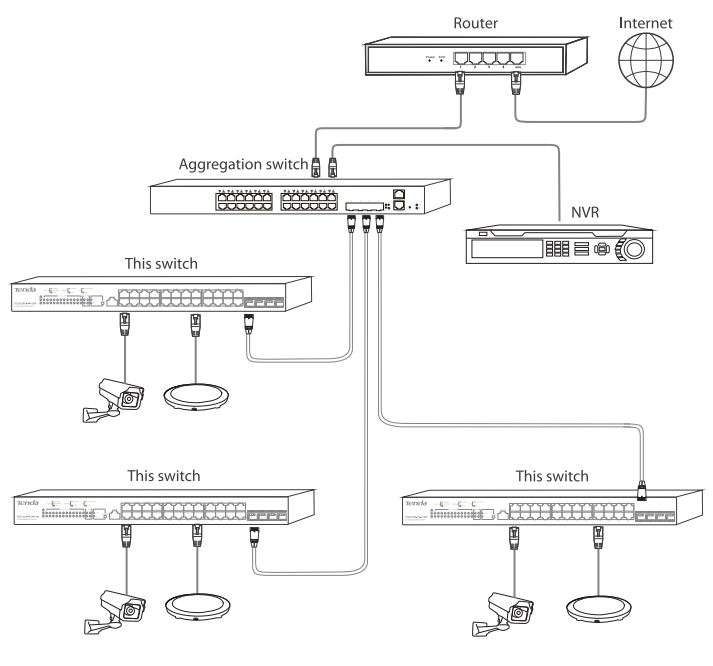
💡 Tip
All ports of this switch support the auto MDI/MDIX function, so both a straight cable and a crossover cable can be used to connect the switch to Ethernet devices.
LED indicators & button descriptions
| LED indicator | Description |
| PoE-Max | Solid on: The total output power of the switch reaches the maximum value. Off: The total output power of the switch does not reach the maximum value. |
| SYS | Blinking: The system works properly. Solid on: The system is not working properly. Off: The system is starting up or not working properly, |
| Power | Solid on: The switch is powered on properly. Off: The switch is not powered on, or not powered on properly. |
| Link/Act or PoE | Link/Act and PoE multipurpose LED indicator. It indicates the connection status or PoE power supply status of RJ45 ports based on the converted status of the LED Mode button. – When the Link/Act LEO indicator of LED Mode is solid on, the descriptions of the Link/Act or PoE LED indicators are shown as follows:
Solid on: The corresponding port is connected to a network device, but no data is being Green light indicates that the negotiation rate of the corresponding port is 1000 Mbps, and orange light indicates a rate of 10 Mbps or 100 Mbps. Solid orange: The corresponding port supplies PoE power to a device properly. |
| Link/Act | Solid on: The corresponding port is connected, but no data is being transmitted over the port. Blinking: Data is being transmitted over the corresponding port. Off: The corresponding port Is not connected or Is not connected properly. |
| LED/RESET | This multipurpose button is for both LED indicator converting button and reset button. – Press the LED/RESET button to convert the mode of the Link/Act or PoE LED indicator. • When the Link/Act LED indictor of LEO/RESET is solid on, the Link/Act or PoE LEO indicator is in the Link/Act mode. When PoE LED indicator of LEO/RESET is solid on, the Link/Act or PoE LED indicator is in the PoE mode. – When the Power LED indicator is solid on and the SYS LED indicator is blinking, hold down the LED Mode button for about 10 seconds, and release it when a LED indicators light up. The switch is restored to factory settings when the Power LEO indicator is solid on and the SYS LED indicator blinks again. |
3 Login
Step 1 Use an Ethernet cable to connect a computer to a RJ45 port of the switch.
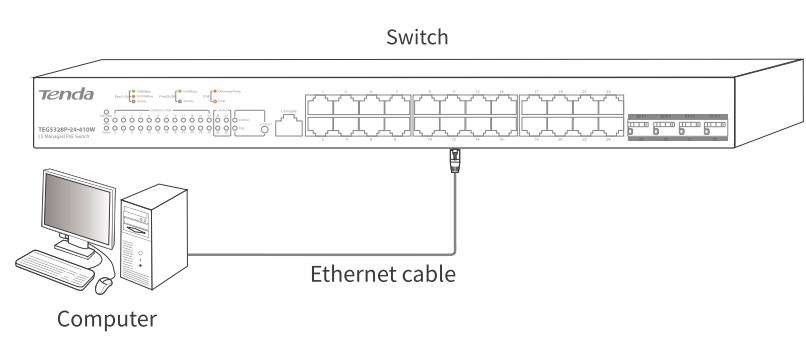
Step 2 Set the IP address of the computer to an unused one belonging to the same network segment with the switch.
For example, the default IP address of t he switch is 192.168.0.1, set the IP address of the computer to 192.168.0.X (X ranges from 2 to 254 and is not be occupied) and subnet mask to 2S5.255.2S5.0.
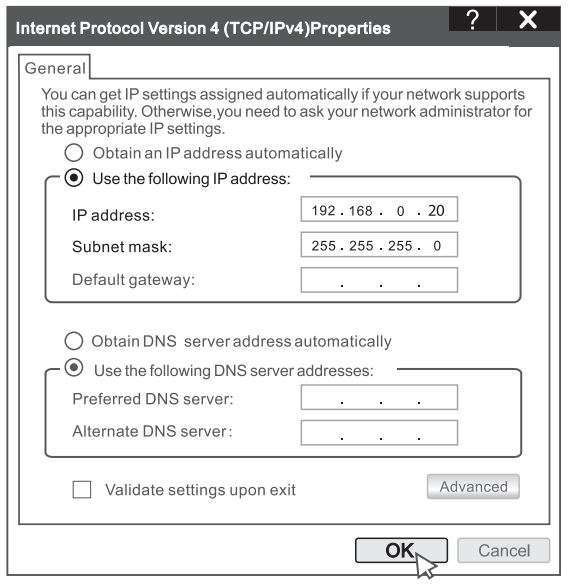
Step 3 Start a web browser (example: Chrome) on the computer, enter 192.168.0.1 in the address bar, and press Enter on the keyboard.

Step 4 On the login page of the switch, enter the login user name and password (both are admin by default), and click Login.
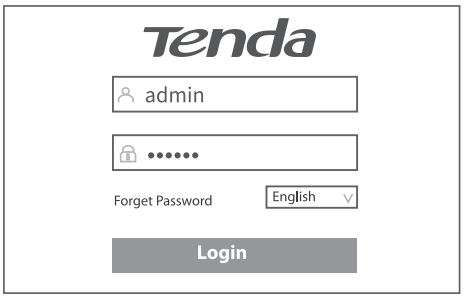
💡 Tip
If tile login window does not appear, refer to Q1 in Appendix A FAQ.
Login to the web UI of the switch succeeded. You can configure the switch now.
Appendix A FAQ
1, I cannot log in to the web UI of the switch, What should I do?
Try the following solutions:
– Check whether the switch is powered on properly.
– Check whether the computer is connected to the switch properly.
– Check whether the IP address of the computer is set to 192.168.0.X
(X ranges from 2 to 254 and is not be occupied).
– Clear the cache of the web browser or try another web browser.
– Disable the firewall of the computer, or try another computer.
– Check whether only one device with the IP address 192.168.0.1 exists in the local network.
– If the problem persists, reset the witch and try again.
Reset method: When the Power LED indicator is solid on and the SYS ED indicator is blinking, hold down the LED Mode button for about 10 seconds, and release it when all LED indicators light up. The switch is restored to factory settings when the SYS LED indicator blinks again.
2.1 forget the login user name and password when logging in to the web UI.
What should I do?
Try entering the default login user name and password (both are admin). If failed still, reset the switch, and then use the default user name and password to log in.
3, How to connect to the switch through the Console port?
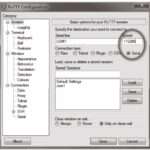
Follow the procedures below:
Use the included console cable to connect a computer to the Console port of the switch.
Run the connection software of console port on the computer. Putty is taken as an example.
Set the Connection type to Serial, Speed to 115200, and click Open on the lower right corner.
Double press Enter on your keyboard, and enter t he user name and password (both
are admin by default) of the switch in the appeared window as shown below.
4. How to deal with power system malfunctions?
You can determine whether the power system malfunctions by observing the Power
LED indicator on the front panel of the switch. When the power system works properly, the Power LED indicator is solid on. If the Power LED indicator does not light up, perform the following operations:
– Check whether the switch is properly connected to a power source using the included power cord.
– Check whether the input voltage matches the value required by the switch.
Appendix B Specifications
| Port | Number of 10/100/1000 Mbps RJ45 port | 24 |
| Number of 1000 Mbps SFP port | 4 | |
| Console port | 1 Baud rate: 115200 | |
| Performance | Exchange mode | Store-and-forward |
| MAC address table leaming | Auto aging, auto learning | |
| MAC address table | 16K | |
| Dimensions (L x W x H) | 440mmx284mmx44mm | |
| Input power | AC 100 – 240V, 50/60Hz, 6A | |
| PoE | PoE standard | IEEE 802.3af, IEEE 802.3at |
| PoE power cable core | 8 cores: voltage of cores 1, 2, 4, 5 is+, and cores 3, 6, 7, 8 is- | |
| PoE port | 1 to24 | |
| Maximum output power of a single port | 30 W | |
| Maximum output power of the switch | 370W | |
| Lightning protection | RJ45 port | Common mode: 6 kV |
| Power | Common mode: 6 kV; Differential mode: 4 kV | |
| Operating environment | Temperature: O”C – 45’C Humidity: (10% • 90%) RH non-condensing | |
| Storage environment | Temperature: -40°C – 70’C Humidity: (5% – 90%) RH non-condensing | |
| Data transmission rate | Ethernet: 10 Mbps (full duplex)/20 Mbps (full duplex)
Fast Ethernet: 100 Mbps (half duplex)/200 Mbps (full duplex) | |
| Transmission media | Ethernet: CAT3 UTP/STP or better Fast Ethernet: CATS UTP/STP or better Gigabit Ethernet: CATSe or CAT6 UTP/STP | |
| Standard | IEEE 802.3, IEEE 802.3u, IEEE 802.3x, IEEE 802.3ab, IEEE 802.3z, IEEE 802.1 d, IEEE 802.1 p, IEEE 802. lq, IEEE 802.1w, IEEE 802.ls |
Appendix C Safety and statement

CE Mark Warning
This is a Class A product. In a domestic environment, this product may cause radio interference, in which case the user may be required to take adequate measures.
The mains plug is used as disconnect device, the disconnect device shall remain readily operable.
NOTE: (1) The manufacturer is not responsible for any radio or TV interference caused by unauthorized modifications to this equipment. (2) To avoid unnecessary radiation interference, it is recommended to use a shielded RJ45 cable.

RECYCLING
This product bears the selective sorting symbol for Waste electrical and electronic equipment (WEEE). This means that this product must be handled pursuant to European directive 2012/19/EU in order to be recycled or dismantled to minimize its impact on the environment.
User has the choice to give his product to a competent recycling organization or to the retailer when he buys a new electrical or electronic equipment.

FCC Statement
This equipment has been tested and found to comply with the limits for a Class A digital device, pursuant to Part 15 of the FCC Rules. These limits are designed to provide reasonable protection against harmful interference when the equipment is operated in a commercial environment. This equipment generates, uses, and can radiate radio frequency energy and, if not installed and used in accordance with the instruction manual, may cause harmful interference to radio communications. Operation of this equipment in a residential area is I likely to cause harmful interference in which case the user will be required to correct the interference at his own expense.
This device complies with Part 15 of the FCC Rules. Operation is subject to the following two conditions: (1) this device may not cause harmful interference, and (2) this device must accept any interference received, including interference that may cause undesired operation.
Caution!
Any changes or modifications not expressly approved by the party responsible for compliance could void the user’s authority to operate the equipment.
NOTE: (1 ) The manufacturer is not responsible for any radio or TV interference caused by unauthorized modifications to this equipment. (2) To avoid unnecessary radiation interference,
it is recommended to use a shielded RJ45 cable.
Technical support
Shenzhen Tenda Technology Co., Ltd.
6-8 Floor, Tower E3, NO.1001, Zhongshanyuan Road, Nanshan District, Shenzhen, China. 518052
USA hotline: 1-800-570-5892
Toll Free: 7 x 24 hours
Canada hotline: 1-888-998-8966
Toll Free: Mon· Fri 9 am -6 pm PST
Hong Kong hotline: 00852-81931998
Global hotline: +86 755-2765 7180 (China 1ime Zone)
Website: www.tendacn.com
E-mail: [email protected]
Copyright te 2020 Shenzhen Tenda Technology Co., Ltd. All rights reserved.
Tenda is a registered trademark legally held by Shenzhen Tenda Technology Co., Ltd.
Other brand and product names mentioned herein are trademarks or registered trademarks of their respective holders. Specifications are subject to change without notice.
